Magellan Meridian Platinum User Manual - Page 65
Viewing a Route, Editing a Route, Inserting a Leg
 |
UPC - 763357103267
View all Magellan Meridian Platinum manuals
Add to My Manuals
Save this manual to your list of manuals |
Page 65 highlights
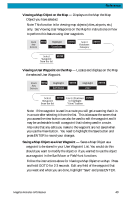
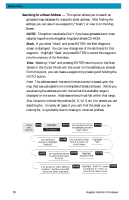
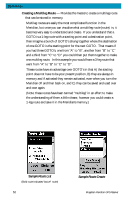
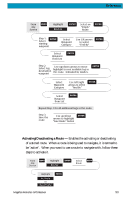
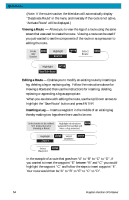
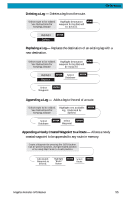
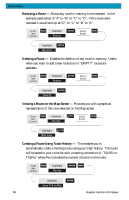
Reference (Note: If the route is active, the Meridian will automatically display "Deactivate Route" in the menu and inversely if the route is not active, "Activate Route" will be displayed.) Viewing a Route - Allows you to view the legs of a route using the same screen that was used to create the route. Viewing a route can be used if you just wanted to see the components of the route or as a precursor to editing the route. From Any Screen MENU Highlight Routes ENTER Select Route MENU Highlight ENTER View/Edit Route Editing a Route - Enables you to modify an existing route by inserting a leg, deleting a leg or replacing a leg. Follow the instructions above for Viewing a Route and then use the instructions for inserting, deleting, replacing or appending a leg as appropriate. When you are done with editing the route, use the Up/Down arrows to highlight the "Save Route" button and press ENTER. Inserting a Leg - Inserts a waypoint in the middle of an existing leg thereby making two legs where there used to be one. Select route to be edited. Highlight destination MENU See Instructions for waypoint for leg that will Viewing a Route have a leg inserted. Highlight Insert ENTER Select Database ENTER Select Waypoint ENTER In the example of a route that goes from "A" to "B" to "C" to "D", if you wanted to insert the waypoint "E" between "B" and "C" you would highlight the waypoint "C" and follow the steps to insert waypoint "E". Your route would then be "A" to "B" to "E" to "C" to "D". 54 Magellan Meridian GPS Receiver
-
 1
1 -
2
-
3
-
4
-
5
-
6
-
7
-
8
-
9
-
10
-
11
-
12
-
13
-
14
-
15
-
16
-
17
-
18
-
19
-
20
-
21
-
22
-
23
-
24
-
25
-
26
-
27
-
28
-
29
-
30
-
31
-
32
-
33
-
34
-
35
-
36
-
37
-
38
-
39
-
40
-
41
-
42
-
43
-
44
-
45
-
46
-
47
-
48
-
49
-
50
-
51
-
52
-
53
-
54
-
55
-
56
-
57
-
58
-
59
-
 60
60 -
 61
61 -
 62
62 -
 63
63 -
 64
64 -
 65
65 -
 66
66 -
 67
67 -
 68
68 -
 69
69 -
 70
70 -
71
-
72
-
73
-
74
-
75
-
76
-
77
-
78
-
79
-
80
-
81
-
82
-
83
-
84
-
85
-
86
-
87
-
88
-
89
-
90
-
91
-
92
-
93
-
94
-
95
-
96
-
97
-
98
-
99
-
100
-
101
-
102
-
103
-
104
-
105
 |
 |
