Nokia E72 Nokia E72 User Guide in US English / Spanish - Page 148
Edit registration servers, Configuration settings, Restrict packet data
 |
UPC - 758478018279
View all Nokia E72 manuals
Add to My Manuals
Save this manual to your list of manuals |
Page 148 highlights
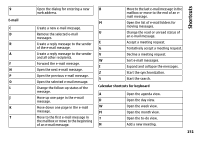
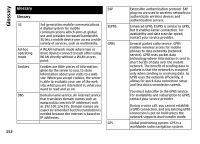
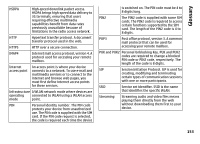
Settings To change the priority of the EAP plug-in settings, select Options > Raise priority to attempt to use the plug-in before other plug-ins when connecting to the network with the access point, orOptions > Lower priority to use this plug-in for network authentication after attempting to use other plug-ins. See the device help for more information on EAP plugins. Edit registration servers Select Options > New SIP profile or Edit > Registrar server. Select from the following: Registrar server address - Enter the host name or IP address of the registrar server in use. Realm - Enter the registrar server realm. User name and Password - Enter your user name and password for the registrar server. Transport type - Select UDP, Automatic or TCP. Port - Enter the port number of the registrar server. Configuration settings Select Menu > Ctrl. panel > Settings and Connection > Configurations. You can receive messages from your service provider or company information management containing configuration settings for trusted servers. These settings are automatically saved in Configurations. You may 148 receive configuration settings for access points, multimedia, or e-mail services, and instant messaging (IM) or synchronization settings from trusted servers. To delete configurations for a trusted server, select Options > Delete. The configuration settings for other applications provided by this server are also deleted. Restrict packet data Select Menu > Ctrl. panel > Settings and Connection > APN control. With the access point control service, you can restrict packet data connections from your device to certain access points only. Your SIM card may not support the access point control service. For more information, contact your service provider. To restrict packet data connections from your device, select Options > Activate restrictions. You need your PIN2 code to activate and deactivate access point control or to edit the packet data access points on the control list. To add access points that can be used for packet data connections to the control list, select Options > Add name manually. To enable connections to an operatorprovided access point, create an empty access point. To remove access points from the list, select Options > Remove.
-
 1
1 -
2
-
3
-
4
-
5
-
6
-
7
-
8
-
9
-
10
-
11
-
12
-
13
-
14
-
15
-
16
-
17
-
18
-
19
-
20
-
21
-
22
-
23
-
24
-
25
-
26
-
27
-
28
-
29
-
30
-
31
-
32
-
33
-
34
-
35
-
36
-
37
-
38
-
39
-
40
-
41
-
42
-
43
-
44
-
45
-
46
-
47
-
48
-
49
-
50
-
51
-
52
-
53
-
54
-
55
-
56
-
57
-
58
-
59
-
60
-
61
-
62
-
63
-
64
-
65
-
66
-
67
-
68
-
69
-
70
-
71
-
72
-
73
-
74
-
75
-
76
-
77
-
78
-
79
-
80
-
81
-
82
-
83
-
84
-
85
-
86
-
87
-
88
-
89
-
90
-
91
-
92
-
93
-
94
-
95
-
96
-
97
-
98
-
99
-
100
-
101
-
102
-
103
-
104
-
105
-
106
-
107
-
108
-
109
-
110
-
111
-
112
-
113
-
114
-
115
-
116
-
117
-
118
-
119
-
120
-
121
-
122
-
123
-
124
-
125
-
126
-
127
-
128
-
129
-
130
-
131
-
132
-
133
-
134
-
135
-
136
-
137
-
138
-
139
-
140
-
141
-
142
-
 143
143 -
 144
144 -
 145
145 -
 146
146 -
 147
147 -
 148
148 -
 149
149 -
 150
150 -
 151
151 -
 152
152 -
 153
153 -
154
-
155
-
156
-
157
-
158
-
159
-
160
-
161
-
162
-
163
-
164
-
165
-
166
-
167
-
168
-
169
-
170
-
171
-
172
-
173
-
174
-
175
-
176
-
177
-
178
-
179
-
180
-
181
-
182
-
183
-
184
-
185
-
186
-
187
-
188
-
189
-
190
-
191
-
192
-
193
-
194
-
195
-
196
-
197
-
198
-
199
-
200
-
201
-
202
-
203
-
204
-
205
-
206
-
207
-
208
-
209
-
210
-
211
-
212
-
213
-
214
-
215
-
216
-
217
-
218
-
219
-
220
-
221
-
222
-
223
-
224
-
225
-
226
-
227
-
228
-
229
-
230
-
231
-
232
-
233
-
234
-
235
-
236
-
237
-
238
-
239
-
240
-
241
-
242
-
243
-
244
-
245
-
246
-
247
-
248
-
249
-
250
-
251
-
252
-
253
-
254
-
255
-
256
-
257
-
258
-
259
-
260
-
261
-
262
-
263
-
264
-
265
-
266
-
267
-
268
-
269
-
270
-
271
-
272
-
273
-
274
-
275
-
276
-
277
-
278
-
279
-
280
-
281
-
282
-
283
-
284
-
285
-
286
-
287
-
288
-
289
-
290
-
291
-
292
-
293
-
294
-
295
-
296
-
297
-
298
-
299
-
300
-
301
-
302
-
303
-
304
-
305
-
306
-
307
-
308
-
309
-
310
-
311
-
312
-
313
-
314
-
315
-
316
-
317
-
318
-
319
-
320
-
321
-
322
-
323
-
324
-
325
-
326
-
327
-
328
-
329
-
330
-
331
-
332
-
333
-
334
-
335
-
336
-
337
-
338
-
339
-
340
-
341
-
342
-
343
-
344
-
345
-
346
-
347
-
348
-
349
-
350
-
351
-
352
-
353
-
354
-
355
-
356
-
357
-
358
-
359
-
360
-
361
 |
 |