Oki PRO510DW Pro510DW Printing Guide - Page 59
Start, Storage Device, Manager, Printers > New Project, Printers > Filter Macro File, Example
 |
View all Oki PRO510DW manuals
Add to My Manuals
Save this manual to your list of manuals |
Page 59 highlights
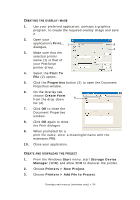
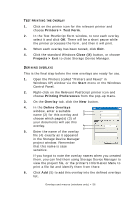
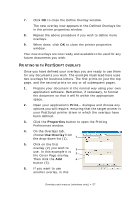
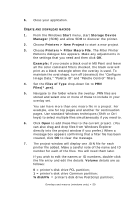
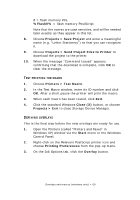
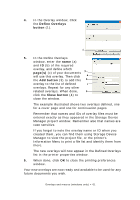
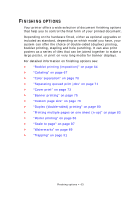
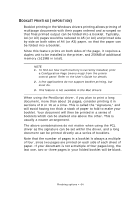
6. Close your application. CREATE AND DOWNLOAD MACROS 1. From the Windows Start menu, start Storage Device Manager (SDM) and allow SDM to discover the printer. 2. Choose Printers > New Project to start a new project. 3. Choose Printers > Filter Macro File. The Filter Printer Patterns dialogue box appears. Make any adjustments in the settings that you need and then click OK. Example: If you create a black oval in MS Paint and leave all the color command filters checked, the black oval will print as a black rectangle when the overlay is used. To maintain the oval shape, turn off (deselect) the "Configure Image Data," "Palette ID" and "Palette Control" filters. 4. Set the Files of Type drop-down list to PRN Files(*.prn). 5. Navigate to the folder where the overlay .PRN files are stored and select one or more of these to include in your overlay set. You can have more than one macro file in a project. For example, one for top pages and another for continuation pages. Use standard Windows techniques (Shift or Ctrl keys) to select multiple files simultaneously if you need to. 6. Click Open to add these files to the current project. (You can also drag and drop files from Windows Explorer directly into the project window if you prefer.) When a message box appears confirming that a filter file has been created, click OK to clear the message. 7. The project window will display one .BIN file for each printer file added. Make a careful note of the name and ID number for each of the files. You will need them later. If you wish to edit the names or ID numbers, double-click the file entry and edit the details. Volume details are as follows: 0 = printer's disk drive PCL partition; 1 = printer's disk drive Common partition; %disk0% = printer's disk drive PostScript partition; Overlays and macros (windows only) > 59
-
 1
1 -
2
-
3
-
4
-
5
-
6
-
7
-
8
-
9
-
10
-
11
-
12
-
13
-
14
-
15
-
16
-
17
-
18
-
19
-
20
-
21
-
22
-
23
-
24
-
25
-
26
-
27
-
28
-
29
-
30
-
31
-
32
-
33
-
34
-
35
-
36
-
37
-
38
-
39
-
40
-
41
-
42
-
43
-
44
-
45
-
46
-
47
-
48
-
49
-
50
-
51
-
52
-
53
-
 54
54 -
 55
55 -
 56
56 -
 57
57 -
 58
58 -
 59
59 -
 60
60 -
 61
61 -
 62
62 -
 63
63 -
 64
64 -
65
-
66
-
67
-
68
-
69
-
70
-
71
-
72
-
73
-
74
-
75
-
76
-
77
-
78
-
79
-
80
-
81
-
82
-
83
-
84
-
85
-
86
-
87
-
88
-
89
-
90
-
91
-
92
-
93
-
94
-
95
-
96
-
97
-
98
-
99
-
100
-
101
 |
 |