Olympus C-750 Camedia Master 4.1 Instruction Manual (4.9MB) - Page 107
Automatic Panorama Function
 |
UPC - 050332140752
View all Olympus C-750 manuals
Add to My Manuals
Save this manual to your list of manuals |
Page 107 highlights
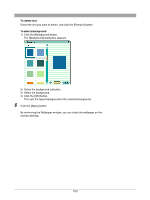
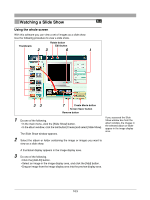
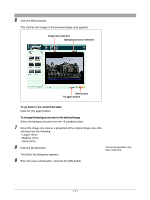
Automatic Panorama Function You can stitch two or more images together into a panorama image. Use the following procedure to automatically generate a panorama image. Thumbnails 23 5 To use this function, the images to be stitched together must have been shot with an Olympus digital camera in panorama mode. The thumbnails of images which can be stitched together in this way are shown with a panorama icon . 3 Remove button 6 1 Do one of the following. • In the main menu, click the [Auto Panorama] button. • In the album window, click the tool button [Create] and select [Auto Panorama]. If you accessed the Auto Panorama window from the album window, the images in the selected album or folder The Auto Panorama window appears. appear in the image display area. 2 Select the album or folder containing the images you want to stitch together. A thumbnail display of the images appears in the image display area. 3 Do one of the following. • Select an image in the image display area, and click the [Add] button. • Drag an image from the image display area into the panorama stitching box. 4 Repeat step 3 to fill the panorama stitching box with the images you want to stitch together. To delete an image from the panorama stitching box Select the image you want to delete, and click the [Remove] button. 5 Select one of the following stitching methods ( • Normal • 360° Panorama version only). 107
-
 1
1 -
2
-
3
-
4
-
5
-
6
-
7
-
8
-
9
-
10
-
11
-
12
-
13
-
14
-
15
-
16
-
17
-
18
-
19
-
20
-
21
-
22
-
23
-
24
-
25
-
26
-
27
-
28
-
29
-
30
-
31
-
32
-
33
-
34
-
35
-
36
-
37
-
38
-
39
-
40
-
41
-
42
-
43
-
44
-
45
-
46
-
47
-
48
-
49
-
50
-
51
-
52
-
53
-
54
-
55
-
56
-
57
-
58
-
59
-
60
-
61
-
62
-
63
-
64
-
65
-
66
-
67
-
68
-
69
-
70
-
71
-
72
-
73
-
74
-
75
-
76
-
77
-
78
-
79
-
80
-
81
-
82
-
83
-
84
-
85
-
86
-
87
-
88
-
89
-
90
-
91
-
92
-
93
-
94
-
95
-
96
-
97
-
98
-
99
-
100
-
101
-
 102
102 -
 103
103 -
 104
104 -
 105
105 -
 106
106 -
 107
107 -
 108
108 -
 109
109 -
 110
110 -
 111
111 -
 112
112 -
113
-
114
-
115
-
116
-
117
-
118
-
119
-
120
-
121
-
122
-
123
-
124
-
125
-
126
-
127
-
128
-
129
-
130
-
131
-
132
-
133
-
134
-
135
-
136
-
137
-
138
-
139
-
140
-
141
-
142
-
143
-
144
-
145
-
146
-
147
-
148
-
149
 |
 |
