Olympus C-750 Camedia Master 4.1 Instruction Manual (4.9MB) - Page 75
To rotate an image
 |
UPC - 050332140752
View all Olympus C-750 manuals
Add to My Manuals
Save this manual to your list of manuals |
Page 75 highlights
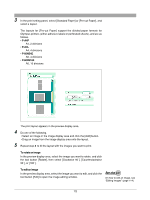
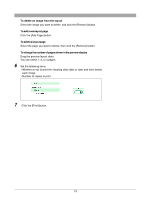
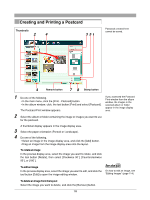
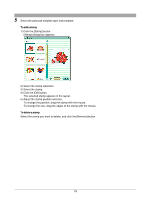
5 Repeat step 4 to fill the layout with the images you want to print. To rotate an image In the preview display area, select the image you want to rotate, and click the tool button [Rotate], then select [Clockwise 90˚], [Counterclockwise 90˚], or [180˚]. To edit an image In the preview display area, select the image you want to edit, and click the tool button [Edit] to open the image editing window. On how to edit an image, see "Editing Images" (page 114). To delete an image from the layout Select the image you want to delete, and click the [Remove] button. To change the number of pages shown in the preview display Drag the preview layout slider. You can select 1, 2 or 4 pages. 6 Set the following items. • Whether or not to print a header or footer • Whether or not to print image information (file name and shooting date) • Number of copies to print To add extra information to the header or footer Click the header or footer button to open a dialog box, then select date, page, or page number/total number of pages, or enter a comment. Click the [OK] button to confirm. Header dialog box 7 Click the [Print] button. Footer dialog box 75
-
 1
1 -
2
-
3
-
4
-
5
-
6
-
7
-
8
-
9
-
10
-
11
-
12
-
13
-
14
-
15
-
16
-
17
-
18
-
19
-
20
-
21
-
22
-
23
-
24
-
25
-
26
-
27
-
28
-
29
-
30
-
31
-
32
-
33
-
34
-
35
-
36
-
37
-
38
-
39
-
40
-
41
-
42
-
43
-
44
-
45
-
46
-
47
-
48
-
49
-
50
-
51
-
52
-
53
-
54
-
55
-
56
-
57
-
58
-
59
-
60
-
61
-
62
-
63
-
64
-
65
-
66
-
67
-
68
-
69
-
 70
70 -
 71
71 -
 72
72 -
 73
73 -
 74
74 -
 75
75 -
 76
76 -
 77
77 -
 78
78 -
 79
79 -
 80
80 -
81
-
82
-
83
-
84
-
85
-
86
-
87
-
88
-
89
-
90
-
91
-
92
-
93
-
94
-
95
-
96
-
97
-
98
-
99
-
100
-
101
-
102
-
103
-
104
-
105
-
106
-
107
-
108
-
109
-
110
-
111
-
112
-
113
-
114
-
115
-
116
-
117
-
118
-
119
-
120
-
121
-
122
-
123
-
124
-
125
-
126
-
127
-
128
-
129
-
130
-
131
-
132
-
133
-
134
-
135
-
136
-
137
-
138
-
139
-
140
-
141
-
142
-
143
-
144
-
145
-
146
-
147
-
148
-
149
 |
 |
