Olympus C-750 Camedia Master 4.1 Instruction Manual (4.9MB) - Page 110
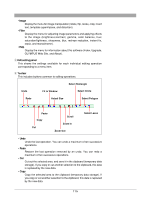
To rotate an image, To edit an image, To delete an image
 |
UPC - 050332140752
View all Olympus C-750 manuals
Add to My Manuals
Save this manual to your list of manuals |
Page 110 highlights
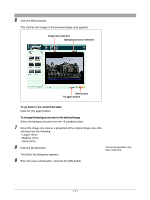
• Spherical Use this to create a fish-eye image when you have taken shots extending in two directions (e.g. 2 by 2 images). • Perspective Use this to create a flat wide-angle lens perspective when you have taken shots extending in two directions (e.g. 2 by 2 images). This is recommended for architectural or other shots including straight lines. 4 Do one of the following. • Select an image in the image display area, and click the [Add] button. • Drag an image from the image display area onto the layout. 5 Repeat step 4 , to assemble the images to be stitched in the preview display area. To rotate an image Select the image you want to rotate in the preview display area, and click the tool button [Rotate], then select [Clockwise 90˚], [Counterclockwise 90˚], or [180˚]. For image editing operations, see "Editing Images" (page 114). To edit an image Select the image you want to edit in the preview display area, and click the tool button [Edit] to open the image editing window. To delete an image Select the image you want to delete, and click the [Remove] button. 110
-
 1
1 -
2
-
3
-
4
-
5
-
6
-
7
-
8
-
9
-
10
-
11
-
12
-
13
-
14
-
15
-
16
-
17
-
18
-
19
-
20
-
21
-
22
-
23
-
24
-
25
-
26
-
27
-
28
-
29
-
30
-
31
-
32
-
33
-
34
-
35
-
36
-
37
-
38
-
39
-
40
-
41
-
42
-
43
-
44
-
45
-
46
-
47
-
48
-
49
-
50
-
51
-
52
-
53
-
54
-
55
-
56
-
57
-
58
-
59
-
60
-
61
-
62
-
63
-
64
-
65
-
66
-
67
-
68
-
69
-
70
-
71
-
72
-
73
-
74
-
75
-
76
-
77
-
78
-
79
-
80
-
81
-
82
-
83
-
84
-
85
-
86
-
87
-
88
-
89
-
90
-
91
-
92
-
93
-
94
-
95
-
96
-
97
-
98
-
99
-
100
-
101
-
102
-
103
-
104
-
 105
105 -
 106
106 -
 107
107 -
 108
108 -
 109
109 -
 110
110 -
 111
111 -
 112
112 -
 113
113 -
 114
114 -
 115
115 -
116
-
117
-
118
-
119
-
120
-
121
-
122
-
123
-
124
-
125
-
126
-
127
-
128
-
129
-
130
-
131
-
132
-
133
-
134
-
135
-
136
-
137
-
138
-
139
-
140
-
141
-
142
-
143
-
144
-
145
-
146
-
147
-
148
-
149
 |
 |
