Olympus C-750 Camedia Master 4.1 Instruction Manual (4.9MB) - Page 29
Select [Sort by Shooting Date] or [Selected Date].
 |
UPC - 050332140752
View all Olympus C-750 manuals
Add to My Manuals
Save this manual to your list of manuals |
Page 29 highlights
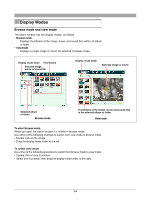
1 In the Transfer Images window, select the [My Albums] tab, and select [Calendar]. 2 Select [Sort by Shooting Date] or [Selected Date]. • Sort by shooting date: Create a new album for each date of shooting, and assign the images to the corresponding album. The date setting must have been made on the camera before shooting the images. • Selected date: Select a date on the calendar, and save the images in the album for that date. 3 Click the [Transfer Images] button. This copies all images into albums as specified in step 2 . If an image has no recorded shooting date, the [Select Date] dialog box appears; specify the shooting date using the calendar. If an existing file has the same file name as one of the files to be transferred, the [Overwrite] dialog box appears (page 27). When all of the images have been transferred, the [Transfer Images] dialog box appears (page 28). Clicking [Browse images now] displays the album window, in which you can view the images that have been transferred. To copy only selected images See the description for saving to an album (page 28). 29
-
 1
1 -
2
-
3
-
4
-
5
-
6
-
7
-
8
-
9
-
10
-
11
-
12
-
13
-
14
-
15
-
16
-
17
-
18
-
19
-
20
-
21
-
22
-
23
-
 24
24 -
 25
25 -
 26
26 -
 27
27 -
 28
28 -
 29
29 -
 30
30 -
 31
31 -
 32
32 -
 33
33 -
 34
34 -
35
-
36
-
37
-
38
-
39
-
40
-
41
-
42
-
43
-
44
-
45
-
46
-
47
-
48
-
49
-
50
-
51
-
52
-
53
-
54
-
55
-
56
-
57
-
58
-
59
-
60
-
61
-
62
-
63
-
64
-
65
-
66
-
67
-
68
-
69
-
70
-
71
-
72
-
73
-
74
-
75
-
76
-
77
-
78
-
79
-
80
-
81
-
82
-
83
-
84
-
85
-
86
-
87
-
88
-
89
-
90
-
91
-
92
-
93
-
94
-
95
-
96
-
97
-
98
-
99
-
100
-
101
-
102
-
103
-
104
-
105
-
106
-
107
-
108
-
109
-
110
-
111
-
112
-
113
-
114
-
115
-
116
-
117
-
118
-
119
-
120
-
121
-
122
-
123
-
124
-
125
-
126
-
127
-
128
-
129
-
130
-
131
-
132
-
133
-
134
-
135
-
136
-
137
-
138
-
139
-
140
-
141
-
142
-
143
-
144
-
145
-
146
-
147
-
148
-
149
 |
 |
