Olympus C-750 Camedia Master 4.1 Instruction Manual (4.9MB) - Page 78
Creating and Printing a Postcard
 |
UPC - 050332140752
View all Olympus C-750 manuals
Add to My Manuals
Save this manual to your list of manuals |
Page 78 highlights
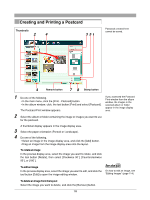
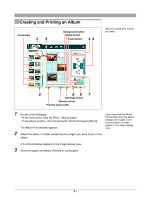
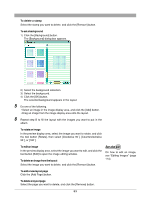
Creating and Printing a Postcard Thumbnails 2 4 356 Postcards created here cannot be saved. 4 Remove button 7 8 Stamp button 1 Do one of the following. • In the main menu, click the [Print - Postcard] button. If you accessed the Postcard Print window from the album window, the images in the • In the album window, click, the tool button [Print] and select [Postcard]. selected album or folder appear in the image display The Postcard Print window appears. area. 2 Select the album or folder containing the image or images you want to use for the postcard. A thumbnail display appears in the image display area. 3 Select the paper orientation (Portrait or Landscape). 4 Do one of the following. • Select an image in the image display area, and click the [Add] button. • Drag an image from the image display area onto the layout. To rotate an image In the preview display area, select the image you want to rotate, and click the tool button [Rotate], then select [Clockwise 90˚], [Counterclockwise 90˚], or [180˚]. To edit an image In the preview display area, select the image you want to edit, and click the tool button [Edit] to open the image editing window. On how to edit an image, see "Editing Images" (page 114). To delete an image from the layout Select the image you want to delete, and click the [Remove] button. 78
-
 1
1 -
2
-
3
-
4
-
5
-
6
-
7
-
8
-
9
-
10
-
11
-
12
-
13
-
14
-
15
-
16
-
17
-
18
-
19
-
20
-
21
-
22
-
23
-
24
-
25
-
26
-
27
-
28
-
29
-
30
-
31
-
32
-
33
-
34
-
35
-
36
-
37
-
38
-
39
-
40
-
41
-
42
-
43
-
44
-
45
-
46
-
47
-
48
-
49
-
50
-
51
-
52
-
53
-
54
-
55
-
56
-
57
-
58
-
59
-
60
-
61
-
62
-
63
-
64
-
65
-
66
-
67
-
68
-
69
-
70
-
71
-
72
-
 73
73 -
 74
74 -
 75
75 -
 76
76 -
 77
77 -
 78
78 -
 79
79 -
 80
80 -
 81
81 -
 82
82 -
 83
83 -
84
-
85
-
86
-
87
-
88
-
89
-
90
-
91
-
92
-
93
-
94
-
95
-
96
-
97
-
98
-
99
-
100
-
101
-
102
-
103
-
104
-
105
-
106
-
107
-
108
-
109
-
110
-
111
-
112
-
113
-
114
-
115
-
116
-
117
-
118
-
119
-
120
-
121
-
122
-
123
-
124
-
125
-
126
-
127
-
128
-
129
-
130
-
131
-
132
-
133
-
134
-
135
-
136
-
137
-
138
-
139
-
140
-
141
-
142
-
143
-
144
-
145
-
146
-
147
-
148
-
149
 |
 |
