Olympus C-750 Camedia Master 4.1 Instruction Manual (4.9MB) - Page 117
Basic Operations
 |
UPC - 050332140752
View all Olympus C-750 manuals
Add to My Manuals
Save this manual to your list of manuals |
Page 117 highlights
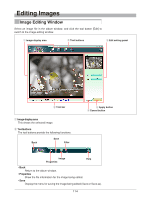
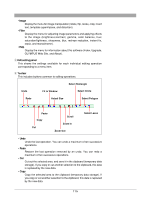
Basic Operations Zooming the display You can change the display magnification in the image display area, to zoom in or out. The available display magnifications are as follows, as a percentage of the actual image size in pixels: 12.5%, 25%, 33%, 50%, 70%, 100%, 140%, 200%, 300%, and 400%. To enlarge the image 1 In the tool bar, click the Zoom In button. 2 To enlarge with a particular point as the center Click the mouse within the image display area on the point; this enlarges the image with the point at the center. To enlarge a particular area Drag the mouse to outline a rectangle within the image display area; this enlarges the selected area. To shrink the image 1 In the tool bar, click the Zoom Out button. 2 Click the mouse on a point within the image display area; this shrinks the image with the point at the center. To display the image at actual size Click the Actual Size button in the tool bar. To display the image to fit the window Click the Fit-to-Window button in the tool bar. Moving the image When the image is too large to fit in the display area, scroll bars appear below and to the right. To drag the image 1 Click the Scrool button in the tool bar. 2 Click the left mouse button anywhere on the image, then drag it to the desired position. You can also use the scroll bars to position the image. 117
-
 1
1 -
2
-
3
-
4
-
5
-
6
-
7
-
8
-
9
-
10
-
11
-
12
-
13
-
14
-
15
-
16
-
17
-
18
-
19
-
20
-
21
-
22
-
23
-
24
-
25
-
26
-
27
-
28
-
29
-
30
-
31
-
32
-
33
-
34
-
35
-
36
-
37
-
38
-
39
-
40
-
41
-
42
-
43
-
44
-
45
-
46
-
47
-
48
-
49
-
50
-
51
-
52
-
53
-
54
-
55
-
56
-
57
-
58
-
59
-
60
-
61
-
62
-
63
-
64
-
65
-
66
-
67
-
68
-
69
-
70
-
71
-
72
-
73
-
74
-
75
-
76
-
77
-
78
-
79
-
80
-
81
-
82
-
83
-
84
-
85
-
86
-
87
-
88
-
89
-
90
-
91
-
92
-
93
-
94
-
95
-
96
-
97
-
98
-
99
-
100
-
101
-
102
-
103
-
104
-
105
-
106
-
107
-
108
-
109
-
110
-
111
-
 112
112 -
 113
113 -
 114
114 -
 115
115 -
 116
116 -
 117
117 -
 118
118 -
 119
119 -
 120
120 -
 121
121 -
 122
122 -
123
-
124
-
125
-
126
-
127
-
128
-
129
-
130
-
131
-
132
-
133
-
134
-
135
-
136
-
137
-
138
-
139
-
140
-
141
-
142
-
143
-
144
-
145
-
146
-
147
-
148
-
149
 |
 |
