Panasonic PVGS70D PVGS70D User Guide - Page 22
USING THE MENU SCREEN, File Selection in the Card Playback Mode
 |
View all Panasonic PVGS70D manuals
Add to My Manuals
Save this manual to your list of manuals |
Page 22 highlights
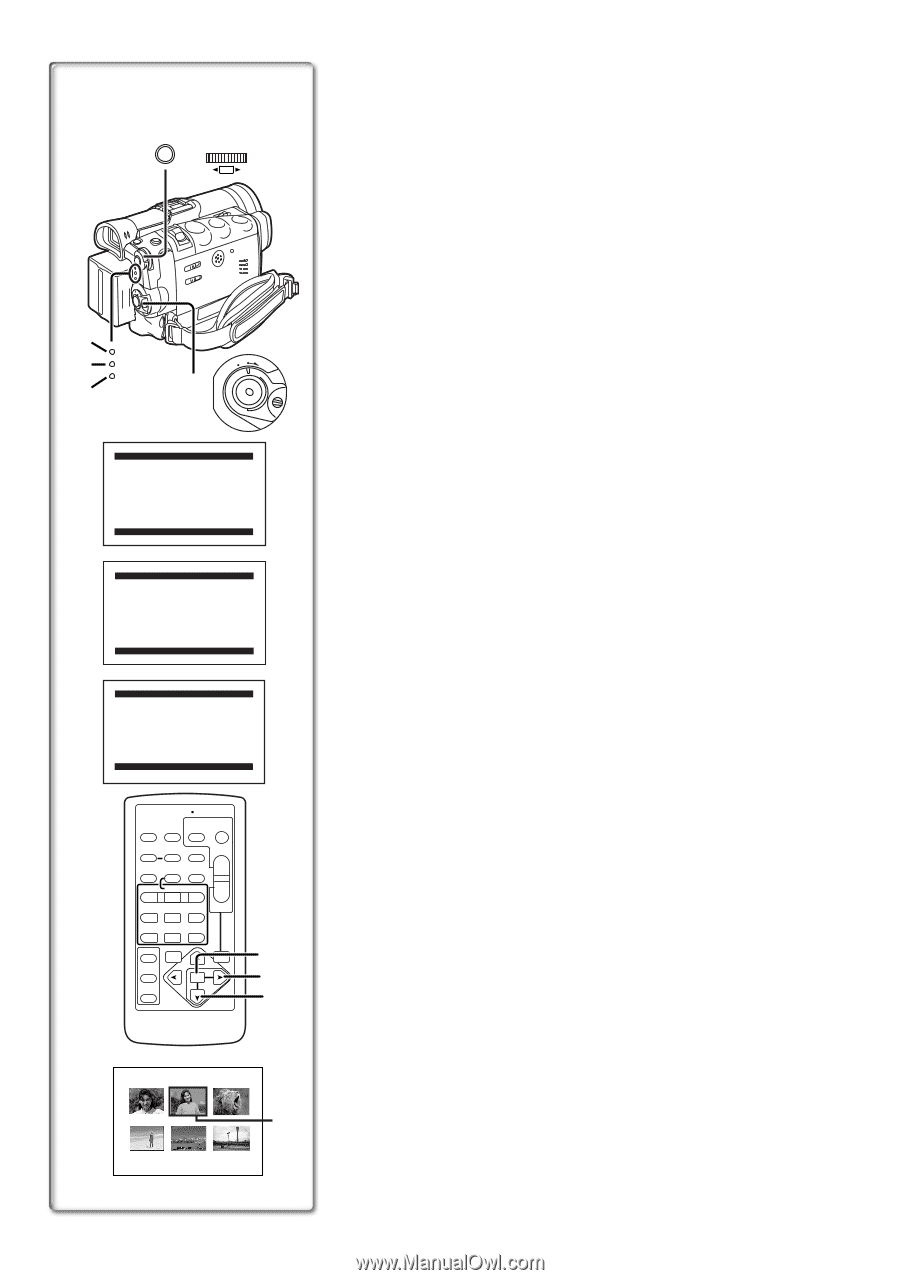
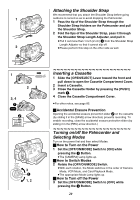
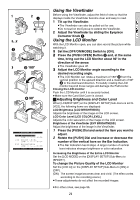
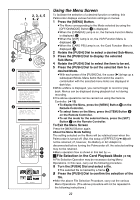
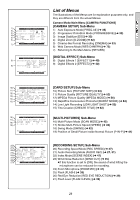
1 MENU 2, 3, 4, 5 1, 2 WB/SHUTTER IRIS/MF/VOL/JOG PUSH 2 3 4 CAMERA VCR CARD PB 1 OFF ON MODE 2 3 4 CAMERA FUNCTIONS 1.CAMERA SETUP 2.DIGITAL EFFECT 3.CARD SETUP 4.MULTI-PICTURES 5.RECORDING SETUP 6.DISPLAY SETUP 7.OTHER FUNCTIONS1 8.OTHER FUNCTIONS2 PUSH MENU TO EXIT VCR FUNCTIONS 1.PLAYBACK FUNCTIONS 2.DIGITAL EFFECT 3.CARD SETUP 4.MULTI-PICTURES 5.RECORDING SETUP 6.AV IN/OUT SETUP 7.DISPLAY SETUP 8.OTHER FUNCTIONS PUSH MENU TO EXIT CARD FUNCTIONS 1.DELETE CARD FILE 2.CARD EDITING 3.DISPLAY SETUP 4.OTHER FUNCTIONS PUSH MENU TO EXIT START/ DATE/ PHOTO STOP OSD TIME SHOT COUNTER RESET TITLE MULTI/ P-IN-P ¥REC A.DUB ZOOM T sVOL r V/REW PLAY FF/W W 61 5 STILL ADV PAUSE STILL ADV E ; D INDEX STOP INDEX K ∫ L SELECT VAR. SEARCH P.B. ZOOM STORE MENU OFF/ON SET P.B.DIGITAL ITEM 5 7 6 PICTURE No.25 100-0012 8 Using the Menu Screen To facilitate the selection of a desired function or setting, this Palmcorder displays various function settings on menus. 1 Press the [MENU] Button. ≥The Menu corresponding to the Mode selected by using the [OFF/ON/MODE] Switch 1 is displayed. ≥When the [CAMERA] Lamp is on, the Camera Function Menu is displayed. 2 ≥When the [VCR] Lamp is on, the VCR Function Menu is displayed. 3 ≥When the [CARD PB] Lamp is on, the Card Function Menu is displayed. 4 2 Rotate the [PUSH] Dial to select a desired Sub-Menu. 3 Press the [PUSH] Dial to display the selected Sub-Menu. 4 Rotate the [PUSH] Dial to select the item to be set. 5 Press the [PUSH] Dial to set the selected item to a desired Mode. ≥With each press of the [PUSH] Dial, the cursor [1] brings up a subsequent Mode. Menu items that cannot be used in combination with the selected menu items are displayed in dark blue. ≥While a Menu is displayed, you cannot begin to record or play back. Menus can be displayed during playback but not during recording. ≥The above operations can be carried out using the Remote Controller. (l 15) ≥To display the Menu, press the [MENU] Button 5 on the Remote Controller. ≥To select items on the Menu, press the [ITEM] Button 6 on the Remote Controller. ≥To set the mode for the selected items, press the [SET] Button 7 on the Remote Controller. To Exit the Menu Screen Press the [MENU] Button again. About the Menu Mode Setting The setting selected on the Menu will be retained even when the Palmcorder is turned off. (But, the setup of [EFFECT2] (l 40) will not be retained.) If, however, the Battery or AC Adaptor is disconnected before turning the Palmcorder off, the selected setting may not be retained. ≥Menu operation flow is shown in this text by >>. ª File Selection in the Card Playback Mode (l 59) A File Selection Operation may be necessary during Menu Operations. In this case, carry out the following procedure. 1 Turn the [PUSH] Dial and select a file. ≥The selected file is marked by a frame 8. 2 Press the [PUSH] Dial to confirm the selection of the file. ≥After the above File Selection Procedure, carry out the various Menu Operations. (The above procedure will not be repeated in the following instructions.) 22
-
 1
1 -
2
-
3
-
4
-
5
-
6
-
7
-
8
-
9
-
10
-
11
-
12
-
13
-
14
-
15
-
16
-
 17
17 -
 18
18 -
 19
19 -
 20
20 -
 21
21 -
 22
22 -
 23
23 -
 24
24 -
 25
25 -
 26
26 -
 27
27 -
28
-
29
-
30
-
31
-
32
-
33
-
34
-
35
-
36
-
37
-
38
-
39
-
40
-
41
-
42
-
43
-
44
-
45
-
46
-
47
-
48
-
49
-
50
-
51
-
52
-
53
-
54
-
55
-
56
-
57
-
58
-
59
-
60
-
61
-
62
-
63
-
64
-
65
-
66
-
67
-
68
-
69
-
70
-
71
-
72
-
73
-
74
-
75
-
76
-
77
-
78
-
79
-
80
-
81
-
82
-
83
-
84
-
85
-
86
-
87
-
88
-
89
-
90
-
91
-
92
-
93
-
94
-
95
-
96
-
97
-
98
-
99
-
100
-
101
-
102
-
103
-
104
-
105
-
106
-
107
-
108
-
109
-
110
-
111
-
112
-
113
-
114
 |
 |