Ricoh 2051 Operating Instructions - Page 31
Job Preset
 |
View all Ricoh 2051 manuals
Add to My Manuals
Save this manual to your list of manuals |
Page 31 highlights
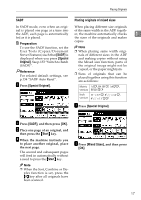
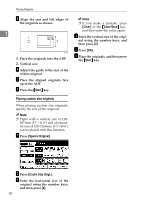
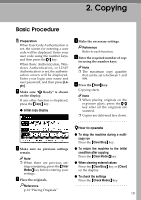
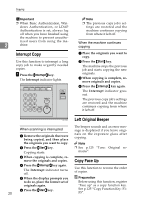
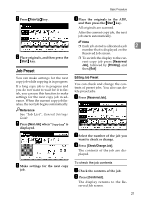
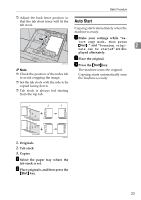
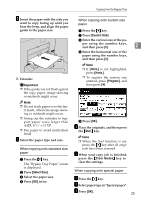
Basic Procedure A Press {Face Up} key. C Place the originals in the ADF, and then press the {Start} key. All originals are scanned. After the current copy job, the next job starts automatically. B Place originals, and then press the {Start} key. Job Preset Note ❒ Each job stored is allocated a job 2 number that is displayed on the Reserved Job screen. ❒ To switch the display to the current copy job press [Reserved Job], followed by [Printing], and then [Exit] You can make settings for the next copy job while copying is in progress. If a long copy job is in progress and you do not want to wait for it to finish, you can use this function to make settings for the next copy job in advance. When the current copy job finishes, the next job begins automatically. Editing Job Preset You can check and change the contents of preset jobs. You also can delete preset jobs. A Press [Reserved Job]. Reference See "Job List", General Settings Guide A Press [Next Job] when "Copying" is displayed. B Select the number of the job you want to check or change. C Press [Check/Change Job]. The contents of the job are displayed. B Make settings for the next copy job. To check the job contents A Check the contents of the job. B Press [Confirmed]. The display returns to the Reserved Job screen. 21
-
 1
1 -
2
-
3
-
4
-
5
-
6
-
7
-
8
-
9
-
10
-
11
-
12
-
13
-
14
-
15
-
16
-
17
-
18
-
19
-
20
-
21
-
22
-
23
-
24
-
25
-
 26
26 -
 27
27 -
 28
28 -
 29
29 -
 30
30 -
 31
31 -
 32
32 -
 33
33 -
 34
34 -
 35
35 -
 36
36 -
37
-
38
-
39
-
40
-
41
-
42
-
43
-
44
-
45
-
46
-
47
-
48
-
49
-
50
-
51
-
52
-
53
-
54
-
55
-
56
-
57
-
58
-
59
-
60
-
61
-
62
-
63
-
64
-
65
-
66
-
67
-
68
-
69
-
70
-
71
-
72
-
73
-
74
-
75
-
76
-
77
-
78
-
79
-
80
-
81
-
82
-
83
-
84
-
85
-
86
-
87
-
88
-
89
-
90
-
91
-
92
-
93
-
94
-
95
-
96
-
97
-
98
-
99
-
100
-
101
-
102
-
103
-
104
-
105
-
106
-
107
-
108
-
109
-
110
-
111
-
112
-
113
-
114
-
115
-
116
-
117
-
118
-
119
-
120
-
121
-
122
-
123
-
124
-
125
-
126
-
127
-
128
-
129
-
130
-
131
-
132
-
133
-
134
-
135
-
136
-
137
-
138
-
139
-
140
-
141
-
142
-
143
-
144
-
145
-
146
-
147
-
148
-
149
-
150
-
151
-
152
-
153
-
154
-
155
-
156
-
157
-
158
-
159
-
160
-
161
-
162
-
163
-
164
-
165
-
166
-
167
-
168
-
169
-
170
-
171
-
172
 |
 |
