Ricoh 2051 Operating Instructions - Page 39
Preset Reduce/Enlarge
 |
View all Ricoh 2051 manuals
Add to My Manuals
Save this manual to your list of manuals |
Page 39 highlights
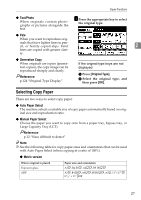
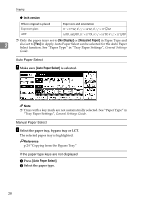
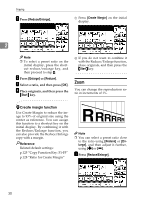
R Copier Functions -Rotated copy If the orientation of the original (L or K) is different to that of the paper you are copying onto, this function rotates the original image by 90°, fitting it onto the copy paper. This function works when [Auto Paper Select] or [Auto Reduce/Enlarge] is selected. See p.27 "Auto Paper Select", p.31 "Auto Reduce/Enlarge". 2 R Note ❒ The default setting for Auto Tray Switching is [With Image Rotation]. You cannot use the Rotated Copy function if this setting is changed to [Without Image Rotation] or [Off]. See p.123 "Auto Tray Switching". ❒ Depending on the settings for the Punch, Staple or Z-fold functions, you may not be able to use the Rotated Copy function.See p.37 "Staple", p.39 "Punch", p.43 "Z-fold". Preset Reduce/Enlarge You can select a preset ratio for copying. ❖ Base Point The base point of Reduce/Enlarge differs depending on how the original was scanned. When the original is placed on the exposure glass, the upper left corner is the base point. When placed in the ADF, the bottom left corner is the base point. 1. Base point when placed on the ex- posure glass. 2. Base point when placed in the ADF. Reference Related default settings: p.126 "Shortcut R/E" p.128 "R/E Priority" 29
-
 1
1 -
2
-
3
-
4
-
5
-
6
-
7
-
8
-
9
-
10
-
11
-
12
-
13
-
14
-
15
-
16
-
17
-
18
-
19
-
20
-
21
-
22
-
23
-
24
-
25
-
26
-
27
-
28
-
29
-
30
-
31
-
32
-
33
-
 34
34 -
 35
35 -
 36
36 -
 37
37 -
 38
38 -
 39
39 -
 40
40 -
 41
41 -
 42
42 -
 43
43 -
 44
44 -
45
-
46
-
47
-
48
-
49
-
50
-
51
-
52
-
53
-
54
-
55
-
56
-
57
-
58
-
59
-
60
-
61
-
62
-
63
-
64
-
65
-
66
-
67
-
68
-
69
-
70
-
71
-
72
-
73
-
74
-
75
-
76
-
77
-
78
-
79
-
80
-
81
-
82
-
83
-
84
-
85
-
86
-
87
-
88
-
89
-
90
-
91
-
92
-
93
-
94
-
95
-
96
-
97
-
98
-
99
-
100
-
101
-
102
-
103
-
104
-
105
-
106
-
107
-
108
-
109
-
110
-
111
-
112
-
113
-
114
-
115
-
116
-
117
-
118
-
119
-
120
-
121
-
122
-
123
-
124
-
125
-
126
-
127
-
128
-
129
-
130
-
131
-
132
-
133
-
134
-
135
-
136
-
137
-
138
-
139
-
140
-
141
-
142
-
143
-
144
-
145
-
146
-
147
-
148
-
149
-
150
-
151
-
152
-
153
-
154
-
155
-
156
-
157
-
158
-
159
-
160
-
161
-
162
-
163
-
164
-
165
-
166
-
167
-
168
-
169
-
170
-
171
-
172
 |
 |
