Ricoh R4 User Guide - Page 113
Using the SETUP Menu
 |
View all Ricoh R4 manuals
Add to My Manuals
Save this manual to your list of manuals |
Page 113 highlights
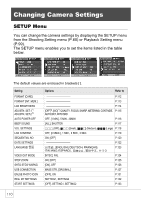
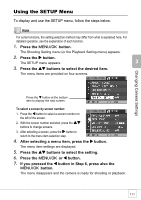
Changing Camera Settings Using the SETUP Menu To display and use the SETUP menu, follow the steps below. Note For some functions, the setting selection method may differ from what is explained here. For detailed operation, see the explanation of each function. 1. Press the C/D button. The Shooting Setting menu (or the Playback Setting menu) appears. 2. Press the $ button. The SETUP menu appears. 3. Press the !" buttons to select the desired item. The menu items are provided on four screens. Press the " button at the bottom item to display the next screen. To select a screen by screen number: 1. Press the # button to select a screen number on the left of the screen. 2. With the screen number selected, press the !" buttons to change screens. 3. After selecting a screen, press the $ button to return to the menu item selection step. 4. After selecting a menu item, press the $ button. The menu item settings are displayed. 5. Press the !" buttons to select the setting. 6. Press the C/D or # button. 7. If you pressed the # button in Step 6, press also the C/D button. The menu disappears and the camera is ready for shooting or playback. 111
-
 1
1 -
2
-
3
-
4
-
5
-
6
-
7
-
8
-
9
-
10
-
11
-
12
-
13
-
14
-
15
-
16
-
17
-
18
-
19
-
20
-
21
-
22
-
23
-
24
-
25
-
26
-
27
-
28
-
29
-
30
-
31
-
32
-
33
-
34
-
35
-
36
-
37
-
38
-
39
-
40
-
41
-
42
-
43
-
44
-
45
-
46
-
47
-
48
-
49
-
50
-
51
-
52
-
53
-
54
-
55
-
56
-
57
-
58
-
59
-
60
-
61
-
62
-
63
-
64
-
65
-
66
-
67
-
68
-
69
-
70
-
71
-
72
-
73
-
74
-
75
-
76
-
77
-
78
-
79
-
80
-
81
-
82
-
83
-
84
-
85
-
86
-
87
-
88
-
89
-
90
-
91
-
92
-
93
-
94
-
95
-
96
-
97
-
98
-
99
-
100
-
101
-
102
-
103
-
104
-
105
-
106
-
107
-
 108
108 -
 109
109 -
 110
110 -
 111
111 -
 112
112 -
 113
113 -
 114
114 -
 115
115 -
 116
116 -
 117
117 -
 118
118 -
119
-
120
-
121
-
122
-
123
-
124
-
125
-
126
-
127
-
128
-
129
-
130
-
131
-
132
-
133
-
134
-
135
-
136
-
137
-
138
-
139
-
140
-
141
-
142
-
143
-
144
-
145
-
146
-
147
-
148
-
149
-
150
-
151
-
152
-
153
-
154
-
155
-
156
-
157
-
158
-
159
-
160
-
161
-
162
-
163
-
164
-
165
-
166
-
167
-
168
-
169
-
170
-
171
-
172
-
173
-
174
-
175
-
176
-
177
-
178
-
179
-
180
-
181
-
182
-
183
-
184
-
185
-
186
-
187
-
188
 |
 |