Ricoh R4 User Guide - Page 83
Using Natural and Artificial Lighting, WHITE BALANCE
 |
View all Ricoh R4 manuals
Add to My Manuals
Save this manual to your list of manuals |
Page 83 highlights
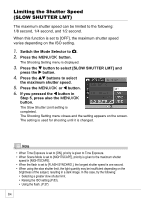
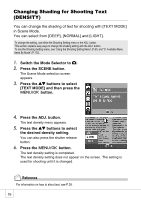
Using the Various Shooting and Playback Functions Using Natural and Artificial Lighting (WHITE BALANCE) Adjust the white balance so that a white subject will appear white. At purchase, the White Balance is set to [AUTO]. Normally you do not need to change the setting, but if the camera is having difficulty determining the white balance when shooting an object of a single color or when shooting under multiple light sources, you can change the setting. White Balance Modes Symbol Mode Description AUTO AUTO Adjusts the white balance automatically. OUTDOORS Select this when shooting outdoors (sunny) and white balance fails to adjust properly. CLOUDY Select this when shooting in cloudy weather or shade and the white balance fails to adjust properly. INCANDESCENT Select this when shooting under incandescent light and white balance fails to LAMP adjust properly. INCANDESCENT Select this when shooting under incandescent light (more reddish, compared with LAMP2 [INCANDESCENT LAMP]) FLUORESCENT Select this when shooting under fluorescent light and white balance fails to LAMP. adjust properly. MANUAL SETTINGS Adjust the white balance manually. To change the setting, use either the Shooting Setting menu or the ADJ. button. This section explains easy ways to change the white balance setting with the ADJ. button. To use the Shooting Setting menu, see "Using the Shooting Setting Menu" (P.61). 1. Switch the Mode Selector to 5. 2. Press the ADJ. button. 3. Press the #$ buttons until the White Balance menu appears. 4. Press the !" buttons to select a mode other than . You can also press the shutter release button. 5. Press the C/D button. The White Balance setting is completed and the appropriate white balance symbol appears on the screen. The setting is used for shooting until it is changed. 81
-
 1
1 -
2
-
3
-
4
-
5
-
6
-
7
-
8
-
9
-
10
-
11
-
12
-
13
-
14
-
15
-
16
-
17
-
18
-
19
-
20
-
21
-
22
-
23
-
24
-
25
-
26
-
27
-
28
-
29
-
30
-
31
-
32
-
33
-
34
-
35
-
36
-
37
-
38
-
39
-
40
-
41
-
42
-
43
-
44
-
45
-
46
-
47
-
48
-
49
-
50
-
51
-
52
-
53
-
54
-
55
-
56
-
57
-
58
-
59
-
60
-
61
-
62
-
63
-
64
-
65
-
66
-
67
-
68
-
69
-
70
-
71
-
72
-
73
-
74
-
75
-
76
-
77
-
 78
78 -
 79
79 -
 80
80 -
 81
81 -
 82
82 -
 83
83 -
 84
84 -
 85
85 -
 86
86 -
 87
87 -
 88
88 -
89
-
90
-
91
-
92
-
93
-
94
-
95
-
96
-
97
-
98
-
99
-
100
-
101
-
102
-
103
-
104
-
105
-
106
-
107
-
108
-
109
-
110
-
111
-
112
-
113
-
114
-
115
-
116
-
117
-
118
-
119
-
120
-
121
-
122
-
123
-
124
-
125
-
126
-
127
-
128
-
129
-
130
-
131
-
132
-
133
-
134
-
135
-
136
-
137
-
138
-
139
-
140
-
141
-
142
-
143
-
144
-
145
-
146
-
147
-
148
-
149
-
150
-
151
-
152
-
153
-
154
-
155
-
156
-
157
-
158
-
159
-
160
-
161
-
162
-
163
-
164
-
165
-
166
-
167
-
168
-
169
-
170
-
171
-
172
-
173
-
174
-
175
-
176
-
177
-
178
-
179
-
180
-
181
-
182
-
183
-
184
-
185
-
186
-
187
-
188
 |
 |