Ricoh R4 User Guide - Page 25
Setting the Language - photos
 |
View all Ricoh R4 manuals
Add to My Manuals
Save this manual to your list of manuals |
Page 25 highlights
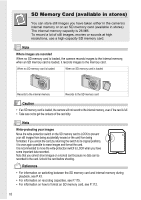
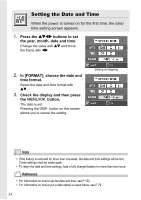
Quick Guide Setting the Language When the power is turned on for the first time, the language setting screen appears (for the LCD monitor display language). After setting the language, go on to the date/time setting (for printing the date and time on your photos). You can shoot without these settings. However, be sure to set the language, and the date/time later. Use the SETUP screen for these settings. 1. Turn the power on for the first time after purchase. The language selection screen appears. To skip language setting, press the M/O button. When the M/O button is pressed, the language setting is cancelled and the video signal format-setting screen appears. 2. Press the !"#$ buttons to select a language. 3. Press the C/D button. The display language is set, and the date/ time setting screen appears. Reference For how to set the display language and date/time on the SETUP screen, see "Changing the Display Language (LANGUAGE/ )" (P.123) and "Setting the Date and Time (DATE SETTINGS)" (P.122) in this guide. 23
-
 1
1 -
2
-
3
-
4
-
5
-
6
-
7
-
8
-
9
-
10
-
11
-
12
-
13
-
14
-
15
-
16
-
17
-
18
-
19
-
 20
20 -
 21
21 -
 22
22 -
 23
23 -
 24
24 -
 25
25 -
 26
26 -
 27
27 -
 28
28 -
 29
29 -
 30
30 -
31
-
32
-
33
-
34
-
35
-
36
-
37
-
38
-
39
-
40
-
41
-
42
-
43
-
44
-
45
-
46
-
47
-
48
-
49
-
50
-
51
-
52
-
53
-
54
-
55
-
56
-
57
-
58
-
59
-
60
-
61
-
62
-
63
-
64
-
65
-
66
-
67
-
68
-
69
-
70
-
71
-
72
-
73
-
74
-
75
-
76
-
77
-
78
-
79
-
80
-
81
-
82
-
83
-
84
-
85
-
86
-
87
-
88
-
89
-
90
-
91
-
92
-
93
-
94
-
95
-
96
-
97
-
98
-
99
-
100
-
101
-
102
-
103
-
104
-
105
-
106
-
107
-
108
-
109
-
110
-
111
-
112
-
113
-
114
-
115
-
116
-
117
-
118
-
119
-
120
-
121
-
122
-
123
-
124
-
125
-
126
-
127
-
128
-
129
-
130
-
131
-
132
-
133
-
134
-
135
-
136
-
137
-
138
-
139
-
140
-
141
-
142
-
143
-
144
-
145
-
146
-
147
-
148
-
149
-
150
-
151
-
152
-
153
-
154
-
155
-
156
-
157
-
158
-
159
-
160
-
161
-
162
-
163
-
164
-
165
-
166
-
167
-
168
-
169
-
170
-
171
-
172
-
173
-
174
-
175
-
176
-
177
-
178
-
179
-
180
-
181
-
182
-
183
-
184
-
185
-
186
-
187
-
188
 |
 |