Seagate Mirra Personal Server User Guide (Mac) - Page 86
Restoring Folders After a Crash
 |
View all Seagate Mirra Personal Server manuals
Add to My Manuals
Save this manual to your list of manuals |
Page 86 highlights
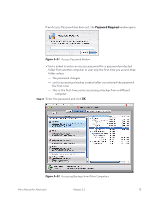
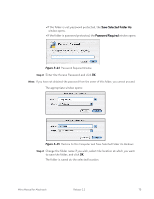
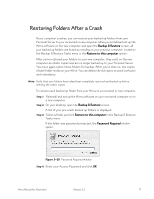
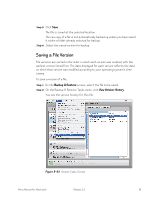
Restoring Folders After a Crash If your computer crashes, you can restore your backed up folders from your Personal Server to your recovered or new computer. When you install and set up the Mirra software on the new computer and open the Backup & Restore screen, all your backed up folders are listed as residing on your previous computer. Listed on the Backup & Restore Tasks menu is the Restore to this computer option. After you've restored your folders to your new computer, they exist on the new computer as static copies and are no longer backed up to your Personal Server. You must again select these folders for backup. After you've done so, two copies of each folder reside on your Mirra. You can delete the old copies to avoid confusion and redundancy. Note: Verify that your folders have indeed been completely restored and backed up before deleting the static copies. To restore each backed up folder from your Mirra to a recovered or new computer, Step 1: Reinstall and set up the Mirra software on your recovered computer or on a new computer. Step 2: On your desktop, open the Backup & Restore screen. A list of your pre-crash backed up folders is displayed. Step 3: Select a folder and click Restore to this computer in the Backup & Restore Tasks menu. If the folder was password protected, the Password Required window opens: Figure 5~28 Password Required Window Step 4: Enter your Access Password and click OK. Mirra Manual for Macintosh Release 2.2 77
-
 1
1 -
2
-
3
-
4
-
5
-
6
-
7
-
8
-
9
-
10
-
11
-
12
-
13
-
14
-
15
-
16
-
17
-
18
-
19
-
20
-
21
-
22
-
23
-
24
-
25
-
26
-
27
-
28
-
29
-
30
-
31
-
32
-
33
-
34
-
35
-
36
-
37
-
38
-
39
-
40
-
41
-
42
-
43
-
44
-
45
-
46
-
47
-
48
-
49
-
50
-
51
-
52
-
53
-
54
-
55
-
56
-
57
-
58
-
59
-
60
-
61
-
62
-
63
-
64
-
65
-
66
-
67
-
68
-
69
-
70
-
71
-
72
-
73
-
74
-
75
-
76
-
77
-
78
-
79
-
80
-
 81
81 -
 82
82 -
 83
83 -
 84
84 -
 85
85 -
 86
86 -
 87
87 -
 88
88 -
 89
89 -
 90
90 -
 91
91 -
92
-
93
-
94
-
95
-
96
-
97
-
98
-
99
-
100
-
101
-
102
-
103
-
104
-
105
-
106
-
107
-
108
-
109
-
110
-
111
-
112
-
113
-
114
-
115
-
116
-
117
-
118
-
119
-
120
-
121
-
122
-
123
-
124
-
125
-
126
-
127
-
128
-
129
-
130
-
131
-
132
-
133
-
134
-
135
-
136
-
137
-
138
-
139
-
140
-
141
-
142
-
143
-
144
-
145
-
146
-
147
-
148
-
149
-
150
-
151
-
152
-
153
-
154
-
155
-
156
-
157
-
158
-
159
-
160
-
161
-
162
-
163
 |
 |
