Seagate Mirra Personal Server User Guide (Mac) - Page 98
Notes on Backing Up and Restoring Files and Folders
 |
View all Seagate Mirra Personal Server manuals
Add to My Manuals
Save this manual to your list of manuals |
Page 98 highlights
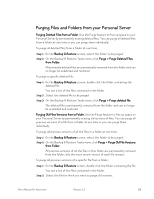
Step 3: On the Backup & Restore Tasks menu, click Purge > Purge Old Versions of File. All previous versions of this file are permanently removed from the folder; only the most recent version remains. Purging a Deleted Folder. Use the Purge feature to free up space on your Personal Server by permanently erasing deleted folders. To purge a deleted folder, Step 1: On the Backup & Restore screen, select the deleted folder to be purged. Step 2: On the Backup & Restore Tasks menu, click Purge > Purge Deleted Folder. The folder is permanently removed from the Mirra. Notes on Backing Up and Restoring Files and Folders • If you interrupt the backup of your files by turning off your computer or disconnecting from your network, Mirra remembers where you left off and picks up from there when you turn your computer back on or reconnect to your network. • Laptop users: Even when you disconnect your computer from the network, the Mirra software continues to track changes and automatically synchronizes the most recent version of each of your files to your Personal Server when you reconnect to the network. • Mirra backs up files even when the Mirra application is not open on your desktop. Mirra Manual for Macintosh Release 2.2 89
-
 1
1 -
2
-
3
-
4
-
5
-
6
-
7
-
8
-
9
-
10
-
11
-
12
-
13
-
14
-
15
-
16
-
17
-
18
-
19
-
20
-
21
-
22
-
23
-
24
-
25
-
26
-
27
-
28
-
29
-
30
-
31
-
32
-
33
-
34
-
35
-
36
-
37
-
38
-
39
-
40
-
41
-
42
-
43
-
44
-
45
-
46
-
47
-
48
-
49
-
50
-
51
-
52
-
53
-
54
-
55
-
56
-
57
-
58
-
59
-
60
-
61
-
62
-
63
-
64
-
65
-
66
-
67
-
68
-
69
-
70
-
71
-
72
-
73
-
74
-
75
-
76
-
77
-
78
-
79
-
80
-
81
-
82
-
83
-
84
-
85
-
86
-
87
-
88
-
89
-
90
-
91
-
92
-
 93
93 -
 94
94 -
 95
95 -
 96
96 -
 97
97 -
 98
98 -
 99
99 -
 100
100 -
 101
101 -
 102
102 -
 103
103 -
104
-
105
-
106
-
107
-
108
-
109
-
110
-
111
-
112
-
113
-
114
-
115
-
116
-
117
-
118
-
119
-
120
-
121
-
122
-
123
-
124
-
125
-
126
-
127
-
128
-
129
-
130
-
131
-
132
-
133
-
134
-
135
-
136
-
137
-
138
-
139
-
140
-
141
-
142
-
143
-
144
-
145
-
146
-
147
-
148
-
149
-
150
-
151
-
152
-
153
-
154
-
155
-
156
-
157
-
158
-
159
-
160
-
161
-
162
-
163
 |
 |
