Sony DCR-PC9 Operating Instructions - Page 165
Symptom, Cause and/or Corrective Actions
 |
View all Sony DCR-PC9 manuals
Add to My Manuals
Save this manual to your list of manuals |
Page 165 highlights
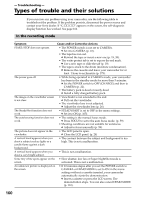
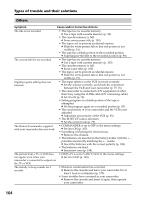
Types of trouble and their solutions Symptom Cause and/or Corrective Actions No function works though the power is on. • Disconnect the AC power adaptor from a wall outlet or remove the battery, then reconnect it in about 1 minute. Turn the power on. If the functions still do not work, press the RESET button using a sharp-pointed object. (If you press the RESET button, all the settings including the date and time return to the default) (p. 186). While charging the battery pack, the CHARGE lamp does not light up. • Charging is completed. • The battery pack is not properly installed. c Install it properly (p. 12). You cannot charge the battery pack. • The POWER switch is not set to OFF (CHARGE). c Set it to OFF (CHARGE). While charging the battery pack, the CHARGE lamp flashes. • The battery pack is not properly installed. c Install it properly (p. 12). • Something is wrong with the battery pack. c Please contact your Sony dealer or local authorized Sony service facility. The buttons do not appear on the touch panel. • The DISPLAY/TOUCH PANEL button is pressed. c Press the LCD screen lightly. c Press the DISPLAY/TOUCH PANEL button on your camcorder or the DISPLAY button on the Remote Commander (p. 36). The buttons on the LCD screen do not work. c Adjust the screen (CALIBRATION) (p. 177). The indicators appear mirrorreversed in the viewfinder or on the TV screen. • The mirror mode is activated. This is not a malfunction. Image data cannot be transferred by the USB connection. • The USB cable was connected before installation of the USB driver was completed. c Uninstall the incorrect USB driver and re-install the USB driver (p. 149). Troubleshooting (continued on the following page) 165
-
 1
1 -
2
-
3
-
4
-
5
-
6
-
7
-
8
-
9
-
10
-
11
-
12
-
13
-
14
-
15
-
16
-
17
-
18
-
19
-
20
-
21
-
22
-
23
-
24
-
25
-
26
-
27
-
28
-
29
-
30
-
31
-
32
-
33
-
34
-
35
-
36
-
37
-
38
-
39
-
40
-
41
-
42
-
43
-
44
-
45
-
46
-
47
-
48
-
49
-
50
-
51
-
52
-
53
-
54
-
55
-
56
-
57
-
58
-
59
-
60
-
61
-
62
-
63
-
64
-
65
-
66
-
67
-
68
-
69
-
70
-
71
-
72
-
73
-
74
-
75
-
76
-
77
-
78
-
79
-
80
-
81
-
82
-
83
-
84
-
85
-
86
-
87
-
88
-
89
-
90
-
91
-
92
-
93
-
94
-
95
-
96
-
97
-
98
-
99
-
100
-
101
-
102
-
103
-
104
-
105
-
106
-
107
-
108
-
109
-
110
-
111
-
112
-
113
-
114
-
115
-
116
-
117
-
118
-
119
-
120
-
121
-
122
-
123
-
124
-
125
-
126
-
127
-
128
-
129
-
130
-
131
-
132
-
133
-
134
-
135
-
136
-
137
-
138
-
139
-
140
-
141
-
142
-
143
-
144
-
145
-
146
-
147
-
148
-
149
-
150
-
151
-
152
-
153
-
154
-
155
-
156
-
157
-
158
-
159
-
 160
160 -
 161
161 -
 162
162 -
 163
163 -
 164
164 -
 165
165 -
 166
166 -
 167
167 -
 168
168 -
 169
169 -
 170
170 -
171
-
172
-
173
-
174
-
175
-
176
-
177
-
178
-
179
-
180
-
181
-
182
-
183
-
184
-
185
-
186
-
187
-
188
-
189
-
190
-
191
-
192
 |
 |