Sony DCR-PC9 Operating Instructions - Page 31
Recording a picture, Self-timer recording
 |
View all Sony DCR-PC9 manuals
Add to My Manuals
Save this manual to your list of manuals |
Page 31 highlights
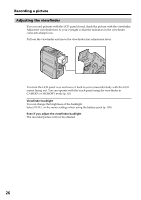
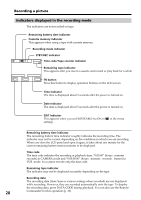
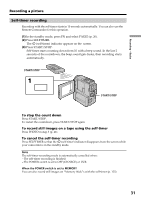
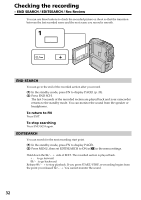
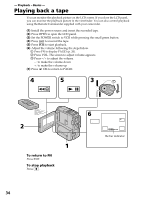
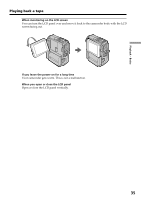
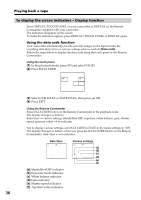
Recording - Basics Recording a picture Self-timer recording Recording with the self-timer starts in 10 seconds automatically. You can also use the Remote Commander for this operation. (1) In the standby mode, press FN and select PAGE3 (p. 20). (2) Press SELFTIMER. The (self-timer) indicator appears on the screen. (3) Press START/STOP. Self-timer starts counting down from 10 with a beep sound. In the last 2 seconds of the countdown, the beep sound gets faster, then recording starts automatically. START/STOP 1 FN START/STOP To stop the count down Press START/STOP. To restart the countdown, press START/STOP again. To record still images on a tape using the self-timer Press PHOTO in step 3 (p. 41). To cancel the self-timer recording Press SELFTIMER so that the (self-timer) indicator disappears from the screen while your camcorder is in the standby mode. Note The self-timer recording mode is automatically cancelled when: - The self-timer recording is finished. - The POWER switch is set to OFF (CHARGE) or VCR. When the POWER switch is set to MEMORY You can also record still images on "Memory Stick"s with the self-timer (p. 125). 31
-
 1
1 -
2
-
3
-
4
-
5
-
6
-
7
-
8
-
9
-
10
-
11
-
12
-
13
-
14
-
15
-
16
-
17
-
18
-
19
-
20
-
21
-
22
-
23
-
24
-
25
-
 26
26 -
 27
27 -
 28
28 -
 29
29 -
 30
30 -
 31
31 -
 32
32 -
 33
33 -
 34
34 -
 35
35 -
 36
36 -
37
-
38
-
39
-
40
-
41
-
42
-
43
-
44
-
45
-
46
-
47
-
48
-
49
-
50
-
51
-
52
-
53
-
54
-
55
-
56
-
57
-
58
-
59
-
60
-
61
-
62
-
63
-
64
-
65
-
66
-
67
-
68
-
69
-
70
-
71
-
72
-
73
-
74
-
75
-
76
-
77
-
78
-
79
-
80
-
81
-
82
-
83
-
84
-
85
-
86
-
87
-
88
-
89
-
90
-
91
-
92
-
93
-
94
-
95
-
96
-
97
-
98
-
99
-
100
-
101
-
102
-
103
-
104
-
105
-
106
-
107
-
108
-
109
-
110
-
111
-
112
-
113
-
114
-
115
-
116
-
117
-
118
-
119
-
120
-
121
-
122
-
123
-
124
-
125
-
126
-
127
-
128
-
129
-
130
-
131
-
132
-
133
-
134
-
135
-
136
-
137
-
138
-
139
-
140
-
141
-
142
-
143
-
144
-
145
-
146
-
147
-
148
-
149
-
150
-
151
-
152
-
153
-
154
-
155
-
156
-
157
-
158
-
159
-
160
-
161
-
162
-
163
-
164
-
165
-
166
-
167
-
168
-
169
-
170
-
171
-
172
-
173
-
174
-
175
-
176
-
177
-
178
-
179
-
180
-
181
-
182
-
183
-
184
-
185
-
186
-
187
-
188
-
189
-
190
-
191
-
192
 |
 |