Sony DCR-PC9 Operating Instructions - Page 20
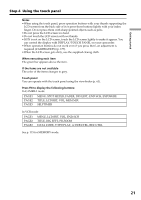
Step 4, Using the touch panel
 |
View all Sony DCR-PC9 manuals
Add to My Manuals
Save this manual to your list of manuals |
Page 20 highlights
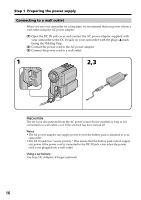
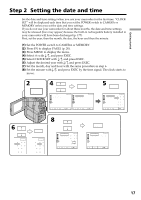
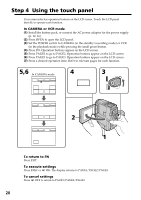
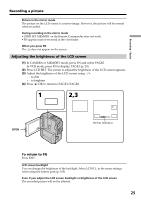
Step 4 Using the touch panel Your camcorder has operation buttons on the LCD screen. Touch the LCD panel directly to operate each function. In CAMERA or VCR mode (1) Install the battery pack, or connect the AC power adaptor for the power supply (p. 12, 16). (2) Press OPEN to open the LCD panel. (3) Set the POWER switch to CAMERA (in the standby/recording mode) or VCR (in the playback mode) while pressing the small green button. (4) Press FN. Operation buttons appear on the LCD screen. (5) Press PAGE2 to go to PAGE2. Operation buttons appear on the LCD screen. (6) Press PAGE3 to go to PAGE3. Operation buttons appear on the LCD screen. (7) Press a desired operation item. Refer to relevant pages for each function. 5,6 In CAMERA mode PAGE1 PAGE2 PAGE3 EXIT MENU FADER DIG EFFT SPOT METER END EXPO- SCH SURE 4 FN MEMORY OFF CAMERA (CHARGE) VCR 3 POWER LOCK PAGE1 PAGE2 PAGE3 EXIT TITLE LCD VOL MEM BRT MIX PAGE1 PAGE2 PAGE3 EXIT SELF TIMER 2 1 To return to FN Press EXIT. To execute settings Press EXEC or OK. The display returns to PAGE1/PAGE2/PAGE3. To cancel settings Press OFF to return to PAGE1/PAGE2/PAGE3. 20
-
 1
1 -
2
-
3
-
4
-
5
-
6
-
7
-
8
-
9
-
10
-
11
-
12
-
13
-
14
-
 15
15 -
 16
16 -
 17
17 -
 18
18 -
 19
19 -
 20
20 -
 21
21 -
 22
22 -
 23
23 -
 24
24 -
 25
25 -
26
-
27
-
28
-
29
-
30
-
31
-
32
-
33
-
34
-
35
-
36
-
37
-
38
-
39
-
40
-
41
-
42
-
43
-
44
-
45
-
46
-
47
-
48
-
49
-
50
-
51
-
52
-
53
-
54
-
55
-
56
-
57
-
58
-
59
-
60
-
61
-
62
-
63
-
64
-
65
-
66
-
67
-
68
-
69
-
70
-
71
-
72
-
73
-
74
-
75
-
76
-
77
-
78
-
79
-
80
-
81
-
82
-
83
-
84
-
85
-
86
-
87
-
88
-
89
-
90
-
91
-
92
-
93
-
94
-
95
-
96
-
97
-
98
-
99
-
100
-
101
-
102
-
103
-
104
-
105
-
106
-
107
-
108
-
109
-
110
-
111
-
112
-
113
-
114
-
115
-
116
-
117
-
118
-
119
-
120
-
121
-
122
-
123
-
124
-
125
-
126
-
127
-
128
-
129
-
130
-
131
-
132
-
133
-
134
-
135
-
136
-
137
-
138
-
139
-
140
-
141
-
142
-
143
-
144
-
145
-
146
-
147
-
148
-
149
-
150
-
151
-
152
-
153
-
154
-
155
-
156
-
157
-
158
-
159
-
160
-
161
-
162
-
163
-
164
-
165
-
166
-
167
-
168
-
169
-
170
-
171
-
172
-
173
-
174
-
175
-
176
-
177
-
178
-
179
-
180
-
181
-
182
-
183
-
184
-
185
-
186
-
187
-
188
-
189
-
190
-
191
-
192
 |
 |