Sony DCR-PC9 Operating Instructions - Page 90
Using the i.LINK cable DV connecting cable
 |
View all Sony DCR-PC9 manuals
Add to My Manuals
Save this manual to your list of manuals |
Page 90 highlights
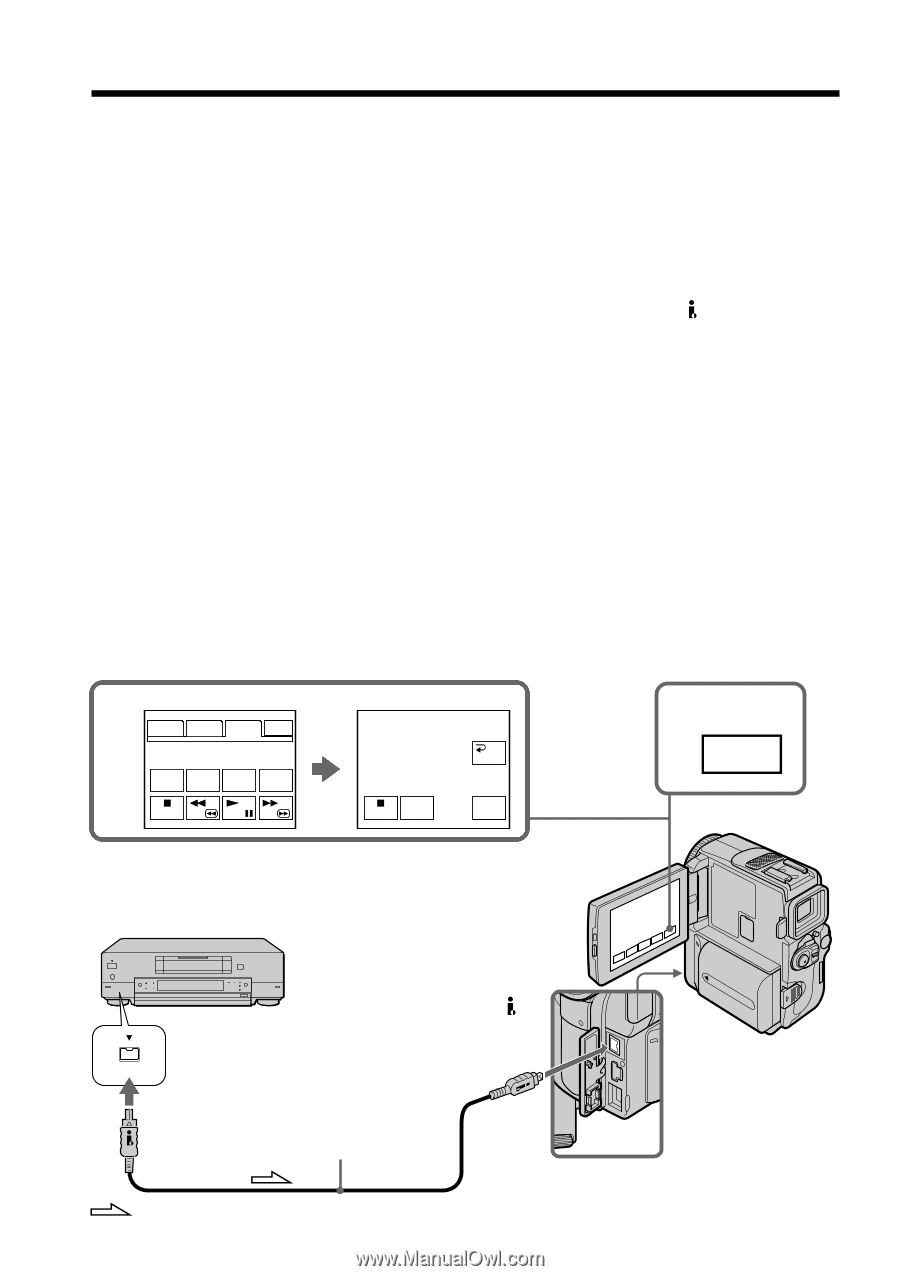
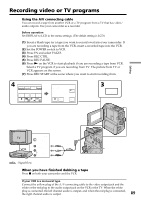
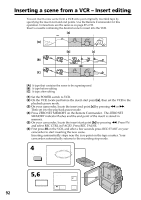
Recording video or TV programs If your TV or VCR has an S video jack Connect using an S video cable (optional) to obtain high-quality pictures. With this connection, you do not need to connect the yellow (video) plug of the A/V connecting cable. Connect an S video cable (optional) to the S video jacks of both your camcorder and the TV or VCR. This connection produces higher quality DV format pictures. Using the i.LINK cable (DV connecting cable) Simply connect the i.LINK cable (DV connecting cable) (optional) to DV jack of your camcorder and to DV jack of the DV products. With digital-to-digital connection, video and audio signals are transmitted in digital form for high-quality editing. Before operation Set DISPLAY to LCD in the menu settings (p. 105). (The default setting is LCD.) (1) Insert a blank tape (or a tape you want to record over) into your camcorder, and insert the recorded tape into VCR. (2) Set the POWER switch to VCR. (3) Press FN and select PAGE3. (4) Press REC CTRL. (5) Press REC PAUSE. (6) Press N on the VCR to start playback. The picture from the DV products appears on the screen of your camcoder. (7) Press REC START at the scene where you want to start recording. 4 PAGE1 PAGE2 PAGE3 EXIT DATA VXXSXPXD AUDDUIOB REC CODE XPXLAXYX CDTURBL CTRL REC CTRL RET. REC PAUSE REC START 3 FN DV DV (optional) : Signal flow 90
-
 1
1 -
2
-
3
-
4
-
5
-
6
-
7
-
8
-
9
-
10
-
11
-
12
-
13
-
14
-
15
-
16
-
17
-
18
-
19
-
20
-
21
-
22
-
23
-
24
-
25
-
26
-
27
-
28
-
29
-
30
-
31
-
32
-
33
-
34
-
35
-
36
-
37
-
38
-
39
-
40
-
41
-
42
-
43
-
44
-
45
-
46
-
47
-
48
-
49
-
50
-
51
-
52
-
53
-
54
-
55
-
56
-
57
-
58
-
59
-
60
-
61
-
62
-
63
-
64
-
65
-
66
-
67
-
68
-
69
-
70
-
71
-
72
-
73
-
74
-
75
-
76
-
77
-
78
-
79
-
80
-
81
-
82
-
83
-
84
-
 85
85 -
 86
86 -
 87
87 -
 88
88 -
 89
89 -
 90
90 -
 91
91 -
 92
92 -
 93
93 -
 94
94 -
 95
95 -
96
-
97
-
98
-
99
-
100
-
101
-
102
-
103
-
104
-
105
-
106
-
107
-
108
-
109
-
110
-
111
-
112
-
113
-
114
-
115
-
116
-
117
-
118
-
119
-
120
-
121
-
122
-
123
-
124
-
125
-
126
-
127
-
128
-
129
-
130
-
131
-
132
-
133
-
134
-
135
-
136
-
137
-
138
-
139
-
140
-
141
-
142
-
143
-
144
-
145
-
146
-
147
-
148
-
149
-
150
-
151
-
152
-
153
-
154
-
155
-
156
-
157
-
158
-
159
-
160
-
161
-
162
-
163
-
164
-
165
-
166
-
167
-
168
-
169
-
170
-
171
-
172
-
173
-
174
-
175
-
176
-
177
-
178
-
179
-
180
-
181
-
182
-
183
-
184
-
185
-
186
-
187
-
188
-
189
-
190
-
191
-
192
 |
 |