Sony DCR-PC9 Operating Instructions - Page 55
Adjusting the white balance manually
 |
View all Sony DCR-PC9 manuals
Add to My Manuals
Save this manual to your list of manuals |
Page 55 highlights
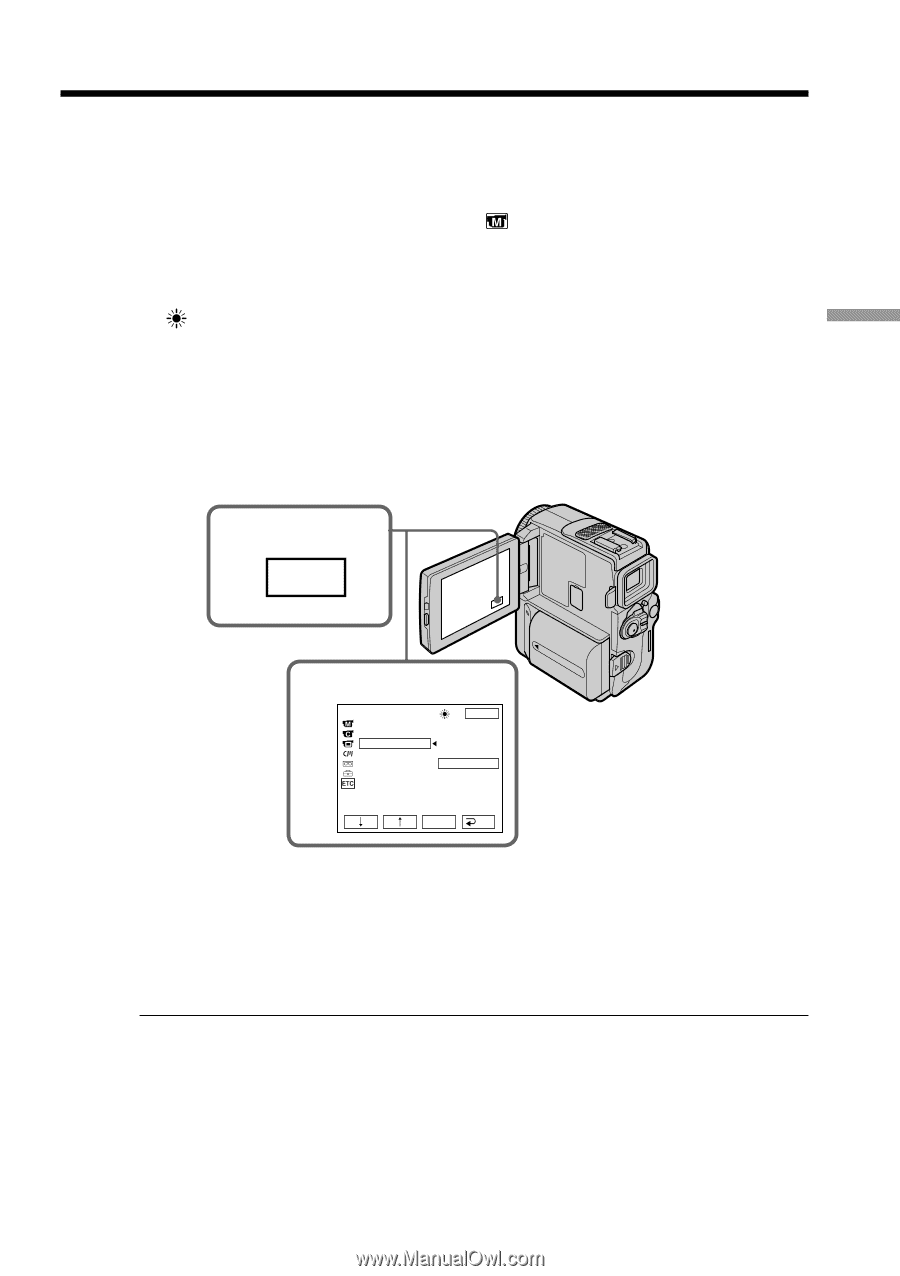
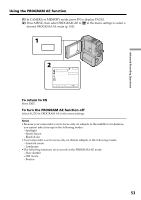
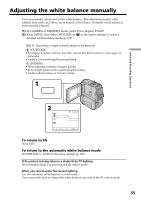
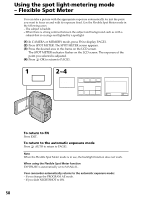
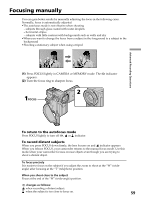
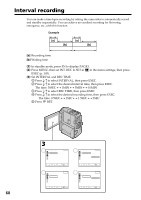
Adjusting the white balance manually You can manually adjust and set the white balance. This adjustment makes white subjects look white and allows more natural color balance. Normally white balance is automatically adjusted. (1) In CAMERA or MEMORY mode, press FN to display PAGE1. (2) Press MENU, then select WHT BAL in in the menu settings to select a desired white balance mode (p. 105). HOLD : Recording a single-colored subject or background (OUTDOOR) : •Recording a sunset/sunrise, just after sunset, just before sunrise, neon signs, or fireworks •Under a color matching fluorescent lamp n (INDOOR) : •When lighting condition changes quickly •In too bright places such as photography studios •Under sodium lamps or mercury lamps 1 FN Advanced Recording Operations 2 MANUAL SET PROGRAM AE P EFFECT WHT BAL AUTO SHTR EXIT AUTO HOLD OUTDOOR INDOOR EXEC RET. To return to FN Press EXIT. To return to the automatic white balance mode Set WHT BAL to AUTO in the menu settings (p. 105). If the picture is being taken in a studio lit by TV lighting We recommend that you record in the n indoor mode. When you record under fluorescent lighting Use the automatic white balance or hold mode. Your camcorder may not adjust the white balance correctly in the n indoor mode. 55
-
 1
1 -
2
-
3
-
4
-
5
-
6
-
7
-
8
-
9
-
10
-
11
-
12
-
13
-
14
-
15
-
16
-
17
-
18
-
19
-
20
-
21
-
22
-
23
-
24
-
25
-
26
-
27
-
28
-
29
-
30
-
31
-
32
-
33
-
34
-
35
-
36
-
37
-
38
-
39
-
40
-
41
-
42
-
43
-
44
-
45
-
46
-
47
-
48
-
49
-
 50
50 -
 51
51 -
 52
52 -
 53
53 -
 54
54 -
 55
55 -
 56
56 -
 57
57 -
 58
58 -
 59
59 -
 60
60 -
61
-
62
-
63
-
64
-
65
-
66
-
67
-
68
-
69
-
70
-
71
-
72
-
73
-
74
-
75
-
76
-
77
-
78
-
79
-
80
-
81
-
82
-
83
-
84
-
85
-
86
-
87
-
88
-
89
-
90
-
91
-
92
-
93
-
94
-
95
-
96
-
97
-
98
-
99
-
100
-
101
-
102
-
103
-
104
-
105
-
106
-
107
-
108
-
109
-
110
-
111
-
112
-
113
-
114
-
115
-
116
-
117
-
118
-
119
-
120
-
121
-
122
-
123
-
124
-
125
-
126
-
127
-
128
-
129
-
130
-
131
-
132
-
133
-
134
-
135
-
136
-
137
-
138
-
139
-
140
-
141
-
142
-
143
-
144
-
145
-
146
-
147
-
148
-
149
-
150
-
151
-
152
-
153
-
154
-
155
-
156
-
157
-
158
-
159
-
160
-
161
-
162
-
163
-
164
-
165
-
166
-
167
-
168
-
169
-
170
-
171
-
172
-
173
-
174
-
175
-
176
-
177
-
178
-
179
-
180
-
181
-
182
-
183
-
184
-
185
-
186
-
187
-
188
-
189
-
190
-
191
-
192
 |
 |