Sony DCR-PC9 Operating Instructions - Page 17
Step 2, Setting the date and time
 |
View all Sony DCR-PC9 manuals
Add to My Manuals
Save this manual to your list of manuals |
Page 17 highlights
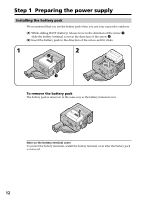
Getting started Step 2 Setting the date and time Set the date and time settings when you use your camcorder for the first time. "CLOCK SET" will be displayed each time that you set the POWER switch to CAMERA or MEMORY unless you set the date and time settings. If you do not use your camcorder for about three months, the date and time settings may be released (bars may appear) because the built-in rechargeable battery installed in your camcorder will have been discharged (p. 177). First, set the year, then the month, the day, the hour and then the minute. (1) Set the POWER switch to CAMERA or MEMORY. (2) Press FN to display PAGE1 (p. 20). (3) Press MENU to display the menu. (4) Select with r/R, and press EXEC. (5) Select CLOCK SET with r/R, and press EXEC. (6) Adjust the desired year with r/R, and press EXEC. (7) Set the month, day and hour with the same procedure as step 6. (8) Set the minute with r/R, and press EXEC by the time signal. The clock starts to move. 2 FN 4R r SETUP MENU CLOCK SET DEMO MODE EXEC EXIT SETUP MENU EXIT CLOCK SET DEMO MODE r R EXEC RET. r R EXEC RET. 5 EXEC SETUP MENU EXIT CLOCK SET DEMO MODE 2001 JAN 1 12 00 AM r R EXEC RET. 6R r EXIT 2001 JAN 1 1 2 00 AM EXEC EXIT 2001 JAN 1 1 2 00 AM 8 R r SETUP MENU EXIT CLOCK SET DEMO MODE 2001 JUL 4 5 30 PM r R EXEC RET. EXEC SETUP MENU EXIT CLOCK SET JUL 4 2001 DEMO MODE 5 : 3 0 : 0 0 PM r R EXEC RET. 17
-
 1
1 -
2
-
3
-
4
-
5
-
6
-
7
-
8
-
9
-
10
-
11
-
 12
12 -
 13
13 -
 14
14 -
 15
15 -
 16
16 -
 17
17 -
 18
18 -
 19
19 -
 20
20 -
 21
21 -
 22
22 -
23
-
24
-
25
-
26
-
27
-
28
-
29
-
30
-
31
-
32
-
33
-
34
-
35
-
36
-
37
-
38
-
39
-
40
-
41
-
42
-
43
-
44
-
45
-
46
-
47
-
48
-
49
-
50
-
51
-
52
-
53
-
54
-
55
-
56
-
57
-
58
-
59
-
60
-
61
-
62
-
63
-
64
-
65
-
66
-
67
-
68
-
69
-
70
-
71
-
72
-
73
-
74
-
75
-
76
-
77
-
78
-
79
-
80
-
81
-
82
-
83
-
84
-
85
-
86
-
87
-
88
-
89
-
90
-
91
-
92
-
93
-
94
-
95
-
96
-
97
-
98
-
99
-
100
-
101
-
102
-
103
-
104
-
105
-
106
-
107
-
108
-
109
-
110
-
111
-
112
-
113
-
114
-
115
-
116
-
117
-
118
-
119
-
120
-
121
-
122
-
123
-
124
-
125
-
126
-
127
-
128
-
129
-
130
-
131
-
132
-
133
-
134
-
135
-
136
-
137
-
138
-
139
-
140
-
141
-
142
-
143
-
144
-
145
-
146
-
147
-
148
-
149
-
150
-
151
-
152
-
153
-
154
-
155
-
156
-
157
-
158
-
159
-
160
-
161
-
162
-
163
-
164
-
165
-
166
-
167
-
168
-
169
-
170
-
171
-
172
-
173
-
174
-
175
-
176
-
177
-
178
-
179
-
180
-
181
-
182
-
183
-
184
-
185
-
186
-
187
-
188
-
189
-
190
-
191
-
192
 |
 |