Sony DCR-PC9 Operating Instructions - Page 177
Charging the built-in rechargeable battery, Ajusting the LCD screen CALIBRATION, Maintenance
 |
View all Sony DCR-PC9 manuals
Add to My Manuals
Save this manual to your list of manuals |
Page 177 highlights
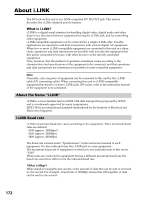
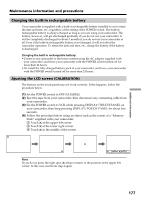
Maintenance information and precautions Charging the built-in rechargeable battery Your camcorder is supplied with a built-in rechargeable battery installed so as to retain the date and time, etc., regardless of the setting of the POWER switch. The built-in rechargeable battery is always charged as long as you are using your camcorder. The battery, however, will get discharged gradually if you do not use your camcorder. It will be completely discharged in about 3 months if you do not use your camcorder at all. Even if the built-in rechargeable battery is not charged, it will not affect the camcorder operation. To retain the date and time, etc., charge the battery if the battery is discharged. Charging the built-in rechargeable battery: •Connect your camcorder to the house current using the AC adaptor supplied with your camcorder, and leave your camcorder with the POWER switch turned off for more than 24 hours. •Or install the fully charged battery pack in your camcorder, and leave your camcorder with the POWER switch turned off for more than 24 hours. Ajusting the LCD screen (CALIBRATION) The buttons on the touch panel may not work correctly. If this happens, follow the procedure below. (1) Set the POWER switch to OFF (CHARGE). (2) Eject the tape from your camcorder, then disconnect any connecting cable from your camcorder. (3) Set the POWER switch to VCR while pressing DISPLAY/TOUCH PANEL on your camcorder, then keep pressing DISPLAY/TOUCH PANEL for about five seconds. (4) Follow the procedure below using an object such as the corner of a "Memory Stick" supplied with your camcorder. 1 Touch at the upper left corner. 2 Touch at the lower right corner. 3 Touch in the middle of the screen. CALIBRATE CALIBRATE CALIBRATE END Note If you do not press the right spot, always returns to the position at the upper left corner. In this case, start from step 4 again. Additional Information 177
-
 1
1 -
2
-
3
-
4
-
5
-
6
-
7
-
8
-
9
-
10
-
11
-
12
-
13
-
14
-
15
-
16
-
17
-
18
-
19
-
20
-
21
-
22
-
23
-
24
-
25
-
26
-
27
-
28
-
29
-
30
-
31
-
32
-
33
-
34
-
35
-
36
-
37
-
38
-
39
-
40
-
41
-
42
-
43
-
44
-
45
-
46
-
47
-
48
-
49
-
50
-
51
-
52
-
53
-
54
-
55
-
56
-
57
-
58
-
59
-
60
-
61
-
62
-
63
-
64
-
65
-
66
-
67
-
68
-
69
-
70
-
71
-
72
-
73
-
74
-
75
-
76
-
77
-
78
-
79
-
80
-
81
-
82
-
83
-
84
-
85
-
86
-
87
-
88
-
89
-
90
-
91
-
92
-
93
-
94
-
95
-
96
-
97
-
98
-
99
-
100
-
101
-
102
-
103
-
104
-
105
-
106
-
107
-
108
-
109
-
110
-
111
-
112
-
113
-
114
-
115
-
116
-
117
-
118
-
119
-
120
-
121
-
122
-
123
-
124
-
125
-
126
-
127
-
128
-
129
-
130
-
131
-
132
-
133
-
134
-
135
-
136
-
137
-
138
-
139
-
140
-
141
-
142
-
143
-
144
-
145
-
146
-
147
-
148
-
149
-
150
-
151
-
152
-
153
-
154
-
155
-
156
-
157
-
158
-
159
-
160
-
161
-
162
-
163
-
164
-
165
-
166
-
167
-
168
-
169
-
170
-
171
-
 172
172 -
 173
173 -
 174
174 -
 175
175 -
 176
176 -
 177
177 -
 178
178 -
 179
179 -
 180
180 -
 181
181 -
 182
182 -
183
-
184
-
185
-
186
-
187
-
188
-
189
-
190
-
191
-
192
 |
 |