Toshiba Tecra A2-S239 Maintenance Manual - Page 228
cooling fin, CPU holder, screws, Applying Silicon Grease
 |
View all Toshiba Tecra A2-S239 manuals
Add to My Manuals
Save this manual to your list of manuals |
Page 228 highlights
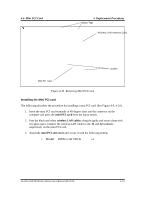
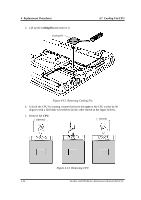
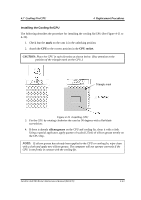
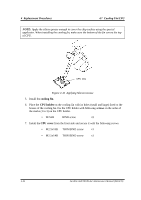
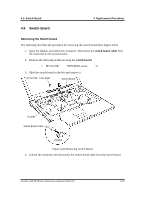
4 Replacement Procedures 4.7 Cooling Fin/CPU NOTE: Apply the silicon grease enough to cover the chip surface using the special applicator. When installing the cooling fin, make sure the bottom of the fin covers the top of CPU. CPU Chip Figure 4-16 Applying Silicon Grease 5. Install the cooling fin. 6. Place the CPU holder on the cooling fin with its holes (small and large) fitted to the bosses of the cooling fin. Fix the CPU holder with following screws in the order of the marks (1 to 3) on the CPU holder. • M2x4B BIND screw x3 7. Install the CPU cover from the front side and secure it with the following screws. • M2.5x18B THIN BIND screw x1 • M2.5x14B THIN BIND screw x1 4-24 Satellite A50/TECRA A2 Maintenance Manual (960-478)
-
 1
1 -
2
-
3
-
4
-
5
-
6
-
7
-
8
-
9
-
10
-
11
-
12
-
13
-
14
-
15
-
16
-
17
-
18
-
19
-
20
-
21
-
22
-
23
-
24
-
25
-
26
-
27
-
28
-
29
-
30
-
31
-
32
-
33
-
34
-
35
-
36
-
37
-
38
-
39
-
40
-
41
-
42
-
43
-
44
-
45
-
46
-
47
-
48
-
49
-
50
-
51
-
52
-
53
-
54
-
55
-
56
-
57
-
58
-
59
-
60
-
61
-
62
-
63
-
64
-
65
-
66
-
67
-
68
-
69
-
70
-
71
-
72
-
73
-
74
-
75
-
76
-
77
-
78
-
79
-
80
-
81
-
82
-
83
-
84
-
85
-
86
-
87
-
88
-
89
-
90
-
91
-
92
-
93
-
94
-
95
-
96
-
97
-
98
-
99
-
100
-
101
-
102
-
103
-
104
-
105
-
106
-
107
-
108
-
109
-
110
-
111
-
112
-
113
-
114
-
115
-
116
-
117
-
118
-
119
-
120
-
121
-
122
-
123
-
124
-
125
-
126
-
127
-
128
-
129
-
130
-
131
-
132
-
133
-
134
-
135
-
136
-
137
-
138
-
139
-
140
-
141
-
142
-
143
-
144
-
145
-
146
-
147
-
148
-
149
-
150
-
151
-
152
-
153
-
154
-
155
-
156
-
157
-
158
-
159
-
160
-
161
-
162
-
163
-
164
-
165
-
166
-
167
-
168
-
169
-
170
-
171
-
172
-
173
-
174
-
175
-
176
-
177
-
178
-
179
-
180
-
181
-
182
-
183
-
184
-
185
-
186
-
187
-
188
-
189
-
190
-
191
-
192
-
193
-
194
-
195
-
196
-
197
-
198
-
199
-
200
-
201
-
202
-
203
-
204
-
205
-
206
-
207
-
208
-
209
-
210
-
211
-
212
-
213
-
214
-
215
-
216
-
217
-
218
-
219
-
220
-
221
-
222
-
 223
223 -
 224
224 -
 225
225 -
 226
226 -
 227
227 -
 228
228 -
 229
229 -
 230
230 -
 231
231 -
 232
232 -
 233
233 -
234
-
235
-
236
-
237
-
238
-
239
-
240
-
241
-
242
-
243
-
244
-
245
-
246
-
247
-
248
-
249
-
250
-
251
-
252
-
253
-
254
-
255
-
256
-
257
-
258
-
259
-
260
-
261
-
262
-
263
-
264
-
265
-
266
-
267
-
268
-
269
-
270
-
271
-
272
-
273
-
274
-
275
-
276
-
277
-
278
-
279
-
280
-
281
-
282
-
283
-
284
-
285
-
286
-
287
-
288
-
289
-
290
-
291
-
292
-
293
-
294
-
295
-
296
-
297
-
298
-
299
-
300
-
301
-
302
-
303
-
304
-
305
-
306
-
307
-
308
-
309
-
310
-
311
-
312
-
313
-
314
-
315
-
316
-
317
-
318
-
319
-
320
-
321
-
322
-
323
-
324
-
325
-
326
-
327
-
328
-
329
-
330
-
331
-
332
-
333
-
334
-
335
-
336
-
337
-
338
 |
 |
4
Replacement Procedures
4.7
Cooling Fin/CPU
4-24
Satellite A50/TECRA A2
Maintenance Manual (960-478)
NOTE:
Apply the silicon grease enough to cover the chip surface using the special
applicator. When installing the cooling fin, make sure the bottom of the fin covers the top
of CPU.
Figure 4-16
Applying Silicon Grease
5.
Install the
cooling fin
.
6.
Place the
CPU holder
on the cooling fin with its holes (small and large) fitted to the
bosses of the cooling fin. Fix the CPU holder with following
screws
in the order of
the marks (1 to 3) on the CPU holder.
•
M2x4B
BIND screw
x3
7.
Install the
CPU cover
from the front side and secure it with the following screws.
•
M2.5x18B
THIN BIND screw
x1
•
M2.5x14B
THIN BIND screw
x1
CPU Chip