Yamaha RX-V3900BL Owner's Manual - Page 102
I/O Assignment, Input/output assignment, Input Rename Input rename, Display Set Display settings
 |
UPC - 705105565903
View all Yamaha RX-V3900BL manuals
Add to My Manuals
Save this manual to your list of manuals |
Page 102 highlights
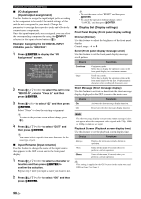
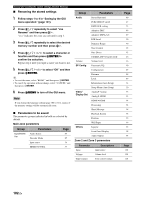
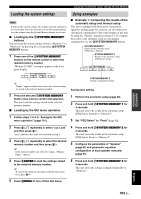
Graphical user interface (GUI) menu ■ I/O Assignment (Input/output assignment) Use this feature to assign the input/output jacks according to the component to be used if the initial settings of this unit do not correspond to your needs. Change the parameter to reassign the respective jacks and effectively connect more components. Once the input/output jacks are reassigned, you can select the corresponding component by using the CINPUT selector (or the input selector buttons (3)). Example: Assigning the CD DIGITAL INPUT COAXIAL jack to "MD/CD-R". 1 Press 9ENTER to display the "I/O Assignment" screen. Coax Opt Opt Comp HDMI In In Out In In PHONO CD 1 TV 4 EXIT MD/CD-R 8 BD/HD DVD 5 A IN 1 DVD 2 6 B IN 2 2 Press 9k / n /l / h to select the cell in row "MD/CD-R", column "Coax In" and then press 9ENTER. 3 Press 9l / h to select "1" and then press 9 ENTER. Select "None" to clear the existing assignment. y To return to the previous screen without change, press 9 k. 4 Press 9k / n /l / h to select "EXIT" and then press 9ENTER. y You cannot select a specific item more than once for the same type of jack. ■ Input Rename (Input rename) Use this feature to change the name of the input source that appears in the GUI screen and in the front panel display. 1 Press 9k / n /l / h to select a character or function and then press 9ENTER to confirm the selection. Repeat step 1 until you input a name you want to use. y • To reset the name, select "RESET" and then press 9 ENTER. • To cancel the operation without change, select "CANCEL" and then press 9ENTER. ■ Display Set (Display settings) Front Panel Display (Front panel display setting) Dimmer (Dimmer) Use this feature to adjust the brightness of the front panel display. Control range: -4 to 0 Scroll (Front panel display message scroll) Use this feature to set the front panel display message scroll pattern. Choice Functions Continue Continuous mode. Select this to display the operation status in the front panel display in a continuous manner. Once Scroll-once mode. Select this to display the operation status in the front panel display by the first 14 alphanumeric characters after scrolling all characters once. Short Message (Short message display) Use this feature to activate or deactivate the short message display displayed in the GUI screen in the main zone. Choice Functions On Activates the short message display function. Off Deactivates the short message display function. Note The short message display (except some status messages) does not appear when the component video signals with 720p, 1080i or 1080p resolutions are input. Playback Screen (Playback screen display time) Use this feature to set the playback screen display time. Choice Functions Always Displays the menu unceasingly during an operation. 10sec Turns off the menu 10 seconds after you perform a certain operation. 30sec Turns off the menu 30 seconds after you perform a certain operation. y This setting is applied to the GUI screen in the main zone and OSD in Zone 2 or Zone 3. 2 Press 9k / n /l / h to select "OK" and then press 9ENTER. 98 En
-
 1
1 -
2
-
3
-
4
-
5
-
6
-
7
-
8
-
9
-
10
-
11
-
12
-
13
-
14
-
15
-
16
-
17
-
18
-
19
-
20
-
21
-
22
-
23
-
24
-
25
-
26
-
27
-
28
-
29
-
30
-
31
-
32
-
33
-
34
-
35
-
36
-
37
-
38
-
39
-
40
-
41
-
42
-
43
-
44
-
45
-
46
-
47
-
48
-
49
-
50
-
51
-
52
-
53
-
54
-
55
-
56
-
57
-
58
-
59
-
60
-
61
-
62
-
63
-
64
-
65
-
66
-
67
-
68
-
69
-
70
-
71
-
72
-
73
-
74
-
75
-
76
-
77
-
78
-
79
-
80
-
81
-
82
-
83
-
84
-
85
-
86
-
87
-
88
-
89
-
90
-
91
-
92
-
93
-
94
-
95
-
96
-
 97
97 -
 98
98 -
 99
99 -
 100
100 -
 101
101 -
 102
102 -
 103
103 -
 104
104 -
 105
105 -
 106
106 -
 107
107 -
108
-
109
-
110
-
111
-
112
-
113
-
114
-
115
-
116
-
117
-
118
-
119
-
120
-
121
-
122
-
123
-
124
-
125
-
126
-
127
-
128
-
129
-
130
-
131
-
132
-
133
-
134
-
135
-
136
-
137
-
138
-
139
-
140
-
141
-
142
-
143
-
144
-
145
-
146
-
147
-
148
-
149
-
150
-
151
-
152
-
153
-
154
-
155
-
156
-
157
-
158
-
159
-
160
-
161
-
162
-
163
-
164
-
165
-
166
-
167
-
168
-
169
 |
 |
