Yamaha RX-V3900BL Owner's Manual - Page 36
Error and warning messages, to save the measurement results
 |
UPC - 705105565903
View all Yamaha RX-V3900BL manuals
Add to My Manuals
Save this manual to your list of manuals |
Page 36 highlights
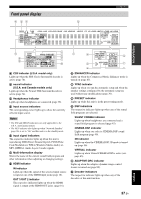
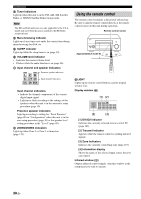
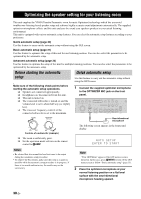
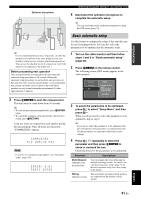
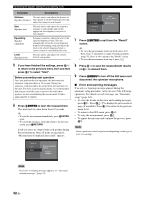
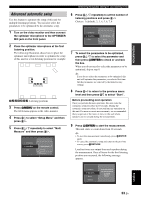
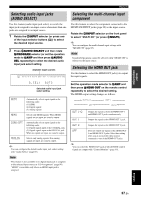
Optimizing the speaker setting for your listening room Parameter Descriptions Distance This unit checks and adjusts the distance of (Speaker distance) each speaker from the listening position and adjusts the timing of each channel. Size (Speaker size) This unit checks and adjusts the frequency response of each speaker and sets the appropriate low-frequency crossover for each channel. Equalizing (Speaker equalizing) Parametric equalizer adjusts the level of the specified frequency bands. This unit automatically selects the crucial frequency bands for the listening room and adjusts the level of the selected frequency bands to create a cohesive sound field in the room. Level (Speaker level) This unit checks and adjusts the volume level of each speaker. 5 If you have finished the settings, press 9l to return to the previous menu level and then press 9n to select "Start". Before proceeding next operation Once you perform the next operation, this unit starts the automatic setup procedure in 10 seconds. During the automatic setup procedure, do not perform any operation on this unit. For more accurate measurements, we recommended that you get out of the room or move to the wall where speakers are not around during the measurement. It takes approximately 3 minutes. 6 Press 9ENTER to start the measurement. This unit starts to count down from 10 seconds. y • To start the measurement immediately, press 9ENTER again. • To cancel the automatic setup and return to the previous screen, press 0RETURN. Loud test tones are output from each speaker during the measurement. Once all items are measured, "Measurement Completed Successful" appears. Pre Check Main Check Wiring Retry Exit Detail E09:User Cancel 7 Press 9ENTER to exit from the "Result" screen. y • To view the measurement results in detail, press 9h. Press 9k / n repeatedly to toggle between parameters (page 35). Press 9l to return to the "Result" screen. • To retry the measurement from step 4, press 9k. 8 Press 9l to save the measurement results or 9h to discard them. 9 Press IMENU to turn off the GUI menu and disconnect the optimizer microphone. ■ Error and warning messages If an error or warning message appears during the automatic setup procedure, carry out one of the following operations. For details on each message, see "Automatic setup" (page 113). • To view the details on the error and warning messages, press 9h. Press 9k / n to display the previous/next page (if available). Press 9l to return to the previous menu level. • To return to the GUI menu, press 9l. • To retry the measurement, press 9k. • To ignore the message and continue the process, press 9 n. Note Some operations cannot be performed depending on the type of error (or warning). Equalizing Level Result Measurement Completed Sucessful Detail:[ ] Exit:ENTER Note If an error or warning message appears, see "Error and warning messages" (page 32). 32 En
-
 1
1 -
2
-
3
-
4
-
5
-
6
-
7
-
8
-
9
-
10
-
11
-
12
-
13
-
14
-
15
-
16
-
17
-
18
-
19
-
20
-
21
-
22
-
23
-
24
-
25
-
26
-
27
-
28
-
29
-
30
-
 31
31 -
 32
32 -
 33
33 -
 34
34 -
 35
35 -
 36
36 -
 37
37 -
 38
38 -
 39
39 -
 40
40 -
 41
41 -
42
-
43
-
44
-
45
-
46
-
47
-
48
-
49
-
50
-
51
-
52
-
53
-
54
-
55
-
56
-
57
-
58
-
59
-
60
-
61
-
62
-
63
-
64
-
65
-
66
-
67
-
68
-
69
-
70
-
71
-
72
-
73
-
74
-
75
-
76
-
77
-
78
-
79
-
80
-
81
-
82
-
83
-
84
-
85
-
86
-
87
-
88
-
89
-
90
-
91
-
92
-
93
-
94
-
95
-
96
-
97
-
98
-
99
-
100
-
101
-
102
-
103
-
104
-
105
-
106
-
107
-
108
-
109
-
110
-
111
-
112
-
113
-
114
-
115
-
116
-
117
-
118
-
119
-
120
-
121
-
122
-
123
-
124
-
125
-
126
-
127
-
128
-
129
-
130
-
131
-
132
-
133
-
134
-
135
-
136
-
137
-
138
-
139
-
140
-
141
-
142
-
143
-
144
-
145
-
146
-
147
-
148
-
149
-
150
-
151
-
152
-
153
-
154
-
155
-
156
-
157
-
158
-
159
-
160
-
161
-
162
-
163
-
164
-
165
-
166
-
167
-
168
-
169
 |
 |