Yamaha RX-V3900BL Owner's Manual - Page 114
SETUP, P-SET, to set the number.
 |
UPC - 705105565903
View all Yamaha RX-V3900BL manuals
Add to My Manuals
Save this manual to your list of manuals |
Page 114 highlights
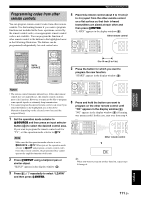
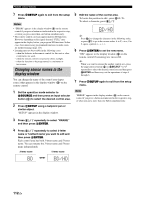
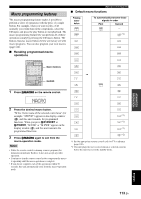
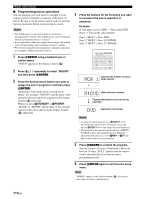
Remote control features 3 Press GSETUP using a ballpoint pen or similar object. "SETUP" appears in the display window (4) on the remote control. SETUP 4 Press 9k / n repeatedly to select "P-SET" and then press 9ENTER. The remote control enters the preset mode. "P-SET" and name of the currently selected control area appears in the display window (4) alternately. P-SET 5 Press an input selector button (3) or 5SELECT l / h repeatedly to select the control area you want to customize. If you selected "TV" in step 2, skip this step. 10 Press 2AV POWER or Ap to confirm whether you can control your component using the remote control. y • If operation is not possible and the manufacturer of your component has more than one code, try each of them until you find the correct one. • If you set "00012" as the remote control code of the selected control area, you can operate the currently selected internal source (DOCK, TUNER, XM, SIRIUS, or USB/NET). Notes • "ERROR" appears in the display window (4) on the remote control if you press a button not indicated in the respective step, or when you press more than one button simultaneously. • The supplied remote control does not contain all possible codes for commercially available audio and video components (including Yamaha components). If operation is not possible with any of the remote control codes, program the new remote control function using the learning feature (page 111) or use the remote control supplied with the component. • Functions programmed using the learning mode take priority over remote control code functions. DVD 6 Press 9ENTER. The current code setting appears. 04306 7 Press the numeric buttons (B) to enter the five-digit remote control code for your component. 8 Press 9ENTER to set the number. "OK" appears in the display window (4) if setting was successful. "NG" appears in the display window (4) if the setting was unsuccessful. In this case, start over from step 5. OK y If you continuously want to set up another code for another control area, repeat steps 5 through 8. 9 Press GSETUP again to exit from the setup menu. 110 En
-
 1
1 -
2
-
3
-
4
-
5
-
6
-
7
-
8
-
9
-
10
-
11
-
12
-
13
-
14
-
15
-
16
-
17
-
18
-
19
-
20
-
21
-
22
-
23
-
24
-
25
-
26
-
27
-
28
-
29
-
30
-
31
-
32
-
33
-
34
-
35
-
36
-
37
-
38
-
39
-
40
-
41
-
42
-
43
-
44
-
45
-
46
-
47
-
48
-
49
-
50
-
51
-
52
-
53
-
54
-
55
-
56
-
57
-
58
-
59
-
60
-
61
-
62
-
63
-
64
-
65
-
66
-
67
-
68
-
69
-
70
-
71
-
72
-
73
-
74
-
75
-
76
-
77
-
78
-
79
-
80
-
81
-
82
-
83
-
84
-
85
-
86
-
87
-
88
-
89
-
90
-
91
-
92
-
93
-
94
-
95
-
96
-
97
-
98
-
99
-
100
-
101
-
102
-
103
-
104
-
105
-
106
-
107
-
108
-
 109
109 -
 110
110 -
 111
111 -
 112
112 -
 113
113 -
 114
114 -
 115
115 -
 116
116 -
 117
117 -
 118
118 -
 119
119 -
120
-
121
-
122
-
123
-
124
-
125
-
126
-
127
-
128
-
129
-
130
-
131
-
132
-
133
-
134
-
135
-
136
-
137
-
138
-
139
-
140
-
141
-
142
-
143
-
144
-
145
-
146
-
147
-
148
-
149
-
150
-
151
-
152
-
153
-
154
-
155
-
156
-
157
-
158
-
159
-
160
-
161
-
162
-
163
-
164
-
165
-
166
-
167
-
168
-
169
 |
 |