Yamaha RX-V3900BL Owner's Manual - Page 112
Customizing the remote control
 |
UPC - 705105565903
View all Yamaha RX-V3900BL manuals
Add to My Manuals
Save this manual to your list of manuals |
Page 112 highlights
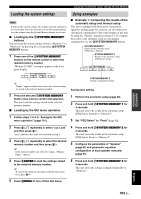
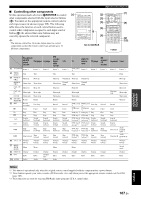
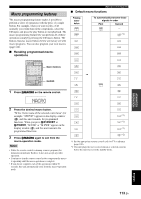
Remote control features ■ Selecting a component to be controlled You can select a component to be controlled independently of the input source selected with the input selector buttons (3). Press 5SELECT l / h repeatedly to select the desired component. The name of the component to be controlled appears in the display window (4) on the remote control. DVD ■ Controlling optional components (Option mode) "OPTN1" and "OPTN2" are optional component control areas that can be programmed with remote control functions independently from any input source. These areas are useful for programming commands that are to be used only as a part of a macro function or for components that do not have a valid remote control code. To select the option mode, press 5SELECT l / h repeatedly until "OPTN1" or "OPTN2" appears in the display window (4) on the remote control. OPTN1 or OPTN2 Note You cannot set a remote control code for the optional areas. See page 111 to program buttons operated within this component control area. Customizing the remote control Use the setup mode of the remote control to customize the remote control. 1 Press GSETUP on the remote control using a ballpoint pen or similar object. "SETUP" appears in the display window on the remote control. 2 Press 9k / n repeatedly to select the desired setup mode. Setup mode SETUP LEARN P-SET RNAME MACRO CLEAR ERASE EX-IR LIGHT Descriptions Page Top setup mode menu. - Learning mode. Use this feature to program codes from other remote controls. 111 Preset mode. Use this feature to change the remote control code of each control area. 109 Renaming mode.Use this feature to change the name of each control area. 112 Macro programming mode.Use this feature to set the macro program. 113 Clearing mode. Use this feature to clear the configurations of this unit. 115 Erase mode. Use this feature to erase the learned functions of each button. 115 Extended IR code mode. This feature is for the authorized custom installers only. - Backlight mode. Use this feature to set the light up mode of the remote control. 109 3 After the configurations, press GSETUP again to exit from the setup menu. Note If you do not complete each of the operations within 30 seconds, this unit automatically exits from the setup menu. 108 En
-
 1
1 -
2
-
3
-
4
-
5
-
6
-
7
-
8
-
9
-
10
-
11
-
12
-
13
-
14
-
15
-
16
-
17
-
18
-
19
-
20
-
21
-
22
-
23
-
24
-
25
-
26
-
27
-
28
-
29
-
30
-
31
-
32
-
33
-
34
-
35
-
36
-
37
-
38
-
39
-
40
-
41
-
42
-
43
-
44
-
45
-
46
-
47
-
48
-
49
-
50
-
51
-
52
-
53
-
54
-
55
-
56
-
57
-
58
-
59
-
60
-
61
-
62
-
63
-
64
-
65
-
66
-
67
-
68
-
69
-
70
-
71
-
72
-
73
-
74
-
75
-
76
-
77
-
78
-
79
-
80
-
81
-
82
-
83
-
84
-
85
-
86
-
87
-
88
-
89
-
90
-
91
-
92
-
93
-
94
-
95
-
96
-
97
-
98
-
99
-
100
-
101
-
102
-
103
-
104
-
105
-
106
-
 107
107 -
 108
108 -
 109
109 -
 110
110 -
 111
111 -
 112
112 -
 113
113 -
 114
114 -
 115
115 -
 116
116 -
 117
117 -
118
-
119
-
120
-
121
-
122
-
123
-
124
-
125
-
126
-
127
-
128
-
129
-
130
-
131
-
132
-
133
-
134
-
135
-
136
-
137
-
138
-
139
-
140
-
141
-
142
-
143
-
144
-
145
-
146
-
147
-
148
-
149
-
150
-
151
-
152
-
153
-
154
-
155
-
156
-
157
-
158
-
159
-
160
-
161
-
162
-
163
-
164
-
165
-
166
-
167
-
168
-
169
 |
 |