Yamaha RX-V3900BL Owner's Manual - Page 18
Connecting the speaker cable, Connecting the banana plug, Except U.K., Europe, Asia and Korea, models
 |
UPC - 705105565903
View all Yamaha RX-V3900BL manuals
Add to My Manuals
Save this manual to your list of manuals |
Page 18 highlights
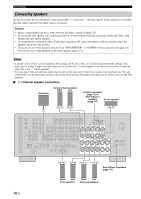
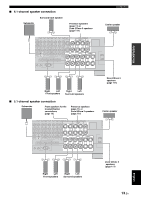
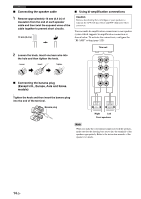
Connections ■ Connecting the speaker cable 1 Remove approximately 10 mm (0.4 in) of insulation from the end of each speaker cable and then twist the exposed wires of the cable together to prevent short circuits. 10 mm (0.4 in) ■ Using bi-amplification connections Caution Remove the shorting bars or bridges of your speakers to separate the LPF (low pass filter) and HPF (high pass filter) crossovers. You can make bi-amplification connections to one speaker system which supports bi-amplification connection as shown below. To activate the connections, configure the "BI-AMP" setting (page 122). This unit 2 Loosen the knob, insert one bare wire into the hole and then tighten the knob. Loosen Insert Tighten SURROUND BACK/BI-AMP R L + SINGLE FRONT R L + ■ Connecting the banana plug (Except U.K., Europe, Asia and Korea models) Tighten the knob and then insert the banana plug into the end of the terminal. Banana plug Right Left Front speakers Note When you make the conventional connection with the speakers, make sure that the shorting bars are put into the terminals of the speakers appropriately. Refer to the instruction manuals of the speakers for details. 14 En
-
 1
1 -
2
-
3
-
4
-
5
-
6
-
7
-
8
-
9
-
10
-
11
-
12
-
 13
13 -
 14
14 -
 15
15 -
 16
16 -
 17
17 -
 18
18 -
 19
19 -
 20
20 -
 21
21 -
 22
22 -
 23
23 -
24
-
25
-
26
-
27
-
28
-
29
-
30
-
31
-
32
-
33
-
34
-
35
-
36
-
37
-
38
-
39
-
40
-
41
-
42
-
43
-
44
-
45
-
46
-
47
-
48
-
49
-
50
-
51
-
52
-
53
-
54
-
55
-
56
-
57
-
58
-
59
-
60
-
61
-
62
-
63
-
64
-
65
-
66
-
67
-
68
-
69
-
70
-
71
-
72
-
73
-
74
-
75
-
76
-
77
-
78
-
79
-
80
-
81
-
82
-
83
-
84
-
85
-
86
-
87
-
88
-
89
-
90
-
91
-
92
-
93
-
94
-
95
-
96
-
97
-
98
-
99
-
100
-
101
-
102
-
103
-
104
-
105
-
106
-
107
-
108
-
109
-
110
-
111
-
112
-
113
-
114
-
115
-
116
-
117
-
118
-
119
-
120
-
121
-
122
-
123
-
124
-
125
-
126
-
127
-
128
-
129
-
130
-
131
-
132
-
133
-
134
-
135
-
136
-
137
-
138
-
139
-
140
-
141
-
142
-
143
-
144
-
145
-
146
-
147
-
148
-
149
-
150
-
151
-
152
-
153
-
154
-
155
-
156
-
157
-
158
-
159
-
160
-
161
-
162
-
163
-
164
-
165
-
166
-
167
-
168
-
169
 |
 |
