Yamaha RX-V3900BL Owner's Manual - Page 40
BASIC OPERATION, Playback, Basic procedure
 |
UPC - 705105565903
View all Yamaha RX-V3900BL manuals
Add to My Manuals
Save this manual to your list of manuals |
Page 40 highlights
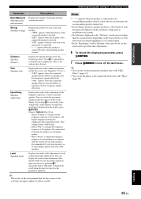
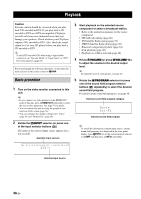
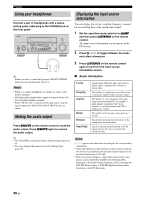
Playback Caution Extreme caution should be exercised when you play back CDs encoded in DTS. If you play back a CD encoded in DTS on a DTS-incompatible CD player, you will only hear some unwanted noise that may damage your speakers. Check whether your CD player supports CDs encoded in DTS. Also, check the sound output level of your CD player before you play back a CD encoded in DTS. y To play DTS-encoded CDs when using a digital audio connection, set "Decoder Mode" in "Input Select" to "DTS" before the playback (page 85). Before performing the following operations, set the operation mode selector on the remote control to FAMP. 3 Start playback on the selected source component or select a broadcast station. • Refer to the instruction manuals for the source component. • FM/AM radio tuning (page 48) • XM Satellite Radio tuning (page 53) • SIRIUS Satellite Radio tuning (page 58) • Bluetooth component playback (page 64) • iPod playback (page 66) • Playback via USB or network (page 68) 4 Rotate PVOLUME (or press JVOLUME +/-) to adjust the volume to the desired output level. y To adjust the level of each speaker, see page 47. Basic procedure 1 Turn on the video monitor connected to this unit. y • If you connect two video monitors to the HDMI OUT jacks of this unit, press RHDMI OUT repeatedly to select the active video monitor(s). See page 37 for details. • You can operate this unit by using the graphical user interface (GUI) screen (page 76). • You can configure the display settings with "Video" (page 93) and "Display Set" (page 98). 5 Rotate the MPROGRAM selector (or press one of the sound field program selector buttons (Q) repeatedly) to select the desired sound field program. For details about sound field program, see page 40. Selected sound field program category Movie Sci-Fi Selected sound field program 2 Rotate the CINPUT selector (or press one of the input selector buttons (3)) The name of the selected input source appears for a few seconds. Available input sources y To switch the information (current input source, current sound field program, etc) displayed in the front panel display, press KINFO (or set the operation mode selector to FAMP and then press CINFO) repeatedly. USB DOCK V-AUX VCR DVR CBL/SAT DVD BD/HD DVD MD/CD-R TV CD PHONO MULTI CH TUNER XM SIRIUS NET DVD Selected input source 36 En
-
 1
1 -
2
-
3
-
4
-
5
-
6
-
7
-
8
-
9
-
10
-
11
-
12
-
13
-
14
-
15
-
16
-
17
-
18
-
19
-
20
-
21
-
22
-
23
-
24
-
25
-
26
-
27
-
28
-
29
-
30
-
31
-
32
-
33
-
34
-
 35
35 -
 36
36 -
 37
37 -
 38
38 -
 39
39 -
 40
40 -
 41
41 -
 42
42 -
 43
43 -
 44
44 -
 45
45 -
46
-
47
-
48
-
49
-
50
-
51
-
52
-
53
-
54
-
55
-
56
-
57
-
58
-
59
-
60
-
61
-
62
-
63
-
64
-
65
-
66
-
67
-
68
-
69
-
70
-
71
-
72
-
73
-
74
-
75
-
76
-
77
-
78
-
79
-
80
-
81
-
82
-
83
-
84
-
85
-
86
-
87
-
88
-
89
-
90
-
91
-
92
-
93
-
94
-
95
-
96
-
97
-
98
-
99
-
100
-
101
-
102
-
103
-
104
-
105
-
106
-
107
-
108
-
109
-
110
-
111
-
112
-
113
-
114
-
115
-
116
-
117
-
118
-
119
-
120
-
121
-
122
-
123
-
124
-
125
-
126
-
127
-
128
-
129
-
130
-
131
-
132
-
133
-
134
-
135
-
136
-
137
-
138
-
139
-
140
-
141
-
142
-
143
-
144
-
145
-
146
-
147
-
148
-
149
-
150
-
151
-
152
-
153
-
154
-
155
-
156
-
157
-
158
-
159
-
160
-
161
-
162
-
163
-
164
-
165
-
166
-
167
-
168
-
169
 |
 |
