3Ware 9550SX-4LP User Guide - Page 114
Rebuild Unit., Migrate Unit., Caution, box are two drop-down menus
 |
UPC - 693494960044
View all 3Ware 9550SX-4LP manuals
Add to My Manuals
Save this manual to your list of manuals |
Page 114 highlights
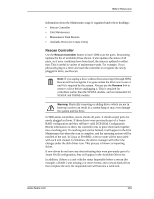
Chapter 6. 3ware Disk Manager (3DM 2) Rebuild Unit. Replaces a degraded drive in a degraded unit with an available drive and begins rebuilding the RAID. When you select a degraded unit and click Rebuild Unit, a dialog box listing available drives appears, so that you can select the drive you want to use. If the degraded unit has more than one degraded drive (for example, a RAID 10 where both mirrored pairs each have a degraded drive), you will repeat this process a second time. If rebuild scheduling is enabled on the Scheduling page, the unit will not start actively rebuilding until the scheduled time, and the status will change to say "Rebuild-Paused." (The Unit Details page indicates whether a unit is actively rebuilding.) If rebuild scheduling is not enabled, the rebuild process will begin right away. For more information about rebuilds, see "About Rebuilds" on page 180. Migrate Unit. Reconfigures a unit while it is on-line. Migration can be used to change only the RAID level, to expand the capacity by adding additional drives, or to change the stripe size. Caution: Once migration of a unit is started, it cannot be cancelled. When you select a unit and click Migrate Unit, a dialog box appears which lists the drives in the unit and any additional available drives. In the dialog box are two drop-down menus, one for choosing the RAID level and one for choosing stripe size. You can only migrate a unit to a RAID level that will be larger than the original unit. For example, you can migrate from a RAID 5 array with 4 drives to a RAID 0 with four drives but you cannot migrate from a RAID 5 with four drives to a RAID 10 with four drives. After you have specified changes to the unit, the Unit Maintenance screen reflects your changes and shows the percentage of migration completed. While the unit is migrating, you can still access the unit as normal but the performance will be lower. You can adjust the I/O rate with the radio buttons on the Controller Settings page. For more information, see "About Migration" on page 182. 104 3ware Serial ATA RAID Controller User Guide
-
 1
1 -
2
-
3
-
4
-
5
-
6
-
7
-
8
-
9
-
10
-
11
-
12
-
13
-
14
-
15
-
16
-
17
-
18
-
19
-
20
-
21
-
22
-
23
-
24
-
25
-
26
-
27
-
28
-
29
-
30
-
31
-
32
-
33
-
34
-
35
-
36
-
37
-
38
-
39
-
40
-
41
-
42
-
43
-
44
-
45
-
46
-
47
-
48
-
49
-
50
-
51
-
52
-
53
-
54
-
55
-
56
-
57
-
58
-
59
-
60
-
61
-
62
-
63
-
64
-
65
-
66
-
67
-
68
-
69
-
70
-
71
-
72
-
73
-
74
-
75
-
76
-
77
-
78
-
79
-
80
-
81
-
82
-
83
-
84
-
85
-
86
-
87
-
88
-
89
-
90
-
91
-
92
-
93
-
94
-
95
-
96
-
97
-
98
-
99
-
100
-
101
-
102
-
103
-
104
-
105
-
106
-
107
-
108
-
 109
109 -
 110
110 -
 111
111 -
 112
112 -
 113
113 -
 114
114 -
 115
115 -
 116
116 -
 117
117 -
 118
118 -
 119
119 -
120
-
121
-
122
-
123
-
124
-
125
-
126
-
127
-
128
-
129
-
130
-
131
-
132
-
133
-
134
-
135
-
136
-
137
-
138
-
139
-
140
-
141
-
142
-
143
-
144
-
145
-
146
-
147
-
148
-
149
-
150
-
151
-
152
-
153
-
154
-
155
-
156
-
157
-
158
-
159
-
160
-
161
-
162
-
163
-
164
-
165
-
166
-
167
-
168
-
169
-
170
-
171
-
172
-
173
-
174
-
175
-
176
-
177
-
178
-
179
-
180
-
181
-
182
-
183
-
184
-
185
-
186
-
187
-
188
-
189
-
190
-
191
-
192
-
193
-
194
-
195
-
196
-
197
-
198
-
199
-
200
-
201
-
202
-
203
-
204
-
205
-
206
-
207
-
208
-
209
-
210
-
211
-
212
-
213
-
214
-
215
-
216
-
217
-
218
-
219
-
220
-
221
-
222
-
223
-
224
-
225
-
226
-
227
-
228
-
229
-
230
-
231
-
232
-
233
-
234
-
235
-
236
-
237
-
238
-
239
-
240
-
241
-
242
-
243
-
244
-
245
-
246
-
247
-
248
-
249
-
250
-
251
-
252
-
253
-
254
-
255
-
256
-
257
-
258
-
259
-
260
-
261
-
262
-
263
-
264
-
265
-
266
-
267
-
268
-
269
-
270
-
271
-
272
 |
 |