3Ware 9550SX-4LP User Guide - Page 134
Enabling and Setting Up Staggered Spin-up, To set the carve size in CLI
 |
UPC - 693494960044
View all 3Ware 9550SX-4LP manuals
Add to My Manuals
Save this manual to your list of manuals |
Page 134 highlights
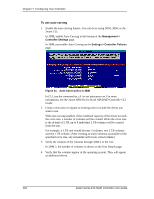
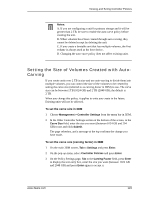
Chapter 7. Configuring Your Controller 4 Tab to OK and press Enter to select it. The policy is enabled immediately. To set the carve size in CLI • Using the 3ware CLI, use the command /cx set carvesize to specify the size for volumes The size can be between 1024 Gb and 2048 Gb For more information, see the 3ware 9000 Series Serial ATA RAID Controller CLI Guide. Enabling and Setting Up Staggered Spin-up Three policy settings let you set the number of drives that will spin up at the same time and set the delay between drive groups that spin up at one time. Not all drives support staggered spinup. If you enable staggered spinup and have drives that do not support it, the setting will be ignored. You can change these setting in 3BM or using the CLI. Note: Some hard drives require that the power management jumper (PM2) be set to enable staggered spinup, in order for the SATA OOB option to be used. For more information, see the knowledgebase article 14889, at http://www.3ware.com/KB/ article.aspx?id=14889 To enable or disable spinup and set the delay between spinups 1 At the main 3BM screen, Tab to Policy and press Enter. 2 On the Policy Control screen, Tab through these fields, making the choices you want to use: • Number of Drives Per Spinup: Select the number of drives-from 1 to 4, 8, or 12, depending on the number of ports on the controller. • Delay between spinup: Select the number of seconds-from 1 to 6. • Staggered Method: Select either ATA-6 or SATA OOB as the type of staggered spinup you want to use. For staggering to work correctly, the drives must support the selected method. Check the documentation for the drive to see which method is supported. 3 Tab to the OK button and press Enter. You will notice a short delay as 3BM makes the policy changes. 124 3ware Serial ATA RAID Controller User Guide
-
 1
1 -
2
-
3
-
4
-
5
-
6
-
7
-
8
-
9
-
10
-
11
-
12
-
13
-
14
-
15
-
16
-
17
-
18
-
19
-
20
-
21
-
22
-
23
-
24
-
25
-
26
-
27
-
28
-
29
-
30
-
31
-
32
-
33
-
34
-
35
-
36
-
37
-
38
-
39
-
40
-
41
-
42
-
43
-
44
-
45
-
46
-
47
-
48
-
49
-
50
-
51
-
52
-
53
-
54
-
55
-
56
-
57
-
58
-
59
-
60
-
61
-
62
-
63
-
64
-
65
-
66
-
67
-
68
-
69
-
70
-
71
-
72
-
73
-
74
-
75
-
76
-
77
-
78
-
79
-
80
-
81
-
82
-
83
-
84
-
85
-
86
-
87
-
88
-
89
-
90
-
91
-
92
-
93
-
94
-
95
-
96
-
97
-
98
-
99
-
100
-
101
-
102
-
103
-
104
-
105
-
106
-
107
-
108
-
109
-
110
-
111
-
112
-
113
-
114
-
115
-
116
-
117
-
118
-
119
-
120
-
121
-
122
-
123
-
124
-
125
-
126
-
127
-
128
-
 129
129 -
 130
130 -
 131
131 -
 132
132 -
 133
133 -
 134
134 -
 135
135 -
 136
136 -
 137
137 -
 138
138 -
 139
139 -
140
-
141
-
142
-
143
-
144
-
145
-
146
-
147
-
148
-
149
-
150
-
151
-
152
-
153
-
154
-
155
-
156
-
157
-
158
-
159
-
160
-
161
-
162
-
163
-
164
-
165
-
166
-
167
-
168
-
169
-
170
-
171
-
172
-
173
-
174
-
175
-
176
-
177
-
178
-
179
-
180
-
181
-
182
-
183
-
184
-
185
-
186
-
187
-
188
-
189
-
190
-
191
-
192
-
193
-
194
-
195
-
196
-
197
-
198
-
199
-
200
-
201
-
202
-
203
-
204
-
205
-
206
-
207
-
208
-
209
-
210
-
211
-
212
-
213
-
214
-
215
-
216
-
217
-
218
-
219
-
220
-
221
-
222
-
223
-
224
-
225
-
226
-
227
-
228
-
229
-
230
-
231
-
232
-
233
-
234
-
235
-
236
-
237
-
238
-
239
-
240
-
241
-
242
-
243
-
244
-
245
-
246
-
247
-
248
-
249
-
250
-
251
-
252
-
253
-
254
-
255
-
256
-
257
-
258
-
259
-
260
-
261
-
262
-
263
-
264
-
265
-
266
-
267
-
268
-
269
-
270
-
271
-
272
 |
 |