3Ware 9550SX-4LP User Guide - Page 170
Warning, Delete Disk Array, Deleting a Unit in 3BM, Enter, Press F8, Remember
 |
UPC - 693494960044
View all 3Ware 9550SX-4LP manuals
Add to My Manuals
Save this manual to your list of manuals |
Page 170 highlights
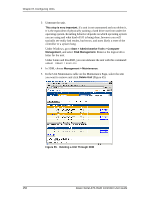
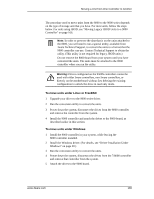
Chapter 8. Configuring Units Warning: Any data on the unit will be lost once the unit is deleted. Backup any data that you want to keep. 3 On the Delete Disk Array screen, review the information about the unit to make sure it is the one you want to delete. Figure 67. Deleting a Unit in 3BM 4 Tab to the OK button and press Enter. You return to the main 3BM screen, and the drives associated with the unit now appear in the list of Available Drives. Remember: The unit is not actually deleted and no data is overwritten until you press the F8 key to save your changes, or press Esc and select Yes when asked if you want to save. 5 Press F8 to save your changes, or press Esc and then Yes. 160 3ware Serial ATA RAID Controller User Guide
-
 1
1 -
2
-
3
-
4
-
5
-
6
-
7
-
8
-
9
-
10
-
11
-
12
-
13
-
14
-
15
-
16
-
17
-
18
-
19
-
20
-
21
-
22
-
23
-
24
-
25
-
26
-
27
-
28
-
29
-
30
-
31
-
32
-
33
-
34
-
35
-
36
-
37
-
38
-
39
-
40
-
41
-
42
-
43
-
44
-
45
-
46
-
47
-
48
-
49
-
50
-
51
-
52
-
53
-
54
-
55
-
56
-
57
-
58
-
59
-
60
-
61
-
62
-
63
-
64
-
65
-
66
-
67
-
68
-
69
-
70
-
71
-
72
-
73
-
74
-
75
-
76
-
77
-
78
-
79
-
80
-
81
-
82
-
83
-
84
-
85
-
86
-
87
-
88
-
89
-
90
-
91
-
92
-
93
-
94
-
95
-
96
-
97
-
98
-
99
-
100
-
101
-
102
-
103
-
104
-
105
-
106
-
107
-
108
-
109
-
110
-
111
-
112
-
113
-
114
-
115
-
116
-
117
-
118
-
119
-
120
-
121
-
122
-
123
-
124
-
125
-
126
-
127
-
128
-
129
-
130
-
131
-
132
-
133
-
134
-
135
-
136
-
137
-
138
-
139
-
140
-
141
-
142
-
143
-
144
-
145
-
146
-
147
-
148
-
149
-
150
-
151
-
152
-
153
-
154
-
155
-
156
-
157
-
158
-
159
-
160
-
161
-
162
-
163
-
164
-
 165
165 -
 166
166 -
 167
167 -
 168
168 -
 169
169 -
 170
170 -
 171
171 -
 172
172 -
 173
173 -
 174
174 -
 175
175 -
176
-
177
-
178
-
179
-
180
-
181
-
182
-
183
-
184
-
185
-
186
-
187
-
188
-
189
-
190
-
191
-
192
-
193
-
194
-
195
-
196
-
197
-
198
-
199
-
200
-
201
-
202
-
203
-
204
-
205
-
206
-
207
-
208
-
209
-
210
-
211
-
212
-
213
-
214
-
215
-
216
-
217
-
218
-
219
-
220
-
221
-
222
-
223
-
224
-
225
-
226
-
227
-
228
-
229
-
230
-
231
-
232
-
233
-
234
-
235
-
236
-
237
-
238
-
239
-
240
-
241
-
242
-
243
-
244
-
245
-
246
-
247
-
248
-
249
-
250
-
251
-
252
-
253
-
254
-
255
-
256
-
257
-
258
-
259
-
260
-
261
-
262
-
263
-
264
-
265
-
266
-
267
-
268
-
269
-
270
-
271
-
272
 |
 |

Chapter 8. Configuring Units
160
3ware Serial ATA RAID Controller User Guide
Warning:
Any data on the unit will be lost once the unit is
deleted. Backup any data that you want to keep.
3
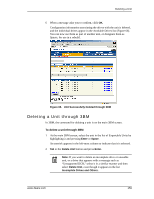
On the
Delete Disk Array
screen, review the information about the unit to
make sure it is the one you want to delete.
Figure 67.
Deleting a Unit in 3BM
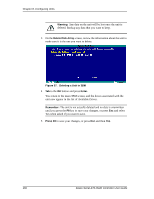
4
Tab
to the
OK
button and press
Enter
.
You return to the main 3BM screen, and the drives associated with the
unit now appear in the list of Available Drives.
Remember:
The unit is not actually deleted and no data is overwritten
until you press the
F8
key to save your changes, or press
Esc
and select
Yes when asked if you want to save.
5
Press F8
to save your changes, or press
Esc
and then
Yes
.