3Ware 9550SX-4LP User Guide - Page 165
Informing the Operating System of Changed Configuration
 |
UPC - 693494960044
View all 3Ware 9550SX-4LP manuals
Add to My Manuals
Save this manual to your list of manuals |
Page 165 highlights
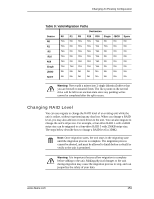
Changing An Existing Configuration 3 Click the Migrate Unit button. The Migrate dialog box appears, listing the drives which can be added to the unit. 4 Select the drives(s) you wish to add to the unit by checking the Port ID box next to each one. 5 If desired or necessary, select the appropriate RAID level. 6 Click OK. The Maintenance page updates to show the newly reconfigured unit. The Status column title indicates that Migration is in progress. 7 If you booted from the unit that is being migrated, when migration is complete, reboot your system. Then turn to Step 4 under "Informing the Operating System of Changed Configuration" on page 155. 8 Inform the operating system of the change, as described below. Note: You can also perform these steps using the CLI. For more information, see the 3ware 9000 Series Serial ATA RAID Controller CLI Guide. Informing the Operating System of Changed Configuration After you change the configuration of a unit, you must inform the operating system of the change, and you may need to re-partition the unit. Resizing the file system to match the new partition size is not automatic. It may be necessary to expand the file-system using tools specific to your operating system. In addition, in order to use the new capacity, you need to either resize the existing partition or add a new partition. Note: This step can only be done after the system has completed the migration or online capacity process. The operating system will not see the capacity until that process is complete. www.3ware.com 155
-
 1
1 -
2
-
3
-
4
-
5
-
6
-
7
-
8
-
9
-
10
-
11
-
12
-
13
-
14
-
15
-
16
-
17
-
18
-
19
-
20
-
21
-
22
-
23
-
24
-
25
-
26
-
27
-
28
-
29
-
30
-
31
-
32
-
33
-
34
-
35
-
36
-
37
-
38
-
39
-
40
-
41
-
42
-
43
-
44
-
45
-
46
-
47
-
48
-
49
-
50
-
51
-
52
-
53
-
54
-
55
-
56
-
57
-
58
-
59
-
60
-
61
-
62
-
63
-
64
-
65
-
66
-
67
-
68
-
69
-
70
-
71
-
72
-
73
-
74
-
75
-
76
-
77
-
78
-
79
-
80
-
81
-
82
-
83
-
84
-
85
-
86
-
87
-
88
-
89
-
90
-
91
-
92
-
93
-
94
-
95
-
96
-
97
-
98
-
99
-
100
-
101
-
102
-
103
-
104
-
105
-
106
-
107
-
108
-
109
-
110
-
111
-
112
-
113
-
114
-
115
-
116
-
117
-
118
-
119
-
120
-
121
-
122
-
123
-
124
-
125
-
126
-
127
-
128
-
129
-
130
-
131
-
132
-
133
-
134
-
135
-
136
-
137
-
138
-
139
-
140
-
141
-
142
-
143
-
144
-
145
-
146
-
147
-
148
-
149
-
150
-
151
-
152
-
153
-
154
-
155
-
156
-
157
-
158
-
159
-
 160
160 -
 161
161 -
 162
162 -
 163
163 -
 164
164 -
 165
165 -
 166
166 -
 167
167 -
 168
168 -
 169
169 -
 170
170 -
171
-
172
-
173
-
174
-
175
-
176
-
177
-
178
-
179
-
180
-
181
-
182
-
183
-
184
-
185
-
186
-
187
-
188
-
189
-
190
-
191
-
192
-
193
-
194
-
195
-
196
-
197
-
198
-
199
-
200
-
201
-
202
-
203
-
204
-
205
-
206
-
207
-
208
-
209
-
210
-
211
-
212
-
213
-
214
-
215
-
216
-
217
-
218
-
219
-
220
-
221
-
222
-
223
-
224
-
225
-
226
-
227
-
228
-
229
-
230
-
231
-
232
-
233
-
234
-
235
-
236
-
237
-
238
-
239
-
240
-
241
-
242
-
243
-
244
-
245
-
246
-
247
-
248
-
249
-
250
-
251
-
252
-
253
-
254
-
255
-
256
-
257
-
258
-
259
-
260
-
261
-
262
-
263
-
264
-
265
-
266
-
267
-
268
-
269
-
270
-
271
-
272
 |
 |