3Ware 9550SX-4LP User Guide - Page 140
Boot volume size, Creating a Unit through 3DM
 |
UPC - 693494960044
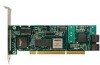
View all 3Ware 9550SX-4LP manuals
Add to My Manuals
Save this manual to your list of manuals |
Page 140 highlights
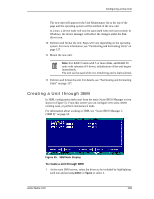
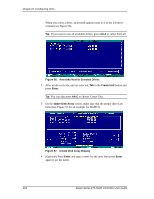
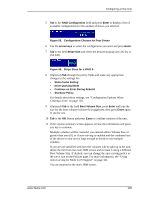
Chapter 8. Configuring Units • StorSave Profile (Protection, by default) Available only for 9550SX and 9590SE controllers. The particular policies that you can adjust when you create the unit vary, depending on which program you are using: 3DM, 3BM, or the CLI. • In 3DM and using the CLI, you can enable/disable write cache, enable Auto-Verify, and specify whether to continue on source error • In 3BM, you can specify all policies except Auto-Verify You can change all of these policies after the unit has been created. For a summary of what these policies do, see the discussion under "Setting Unit Policies" on page 142. For how to adjust each one, see the procedures later in this chapter. Boot volume size When you create a unit through 3BM, you can create a special volume to function as the boot volume. You specify the size you want this volume to be. This is useful if you will be installing an operating system onto the unit, and want it to be installed in one volume and have a separate volume for data. This is an optional feature. You do not have to create a boot volume if you plan to install the operating system on the unit. If you are creating a very large unit (2 TB or greater) and have enabled the Auto-Carving policy, the boot volume will be created in addition to any volumes created through auto-carving. For more information about autocarving, see "Using Auto-Carving for Multi LUN Support" on page 121. This feature is only available on 9550SX and 9590SE controllers, and can only be specified in 3BM. Creating a Unit through 3DM In 3DM, configuration starts from the Maintenance page (Figure 52), where you can configure a new unit, designate an available drive as a hot spare, delete a unit, and remove units or drives. You can also have 3DM rescan the controller, if you have added drives or units. For information about working in 3DM, see "3ware Disk Manager (3DM 2)" on page 65. 130 3ware Serial ATA RAID Controller User Guide
-
 1
1 -
2
-
3
-
4
-
5
-
6
-
7
-
8
-
9
-
10
-
11
-
12
-
13
-
14
-
15
-
16
-
17
-
18
-
19
-
20
-
21
-
22
-
23
-
24
-
25
-
26
-
27
-
28
-
29
-
30
-
31
-
32
-
33
-
34
-
35
-
36
-
37
-
38
-
39
-
40
-
41
-
42
-
43
-
44
-
45
-
46
-
47
-
48
-
49
-
50
-
51
-
52
-
53
-
54
-
55
-
56
-
57
-
58
-
59
-
60
-
61
-
62
-
63
-
64
-
65
-
66
-
67
-
68
-
69
-
70
-
71
-
72
-
73
-
74
-
75
-
76
-
77
-
78
-
79
-
80
-
81
-
82
-
83
-
84
-
85
-
86
-
87
-
88
-
89
-
90
-
91
-
92
-
93
-
94
-
95
-
96
-
97
-
98
-
99
-
100
-
101
-
102
-
103
-
104
-
105
-
106
-
107
-
108
-
109
-
110
-
111
-
112
-
113
-
114
-
115
-
116
-
117
-
118
-
119
-
120
-
121
-
122
-
123
-
124
-
125
-
126
-
127
-
128
-
129
-
130
-
131
-
132
-
133
-
134
-
 135
135 -
 136
136 -
 137
137 -
 138
138 -
 139
139 -
 140
140 -
 141
141 -
 142
142 -
 143
143 -
 144
144 -
 145
145 -
146
-
147
-
148
-
149
-
150
-
151
-
152
-
153
-
154
-
155
-
156
-
157
-
158
-
159
-
160
-
161
-
162
-
163
-
164
-
165
-
166
-
167
-
168
-
169
-
170
-
171
-
172
-
173
-
174
-
175
-
176
-
177
-
178
-
179
-
180
-
181
-
182
-
183
-
184
-
185
-
186
-
187
-
188
-
189
-
190
-
191
-
192
-
193
-
194
-
195
-
196
-
197
-
198
-
199
-
200
-
201
-
202
-
203
-
204
-
205
-
206
-
207
-
208
-
209
-
210
-
211
-
212
-
213
-
214
-
215
-
216
-
217
-
218
-
219
-
220
-
221
-
222
-
223
-
224
-
225
-
226
-
227
-
228
-
229
-
230
-
231
-
232
-
233
-
234
-
235
-
236
-
237
-
238
-
239
-
240
-
241
-
242
-
243
-
244
-
245
-
246
-
247
-
248
-
249
-
250
-
251
-
252
-
253
-
254
-
255
-
256
-
257
-
258
-
259
-
260
-
261
-
262
-
263
-
264
-
265
-
266
-
267
-
268
-
269
-
270
-
271
-
272
 |
 |