3Ware 9550SX-4LP User Guide - Page 204
Cancelling a Rebuild and Restarting It with a Different Drive, Verifying Units, Different Drive
 |
UPC - 693494960044
View all 3Ware 9550SX-4LP manuals
Add to My Manuals
Save this manual to your list of manuals |
Page 204 highlights
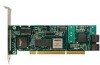
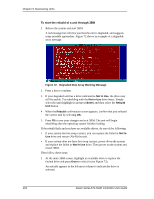
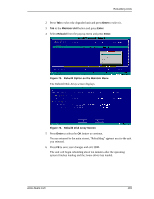
Chapter 9. Maintaining Units Cancelling a Rebuild and Restarting It with a Different Drive When you start a rebuild from 3BM, you cannot cancel from within the 3BM interface. However, if you have hot-swap carriers, you can remove and replace the drive, rescan the controller (Alt-R), and then select a new drive to be used in the rebuild. You can also boot the operating system, launch 3DM, and cancel a rebuild by using the Remove Drive link on the Maintenance page. If you do not have hot-swap carriers and do not want to boot the operating system and launch 3DM, you can also cancel a rebuild by powering down the system, physically removing a drive, and installing another one that you want to use. Then when you start 3BM, the unit will appear as degraded and you can rebuild it, using the steps described under "Rebuilding Units through 3BM" on page 191. Note: If you want to pause the rebuild process through 3DM, you can do so by setting or changing the rebuild schedule on the Scheduling page. If you set a schedule for rebuilds that does not include the current time, the rebuild process will pause. Verifying Units For redundant units, verify checks the redundancy of the unit. For example it will check parity for a RAID 5 or check data consistency for a RAID 1. If the unit you checked is not a redundant unit, verify performs a surface scan of the media. During verification, I/O continues normally, but with a slight performance loss, depending on your verify rate setting. For more details about how verification works, see "About Verification" on page 181. For details about verify rates, see "Setting Background Task Rate" on page 183. For 9000 series controllers, if the verify unit process determines that the mirrored drives are not identical or the parity is not correct, the error is corrected. For RAID 1 and 10, this involves copying the miscompared data from the lower port(s) to the higher port(s) of the mirror. For RAID 5 this involves recalculating and rewriting the RAID 5 parity that was incorrect. AEN 36 ("Verify detected and fixed data/parity mismatch") is posted to the Alarms page. When this occurs for 7000/8000 series controllers, AEN 36 ("Verify detected and fixed data/parity mismatch") is logged and the entire unit is initialized. For RAID 1 and 10, initialization involves copying the data from the lower port(s) to the higher port(s) of the mirror. For RAID 5 this involves recalculating and rewriting the RAID 5 parity for the entire unit. If the unit is 194 3ware Serial ATA RAID Controller User Guide
-
 1
1 -
2
-
3
-
4
-
5
-
6
-
7
-
8
-
9
-
10
-
11
-
12
-
13
-
14
-
15
-
16
-
17
-
18
-
19
-
20
-
21
-
22
-
23
-
24
-
25
-
26
-
27
-
28
-
29
-
30
-
31
-
32
-
33
-
34
-
35
-
36
-
37
-
38
-
39
-
40
-
41
-
42
-
43
-
44
-
45
-
46
-
47
-
48
-
49
-
50
-
51
-
52
-
53
-
54
-
55
-
56
-
57
-
58
-
59
-
60
-
61
-
62
-
63
-
64
-
65
-
66
-
67
-
68
-
69
-
70
-
71
-
72
-
73
-
74
-
75
-
76
-
77
-
78
-
79
-
80
-
81
-
82
-
83
-
84
-
85
-
86
-
87
-
88
-
89
-
90
-
91
-
92
-
93
-
94
-
95
-
96
-
97
-
98
-
99
-
100
-
101
-
102
-
103
-
104
-
105
-
106
-
107
-
108
-
109
-
110
-
111
-
112
-
113
-
114
-
115
-
116
-
117
-
118
-
119
-
120
-
121
-
122
-
123
-
124
-
125
-
126
-
127
-
128
-
129
-
130
-
131
-
132
-
133
-
134
-
135
-
136
-
137
-
138
-
139
-
140
-
141
-
142
-
143
-
144
-
145
-
146
-
147
-
148
-
149
-
150
-
151
-
152
-
153
-
154
-
155
-
156
-
157
-
158
-
159
-
160
-
161
-
162
-
163
-
164
-
165
-
166
-
167
-
168
-
169
-
170
-
171
-
172
-
173
-
174
-
175
-
176
-
177
-
178
-
179
-
180
-
181
-
182
-
183
-
184
-
185
-
186
-
187
-
188
-
189
-
190
-
191
-
192
-
193
-
194
-
195
-
196
-
197
-
198
-
 199
199 -
 200
200 -
 201
201 -
 202
202 -
 203
203 -
 204
204 -
 205
205 -
 206
206 -
 207
207 -
 208
208 -
 209
209 -
210
-
211
-
212
-
213
-
214
-
215
-
216
-
217
-
218
-
219
-
220
-
221
-
222
-
223
-
224
-
225
-
226
-
227
-
228
-
229
-
230
-
231
-
232
-
233
-
234
-
235
-
236
-
237
-
238
-
239
-
240
-
241
-
242
-
243
-
244
-
245
-
246
-
247
-
248
-
249
-
250
-
251
-
252
-
253
-
254
-
255
-
256
-
257
-
258
-
259
-
260
-
261
-
262
-
263
-
264
-
265
-
266
-
267
-
268
-
269
-
270
-
271
-
272
 |
 |