3Ware 9550SX-4LP User Guide - Page 145
Auto-Carving for Multi LUN Support
 |
UPC - 693494960044
View all 3Ware 9550SX-4LP manuals
Add to My Manuals
Save this manual to your list of manuals |
Page 145 highlights
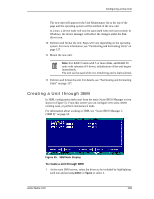
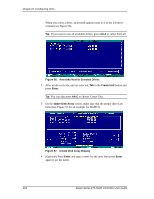
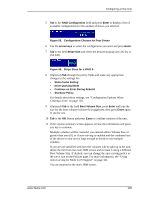
Configuring a New Unit 5 Tab to the RAID Configuration field and press Enter to display a list of available configurations for the number of drives you selected. Figure 58. Configuration Choices for Four Drives 6 Use the arrow keys to select the configuration you want and press Enter. 7 Tab to the field Stripe Size and select the desired striping size (16, 64, or 256 KB). Figure 59. Stripe Sizes for a RAID 5 8 (Optional) Tab through the policy fields and make any appropriate changes to the settings for: • Write Cache Setting • Drive Queuing Mode • Continue on Error During Rebuild • StorSave Policy For details about these settings, see "Configuration Options When Creating a Unit" on page 128. 9 (Optional) Tab to the field Boot Volume Size, press Enter and type the size for the boot volume (volume 0) in gigabytes; then press Enter again to set the size. 10 Tab to the OK button and press Enter to confirm creation of the unit. 11 If the volume summary screen appears, review the information and press any key to continue. Multiple volumes will be created if you entered a Boot Volume Size of greater than zero (0), or if auto-carving is enabled and the combined size of the drives in your unit is large enough to divide it into multiple volumes. If you are not satisified with how the volumes will be split up in the unit, delete the unit from the main 3BM screen and recreate it using a different Boot Volume Size. If desired, you can change the auto-carving policy or the carve size on the Policies page. For more information, see "Using Auto-Carving for Multi LUN Support" on page 121. You are returned to the main 3BM screen. www.3ware.com 135
-
 1
1 -
2
-
3
-
4
-
5
-
6
-
7
-
8
-
9
-
10
-
11
-
12
-
13
-
14
-
15
-
16
-
17
-
18
-
19
-
20
-
21
-
22
-
23
-
24
-
25
-
26
-
27
-
28
-
29
-
30
-
31
-
32
-
33
-
34
-
35
-
36
-
37
-
38
-
39
-
40
-
41
-
42
-
43
-
44
-
45
-
46
-
47
-
48
-
49
-
50
-
51
-
52
-
53
-
54
-
55
-
56
-
57
-
58
-
59
-
60
-
61
-
62
-
63
-
64
-
65
-
66
-
67
-
68
-
69
-
70
-
71
-
72
-
73
-
74
-
75
-
76
-
77
-
78
-
79
-
80
-
81
-
82
-
83
-
84
-
85
-
86
-
87
-
88
-
89
-
90
-
91
-
92
-
93
-
94
-
95
-
96
-
97
-
98
-
99
-
100
-
101
-
102
-
103
-
104
-
105
-
106
-
107
-
108
-
109
-
110
-
111
-
112
-
113
-
114
-
115
-
116
-
117
-
118
-
119
-
120
-
121
-
122
-
123
-
124
-
125
-
126
-
127
-
128
-
129
-
130
-
131
-
132
-
133
-
134
-
135
-
136
-
137
-
138
-
139
-
 140
140 -
 141
141 -
 142
142 -
 143
143 -
 144
144 -
 145
145 -
 146
146 -
 147
147 -
 148
148 -
 149
149 -
 150
150 -
151
-
152
-
153
-
154
-
155
-
156
-
157
-
158
-
159
-
160
-
161
-
162
-
163
-
164
-
165
-
166
-
167
-
168
-
169
-
170
-
171
-
172
-
173
-
174
-
175
-
176
-
177
-
178
-
179
-
180
-
181
-
182
-
183
-
184
-
185
-
186
-
187
-
188
-
189
-
190
-
191
-
192
-
193
-
194
-
195
-
196
-
197
-
198
-
199
-
200
-
201
-
202
-
203
-
204
-
205
-
206
-
207
-
208
-
209
-
210
-
211
-
212
-
213
-
214
-
215
-
216
-
217
-
218
-
219
-
220
-
221
-
222
-
223
-
224
-
225
-
226
-
227
-
228
-
229
-
230
-
231
-
232
-
233
-
234
-
235
-
236
-
237
-
238
-
239
-
240
-
241
-
242
-
243
-
244
-
245
-
246
-
247
-
248
-
249
-
250
-
251
-
252
-
253
-
254
-
255
-
256
-
257
-
258
-
259
-
260
-
261
-
262
-
263
-
264
-
265
-
266
-
267
-
268
-
269
-
270
-
271
-
272
 |
 |
