3Ware 9550SX-4LP User Guide - Page 69
Table 6: Working in 3BM 2, type connected to the controller.
 |
UPC - 693494960044
View all 3Ware 9550SX-4LP manuals
Add to My Manuals
Save this manual to your list of manuals |
Page 69 highlights
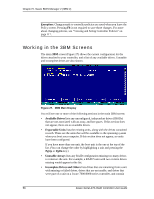
Working in the 3BM Screens data that needs to be updated before your 3ware 9000 series controller can use them. (If you want to move a unit from a 7/8000 controller to the 9000 controller, you must convert the drives first. For more information, see the section "Moving a Unit from One Controller to Another" on page 163.) When some of the drives are remaining from a unit, you can power down and add the missing drives to complete the unit. To use drives that are listed here in other units, you must first delete them. For more information, see "Deleting a Unit" on page 157. If any of the sections are not shown, it means that there are no items of that type connected to the controller. Table 6 lists how to move around and select information in the 3BM screens. When these commands are available in 3BM, they appear at the bottom of the 3BM screen. Table 6: Working in 3BM 2 To do this Move between units or drives in a list, between fields, and between buttons Select (or unselect) what is currently highlighted. Use these keys Up and Down Arrow Keys OR Left and Right Arrow Keys OR Tab and Shift+Tab Enter or the Spacebar A selection may be a drive in a list of drives, a button at the bottom of the screen, or a field in the middle of the screen. In lists, an asterisk appears to the left of selected drives or units Display a drop-down list of available choices in a field Move between choices in a field list Select all available drives In the list of units, expand a selected unit to see any subunits and drives in the unit, or contract it to see only the heading again. (9550SX and 9590SE controllers only) Enter Up and Down Arrow Keys Alt+A Shift+ Shift- www.3ware.com 59
-
 1
1 -
2
-
3
-
4
-
5
-
6
-
7
-
8
-
9
-
10
-
11
-
12
-
13
-
14
-
15
-
16
-
17
-
18
-
19
-
20
-
21
-
22
-
23
-
24
-
25
-
26
-
27
-
28
-
29
-
30
-
31
-
32
-
33
-
34
-
35
-
36
-
37
-
38
-
39
-
40
-
41
-
42
-
43
-
44
-
45
-
46
-
47
-
48
-
49
-
50
-
51
-
52
-
53
-
54
-
55
-
56
-
57
-
58
-
59
-
60
-
61
-
62
-
63
-
 64
64 -
 65
65 -
 66
66 -
 67
67 -
 68
68 -
 69
69 -
 70
70 -
 71
71 -
 72
72 -
 73
73 -
 74
74 -
75
-
76
-
77
-
78
-
79
-
80
-
81
-
82
-
83
-
84
-
85
-
86
-
87
-
88
-
89
-
90
-
91
-
92
-
93
-
94
-
95
-
96
-
97
-
98
-
99
-
100
-
101
-
102
-
103
-
104
-
105
-
106
-
107
-
108
-
109
-
110
-
111
-
112
-
113
-
114
-
115
-
116
-
117
-
118
-
119
-
120
-
121
-
122
-
123
-
124
-
125
-
126
-
127
-
128
-
129
-
130
-
131
-
132
-
133
-
134
-
135
-
136
-
137
-
138
-
139
-
140
-
141
-
142
-
143
-
144
-
145
-
146
-
147
-
148
-
149
-
150
-
151
-
152
-
153
-
154
-
155
-
156
-
157
-
158
-
159
-
160
-
161
-
162
-
163
-
164
-
165
-
166
-
167
-
168
-
169
-
170
-
171
-
172
-
173
-
174
-
175
-
176
-
177
-
178
-
179
-
180
-
181
-
182
-
183
-
184
-
185
-
186
-
187
-
188
-
189
-
190
-
191
-
192
-
193
-
194
-
195
-
196
-
197
-
198
-
199
-
200
-
201
-
202
-
203
-
204
-
205
-
206
-
207
-
208
-
209
-
210
-
211
-
212
-
213
-
214
-
215
-
216
-
217
-
218
-
219
-
220
-
221
-
222
-
223
-
224
-
225
-
226
-
227
-
228
-
229
-
230
-
231
-
232
-
233
-
234
-
235
-
236
-
237
-
238
-
239
-
240
-
241
-
242
-
243
-
244
-
245
-
246
-
247
-
248
-
249
-
250
-
251
-
252
-
253
-
254
-
255
-
256
-
257
-
258
-
259
-
260
-
261
-
262
-
263
-
264
-
265
-
266
-
267
-
268
-
269
-
270
-
271
-
272
 |
 |