3Ware 9550SX-4LP User Guide - Page 155
Setting Auto-Verify for a Unit, To set the auto-verify policy for an existing unit
 |
UPC - 693494960044
View all 3Ware 9550SX-4LP manuals
Add to My Manuals
Save this manual to your list of manuals |
Page 155 highlights
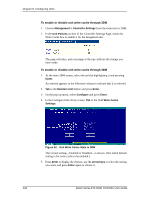
Setting Unit Policies 6 Tab to the OK button and press Enter to select it. You return to the main 3BM screen. 7 When you are finished making changes, press F8 to save them and exit 3BM. Setting Auto-Verify for a Unit For 9000-series controllers, the auto-verify policy causes verify tasks to be performed automatically, whenever the controller firmware algorithms determine that a verify task is needed. This feature is designed to make verification of units easier. When you enable this for a unit, the controller will run verify tasks as they are required. If there is no schedule set up for verify tasks, then the controller firmware can initiate a verify task at any time. If a verify time window is scheduled, then the controller will not start a verify task for that unit outside the time window, and may or may not start a verify task for that unit within the time window, depending on whether one is needed. If Auto-verify is not set and there is no schedule for verify tasks, you must manually specify when you want to run a verify, on the 3DM Management page. If a schedule is set for verify, then the verify that you manually start will only run during the scheduled time. You can set this policy while creating a unit through 3DM or CLI, and you can change it for existing units. To set the auto-verify policy for an existing unit 1 Choose Management > Controller Settings from the menu bar in 3DM. 2 In the Unit Policies section of the Controller Settings Page, check the Auto Verify box for the unit for which you want to set it. (To disable this policy, uncheck the box.) The page refreshes, and a message at the top confirms the change you have made (Figure 63). www.3ware.com 145
-
 1
1 -
2
-
3
-
4
-
5
-
6
-
7
-
8
-
9
-
10
-
11
-
12
-
13
-
14
-
15
-
16
-
17
-
18
-
19
-
20
-
21
-
22
-
23
-
24
-
25
-
26
-
27
-
28
-
29
-
30
-
31
-
32
-
33
-
34
-
35
-
36
-
37
-
38
-
39
-
40
-
41
-
42
-
43
-
44
-
45
-
46
-
47
-
48
-
49
-
50
-
51
-
52
-
53
-
54
-
55
-
56
-
57
-
58
-
59
-
60
-
61
-
62
-
63
-
64
-
65
-
66
-
67
-
68
-
69
-
70
-
71
-
72
-
73
-
74
-
75
-
76
-
77
-
78
-
79
-
80
-
81
-
82
-
83
-
84
-
85
-
86
-
87
-
88
-
89
-
90
-
91
-
92
-
93
-
94
-
95
-
96
-
97
-
98
-
99
-
100
-
101
-
102
-
103
-
104
-
105
-
106
-
107
-
108
-
109
-
110
-
111
-
112
-
113
-
114
-
115
-
116
-
117
-
118
-
119
-
120
-
121
-
122
-
123
-
124
-
125
-
126
-
127
-
128
-
129
-
130
-
131
-
132
-
133
-
134
-
135
-
136
-
137
-
138
-
139
-
140
-
141
-
142
-
143
-
144
-
145
-
146
-
147
-
148
-
149
-
 150
150 -
 151
151 -
 152
152 -
 153
153 -
 154
154 -
 155
155 -
 156
156 -
 157
157 -
 158
158 -
 159
159 -
 160
160 -
161
-
162
-
163
-
164
-
165
-
166
-
167
-
168
-
169
-
170
-
171
-
172
-
173
-
174
-
175
-
176
-
177
-
178
-
179
-
180
-
181
-
182
-
183
-
184
-
185
-
186
-
187
-
188
-
189
-
190
-
191
-
192
-
193
-
194
-
195
-
196
-
197
-
198
-
199
-
200
-
201
-
202
-
203
-
204
-
205
-
206
-
207
-
208
-
209
-
210
-
211
-
212
-
213
-
214
-
215
-
216
-
217
-
218
-
219
-
220
-
221
-
222
-
223
-
224
-
225
-
226
-
227
-
228
-
229
-
230
-
231
-
232
-
233
-
234
-
235
-
236
-
237
-
238
-
239
-
240
-
241
-
242
-
243
-
244
-
245
-
246
-
247
-
248
-
249
-
250
-
251
-
252
-
253
-
254
-
255
-
256
-
257
-
258
-
259
-
260
-
261
-
262
-
263
-
264
-
265
-
266
-
267
-
268
-
269
-
270
-
271
-
272
 |
 |