Brother International HL-2600CN Users Manual - English - Page 119
Close the Front Cover., rails, they will be correctly positioned when the front cover is closed.
 |
View all Brother International HL-2600CN manuals
Add to My Manuals
Save this manual to your list of manuals |
Page 119 highlights
CHAPTER 5 MAINTENANCE 4. After rocking each new Toner Cartridge 3 to 4 times from side to side, remove the tape labeled 'REMOVE' and the orange protective cover from the new Toner Cartridge. Fig. 5-2 5. Insert the new Toner Cartridge(s) by positioning it in the correct guide(s). Slide it gently into the printer. Do not try to lock or push the new Toner Cartridge(s) in; the new Toner Cartridge(s) must rest loosely in the guide rails, they will be correctly positioned when the front cover is closed. Note that each color cartridge is individually keyed to prevent improper installation. Match each cartridge color label to the corresponding label on the printer. KK YY MM CC 6. Close the Front Cover. Fig. 5-3 5-7
-
 1
1 -
2
-
3
-
4
-
5
-
6
-
7
-
8
-
9
-
10
-
11
-
12
-
13
-
14
-
15
-
16
-
17
-
18
-
19
-
20
-
21
-
22
-
23
-
24
-
25
-
26
-
27
-
28
-
29
-
30
-
31
-
32
-
33
-
34
-
35
-
36
-
37
-
38
-
39
-
40
-
41
-
42
-
43
-
44
-
45
-
46
-
47
-
48
-
49
-
50
-
51
-
52
-
53
-
54
-
55
-
56
-
57
-
58
-
59
-
60
-
61
-
62
-
63
-
64
-
65
-
66
-
67
-
68
-
69
-
70
-
71
-
72
-
73
-
74
-
75
-
76
-
77
-
78
-
79
-
80
-
81
-
82
-
83
-
84
-
85
-
86
-
87
-
88
-
89
-
90
-
91
-
92
-
93
-
94
-
95
-
96
-
97
-
98
-
99
-
100
-
101
-
102
-
103
-
104
-
105
-
106
-
107
-
108
-
109
-
110
-
111
-
112
-
113
-
 114
114 -
 115
115 -
 116
116 -
 117
117 -
 118
118 -
 119
119 -
 120
120 -
 121
121 -
 122
122 -
 123
123 -
 124
124 -
125
-
126
-
127
-
128
-
129
-
130
-
131
-
132
-
133
-
134
-
135
-
136
-
137
-
138
-
139
-
140
-
141
-
142
-
143
-
144
-
145
-
146
-
147
-
148
-
149
-
150
-
151
-
152
-
153
-
154
-
155
-
156
-
157
-
158
-
159
-
160
-
161
-
162
-
163
-
164
-
165
-
166
-
167
-
168
-
169
-
170
-
171
-
172
-
173
-
174
-
175
-
176
-
177
-
178
-
179
-
180
-
181
-
182
-
183
-
184
-
185
-
186
-
187
-
188
-
189
-
190
-
191
-
192
-
193
-
194
-
195
-
196
-
197
-
198
-
199
-
200
-
201
-
202
-
203
-
204
-
205
-
206
-
207
-
208
-
209
-
210
-
211
-
212
-
213
-
214
-
215
-
216
-
217
-
218
-
219
-
220
-
221
-
222
-
223
-
224
-
225
 |
 |
CHAPTER 5 MAINTENANCE
5-7
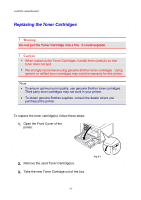
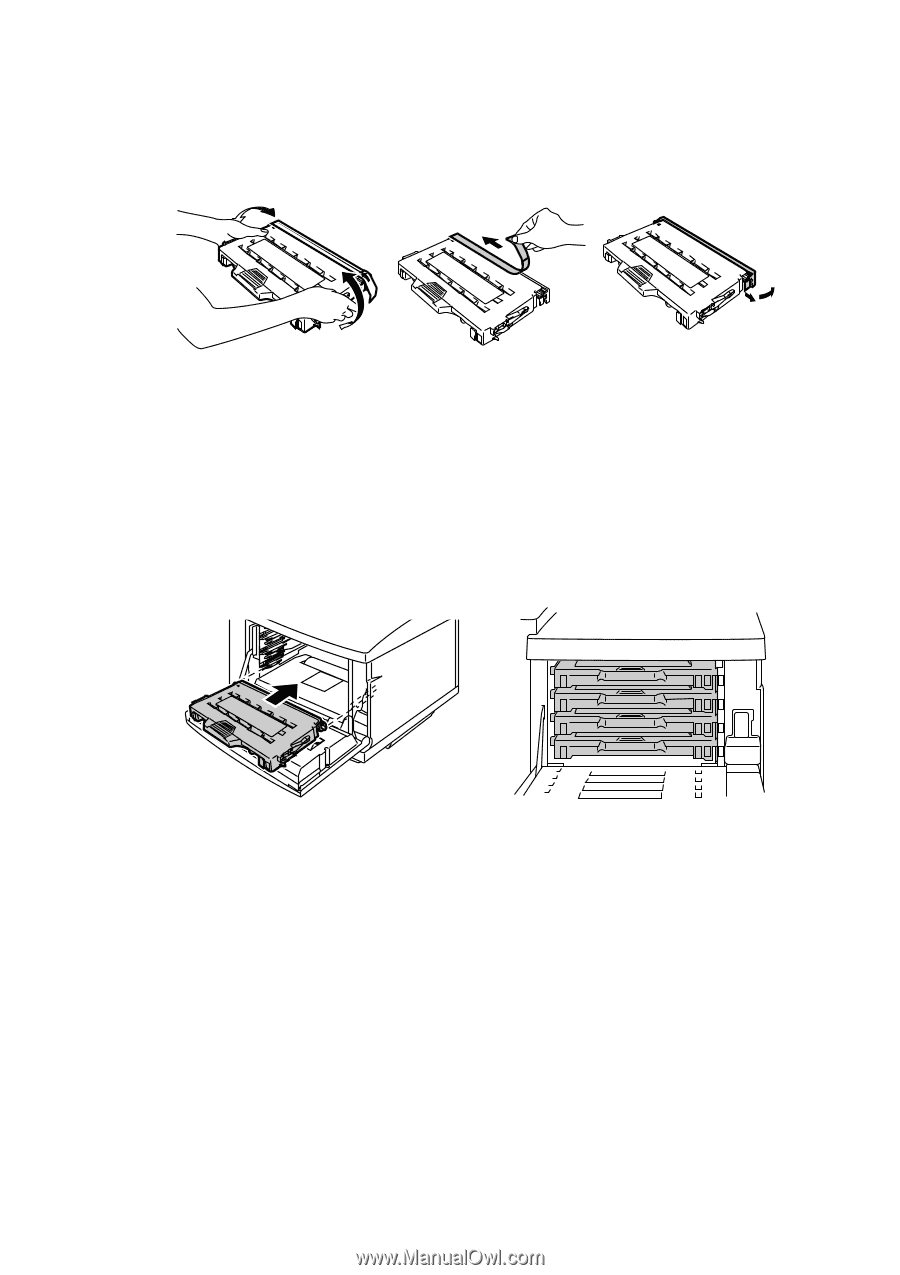
4.
After rocking each new Toner Cartridge 3 to 4 times from side to side,
remove the tape labeled ‘REMOVE’ and the orange protective cover from
the new Toner Cartridge.
Fig. 5-2
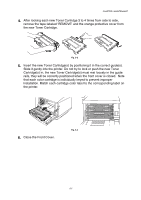
5.
Insert the new Toner Cartridge(s) by positioning it in the correct guide(s).
Slide it gently into the printer. Do not try to lock or push the new Toner
Cartridge(s) in; the new Toner Cartridge(s) must rest loosely in the guide
rails, they will be correctly positioned when the front cover is closed.
Note
that each color cartridge is individually keyed to prevent improper
installation. Match each cartridge color label to the corresponding label on
the printer.
C
M
Y
K
K
Y
M
C
Fig. 5-3
6.
Close the Front Cover.