Brother International HL-2600CN Users Manual - English - Page 153
marks on the Laser Unit, and the Dustproof Glass; This will ensure that it is correctly in place
 |
View all Brother International HL-2600CN manuals
Add to My Manuals
Save this manual to your list of manuals |
Page 153 highlights
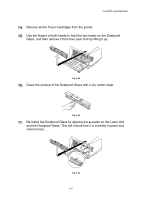
CHAPTER 5 MAINTENANCE 14. Remove all the Toner Cartridges from the printer. 15. Use the fingers of both hands to hold the two knobs on the Dustproof Glass, and then remove it from the Laser Unit by lifting it up. Fig. 5-48 16. Clean the surface of the Dustproof Glass with a dry cotton swab. Fig. 5-49 17. Re-install the Dustproof Glass by aligning the ▲ marks on the Laser Unit and the Dustproof Glass; This will ensure that it is correctly in place and cannot move. Fig. 5-50 5-41
-
 1
1 -
2
-
3
-
4
-
5
-
6
-
7
-
8
-
9
-
10
-
11
-
12
-
13
-
14
-
15
-
16
-
17
-
18
-
19
-
20
-
21
-
22
-
23
-
24
-
25
-
26
-
27
-
28
-
29
-
30
-
31
-
32
-
33
-
34
-
35
-
36
-
37
-
38
-
39
-
40
-
41
-
42
-
43
-
44
-
45
-
46
-
47
-
48
-
49
-
50
-
51
-
52
-
53
-
54
-
55
-
56
-
57
-
58
-
59
-
60
-
61
-
62
-
63
-
64
-
65
-
66
-
67
-
68
-
69
-
70
-
71
-
72
-
73
-
74
-
75
-
76
-
77
-
78
-
79
-
80
-
81
-
82
-
83
-
84
-
85
-
86
-
87
-
88
-
89
-
90
-
91
-
92
-
93
-
94
-
95
-
96
-
97
-
98
-
99
-
100
-
101
-
102
-
103
-
104
-
105
-
106
-
107
-
108
-
109
-
110
-
111
-
112
-
113
-
114
-
115
-
116
-
117
-
118
-
119
-
120
-
121
-
122
-
123
-
124
-
125
-
126
-
127
-
128
-
129
-
130
-
131
-
132
-
133
-
134
-
135
-
136
-
137
-
138
-
139
-
140
-
141
-
142
-
143
-
144
-
145
-
146
-
147
-
 148
148 -
 149
149 -
 150
150 -
 151
151 -
 152
152 -
 153
153 -
 154
154 -
 155
155 -
 156
156 -
 157
157 -
 158
158 -
159
-
160
-
161
-
162
-
163
-
164
-
165
-
166
-
167
-
168
-
169
-
170
-
171
-
172
-
173
-
174
-
175
-
176
-
177
-
178
-
179
-
180
-
181
-
182
-
183
-
184
-
185
-
186
-
187
-
188
-
189
-
190
-
191
-
192
-
193
-
194
-
195
-
196
-
197
-
198
-
199
-
200
-
201
-
202
-
203
-
204
-
205
-
206
-
207
-
208
-
209
-
210
-
211
-
212
-
213
-
214
-
215
-
216
-
217
-
218
-
219
-
220
-
221
-
222
-
223
-
224
-
225
 |
 |
CHAPTER 5 MAINTENANCE
5-41
14.
Remove all the Toner Cartridges from the printer.
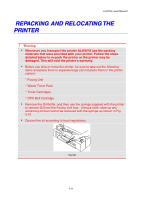
15.
Use the fingers of both hands to hold the two knobs on the Dustproof
Glass, and then remove it from the Laser Unit by lifting it up.
Fig. 5-48
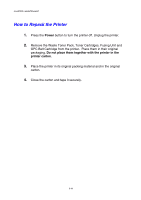
16.
Clean the surface of the Dustproof Glass with a dry cotton swab.
Fig. 5-49
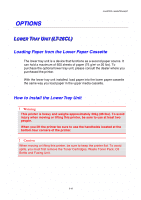
17.
Re-install the Dustproof Glass by aligning the
▲
marks on the Laser Unit
and the Dustproof Glass; This will ensure that it is correctly in place and
cannot move.
Fig. 5-50