Brother International HL-2600CN Users Manual - English - Page 189
Paper Jam At The Transfer Roller Or The, Fusing Roller Inside The Printer, Jam D, Jam E2
 |
View all Brother International HL-2600CN manuals
Add to My Manuals
Save this manual to your list of manuals |
Page 189 highlights
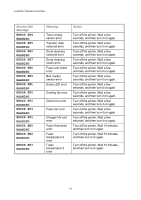
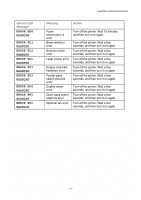
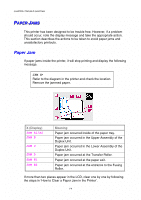
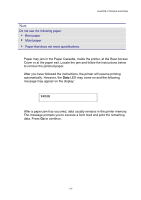
CHAPTER 6 TROUBLE SHOOTING Note When paper jams at the Rear Access Cover increase, replace the Paper Discharger. PAPER JAM AT THE TRANSFER ROLLER OR THE FUSING ROLLER INSIDE THE PRINTER JAM D or JAM E2 If a paper jam occurs at the Transfer roller or the Fusing Roller, follow the same steps to remove the jammed paper as for 'Paper Jam at Paper Exit'. Otherwise, follow the steps below: ! Warning The Fusing Roller is extremely HOT during operation. Remove the paper carefully. 6-11
-
 1
1 -
2
-
3
-
4
-
5
-
6
-
7
-
8
-
9
-
10
-
11
-
12
-
13
-
14
-
15
-
16
-
17
-
18
-
19
-
20
-
21
-
22
-
23
-
24
-
25
-
26
-
27
-
28
-
29
-
30
-
31
-
32
-
33
-
34
-
35
-
36
-
37
-
38
-
39
-
40
-
41
-
42
-
43
-
44
-
45
-
46
-
47
-
48
-
49
-
50
-
51
-
52
-
53
-
54
-
55
-
56
-
57
-
58
-
59
-
60
-
61
-
62
-
63
-
64
-
65
-
66
-
67
-
68
-
69
-
70
-
71
-
72
-
73
-
74
-
75
-
76
-
77
-
78
-
79
-
80
-
81
-
82
-
83
-
84
-
85
-
86
-
87
-
88
-
89
-
90
-
91
-
92
-
93
-
94
-
95
-
96
-
97
-
98
-
99
-
100
-
101
-
102
-
103
-
104
-
105
-
106
-
107
-
108
-
109
-
110
-
111
-
112
-
113
-
114
-
115
-
116
-
117
-
118
-
119
-
120
-
121
-
122
-
123
-
124
-
125
-
126
-
127
-
128
-
129
-
130
-
131
-
132
-
133
-
134
-
135
-
136
-
137
-
138
-
139
-
140
-
141
-
142
-
143
-
144
-
145
-
146
-
147
-
148
-
149
-
150
-
151
-
152
-
153
-
154
-
155
-
156
-
157
-
158
-
159
-
160
-
161
-
162
-
163
-
164
-
165
-
166
-
167
-
168
-
169
-
170
-
171
-
172
-
173
-
174
-
175
-
176
-
177
-
178
-
179
-
180
-
181
-
182
-
183
-
 184
184 -
 185
185 -
 186
186 -
 187
187 -
 188
188 -
 189
189 -
 190
190 -
 191
191 -
 192
192 -
 193
193 -
 194
194 -
195
-
196
-
197
-
198
-
199
-
200
-
201
-
202
-
203
-
204
-
205
-
206
-
207
-
208
-
209
-
210
-
211
-
212
-
213
-
214
-
215
-
216
-
217
-
218
-
219
-
220
-
221
-
222
-
223
-
224
-
225
 |
 |
CHAPTER 6 TROUBLE SHOOTING
6-11
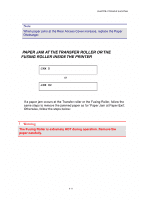
Note
When paper jams at the Rear Access Cover increase, replace the Paper
Discharger.
PAPER JAM AT THE TRANSFER ROLLER OR THE
FUSING ROLLER INSIDE THE PRINTER
JAM D
or
JAM E2
If a paper jam occurs at the Transfer roller or the Fusing Roller, follow the
same steps to remove the jammed paper as for ‘Paper Jam at Paper Exit’.
Otherwise, follow the steps below:
!
Warning
The Fusing Roller is extremely HOT during operation. Remove the
paper carefully.