Brother International HL-2600CN Users Manual - English - Page 132
Close the Front Cover and the Top Cover., Insert the new Belt Cartridge
 |
View all Brother International HL-2600CN manuals
Add to My Manuals
Save this manual to your list of manuals |
Page 132 highlights
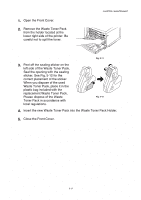
CHAPTER 5 MAINTENANCE 5. Remove the Tension Release Pins from both sides of the new OPC Belt Cartridge. Remove the protective sheet from the new OPC Belt Cartridge. Do not touch the green part of the OPC Belt Cartridge. 6. Insert the new Belt Cartridge into the printer guides with the flat side facing you. Fig. 5-15 Fig. 5-16 Fig. 5-17 7. To lock the cartridge into the printer, press the Belt Cartridge Lock Levers that are on both sides of the OPC Belt Cartridge to the rear. 8. Close the Front Cover and the Top Cover. 5-20
-
 1
1 -
2
-
3
-
4
-
5
-
6
-
7
-
8
-
9
-
10
-
11
-
12
-
13
-
14
-
15
-
16
-
17
-
18
-
19
-
20
-
21
-
22
-
23
-
24
-
25
-
26
-
27
-
28
-
29
-
30
-
31
-
32
-
33
-
34
-
35
-
36
-
37
-
38
-
39
-
40
-
41
-
42
-
43
-
44
-
45
-
46
-
47
-
48
-
49
-
50
-
51
-
52
-
53
-
54
-
55
-
56
-
57
-
58
-
59
-
60
-
61
-
62
-
63
-
64
-
65
-
66
-
67
-
68
-
69
-
70
-
71
-
72
-
73
-
74
-
75
-
76
-
77
-
78
-
79
-
80
-
81
-
82
-
83
-
84
-
85
-
86
-
87
-
88
-
89
-
90
-
91
-
92
-
93
-
94
-
95
-
96
-
97
-
98
-
99
-
100
-
101
-
102
-
103
-
104
-
105
-
106
-
107
-
108
-
109
-
110
-
111
-
112
-
113
-
114
-
115
-
116
-
117
-
118
-
119
-
120
-
121
-
122
-
123
-
124
-
125
-
126
-
 127
127 -
 128
128 -
 129
129 -
 130
130 -
 131
131 -
 132
132 -
 133
133 -
 134
134 -
 135
135 -
 136
136 -
 137
137 -
138
-
139
-
140
-
141
-
142
-
143
-
144
-
145
-
146
-
147
-
148
-
149
-
150
-
151
-
152
-
153
-
154
-
155
-
156
-
157
-
158
-
159
-
160
-
161
-
162
-
163
-
164
-
165
-
166
-
167
-
168
-
169
-
170
-
171
-
172
-
173
-
174
-
175
-
176
-
177
-
178
-
179
-
180
-
181
-
182
-
183
-
184
-
185
-
186
-
187
-
188
-
189
-
190
-
191
-
192
-
193
-
194
-
195
-
196
-
197
-
198
-
199
-
200
-
201
-
202
-
203
-
204
-
205
-
206
-
207
-
208
-
209
-
210
-
211
-
212
-
213
-
214
-
215
-
216
-
217
-
218
-
219
-
220
-
221
-
222
-
223
-
224
-
225
 |
 |
CHAPTER 5 MAINTENANCE
5-20
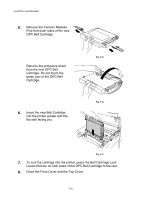
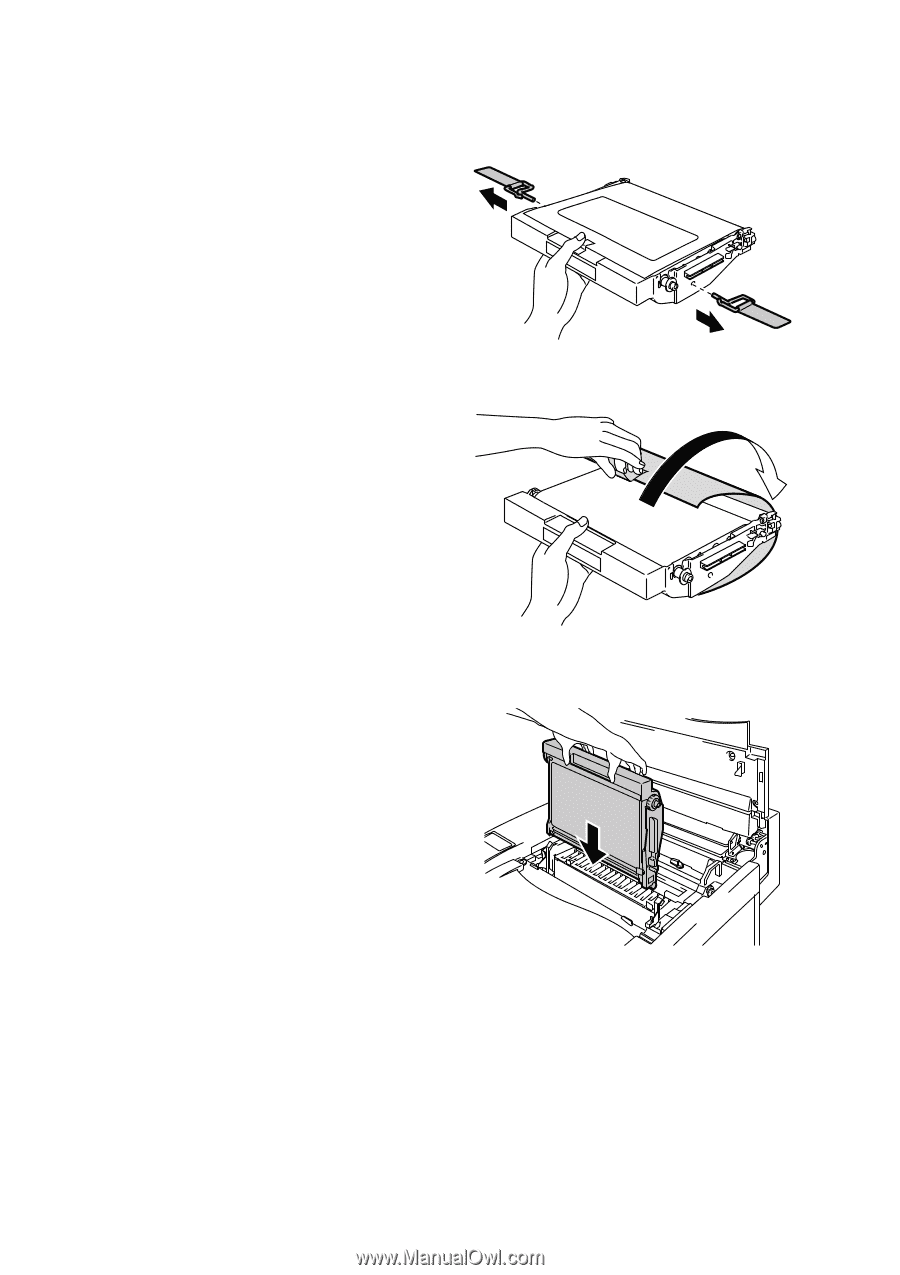
5.
Remove the Tension Release
Pins from both sides of the new
OPC Belt Cartridge.
Fig. 5-15
Remove the protective sheet
from the new OPC Belt
Cartridge. Do not touch the
green part of the OPC Belt
Cartridge.
Fig. 5-16
6.
Insert the new Belt Cartridge
into the printer guides with the
flat side facing you.
Fig. 5-17
7.
To lock the cartridge into the printer, press the Belt Cartridge Lock
Levers that are on both sides of the OPC Belt Cartridge to the rear.
8.
Close the Front Cover and the Top Cover.