Brother International HL-2600CN Users Manual - English - Page 138
Caution Warning, Please wait for 30 minutes after installing a new Fusing Unit to allow
 |
View all Brother International HL-2600CN manuals
Add to My Manuals
Save this manual to your list of manuals |
Page 138 highlights
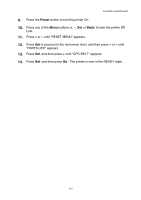
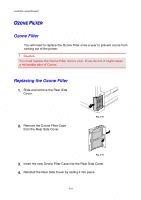
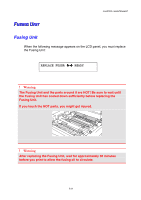
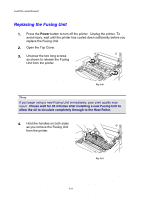
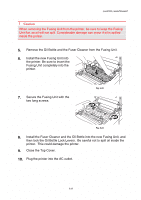
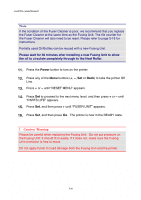
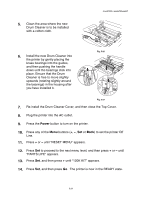
CHAPTER 5 MAINTENANCE Note If the condition of the Fuser Cleaner is poor, we recommend that you replace the Fuser Cleaner at the same time as the Fusing Unit. The life counter for the Fuser Cleaner will also need to be reset. Please refer to page 5-15 for instructions. Partially used Oil Bottles can be reused with a new Fusing Unit. Please wait for 30 minutes after installing a new Fusing Unit to allow the oil to circulate completely through to the Heat Roller. 11. Press the Power button to turn on the printer. 12. Press any of the Menu buttons (+, - , Set or Back) to take the printer Off Line. 13. Press + or - until "RESET MENU" appears. 14. Press Set to proceed to the next menu level, and then press + or - until "PARTS LIFE" appears. 15. Press Set, and then press + until "FUSER UNIT" appears. 16. Press Set, and then press Go. The printer is now in the READY state. ! Caution, Warning Please be careful when replacing the Fusing Unit. Do not put pressure on the Fusing Unit; it should fit in easily. If it does not, make sure the Fusing Unit connector is free to move. Do not apply force! It could damage both the Fusing Unit and the printer. 5-26
-
 1
1 -
2
-
3
-
4
-
5
-
6
-
7
-
8
-
9
-
10
-
11
-
12
-
13
-
14
-
15
-
16
-
17
-
18
-
19
-
20
-
21
-
22
-
23
-
24
-
25
-
26
-
27
-
28
-
29
-
30
-
31
-
32
-
33
-
34
-
35
-
36
-
37
-
38
-
39
-
40
-
41
-
42
-
43
-
44
-
45
-
46
-
47
-
48
-
49
-
50
-
51
-
52
-
53
-
54
-
55
-
56
-
57
-
58
-
59
-
60
-
61
-
62
-
63
-
64
-
65
-
66
-
67
-
68
-
69
-
70
-
71
-
72
-
73
-
74
-
75
-
76
-
77
-
78
-
79
-
80
-
81
-
82
-
83
-
84
-
85
-
86
-
87
-
88
-
89
-
90
-
91
-
92
-
93
-
94
-
95
-
96
-
97
-
98
-
99
-
100
-
101
-
102
-
103
-
104
-
105
-
106
-
107
-
108
-
109
-
110
-
111
-
112
-
113
-
114
-
115
-
116
-
117
-
118
-
119
-
120
-
121
-
122
-
123
-
124
-
125
-
126
-
127
-
128
-
129
-
130
-
131
-
132
-
 133
133 -
 134
134 -
 135
135 -
 136
136 -
 137
137 -
 138
138 -
 139
139 -
 140
140 -
 141
141 -
 142
142 -
 143
143 -
144
-
145
-
146
-
147
-
148
-
149
-
150
-
151
-
152
-
153
-
154
-
155
-
156
-
157
-
158
-
159
-
160
-
161
-
162
-
163
-
164
-
165
-
166
-
167
-
168
-
169
-
170
-
171
-
172
-
173
-
174
-
175
-
176
-
177
-
178
-
179
-
180
-
181
-
182
-
183
-
184
-
185
-
186
-
187
-
188
-
189
-
190
-
191
-
192
-
193
-
194
-
195
-
196
-
197
-
198
-
199
-
200
-
201
-
202
-
203
-
204
-
205
-
206
-
207
-
208
-
209
-
210
-
211
-
212
-
213
-
214
-
215
-
216
-
217
-
218
-
219
-
220
-
221
-
222
-
223
-
224
-
225
 |
 |