Brother International HL 5280DW Network Users Manual - English - Page 105
UNIX®/Linux systems, Using the TELNET console to con the IP address
 |
UPC - 012502614456
View all Brother International HL 5280DW manuals
Add to My Manuals
Save this manual to your list of manuals |
Page 105 highlights
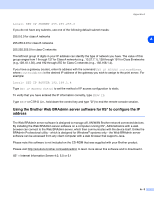
Appendix A UNIX®/Linux systems Typically, UNIX® and Linux systems require the colon ":" character between each digit of the Ethernet address. arp -s 192.168.1.2 00:80:77:31:01:07 A Note You must be on the same Ethernet segment (that is, there cannot be a router between the print server and operating system) to use the arp -s command. If there is a router, you may use BOOTP or other methods described in this chapter to enter the IP address. If your Administrator has configured the system to deliver IP addresses using BOOTP, DHCP or RARP your Brother print server can receive an IP address from any one of these IP address allocation systems. In which case, you will not need to use the ARP command. The ARP command only works once. For security reasons, once you have successfully configured the IP address of a Brother print server using the ARP command, you cannot use the ARP command again to change the address. The print server will ignore any attempts to do this. If you wish to change the IP address again, use a web browser, TELNET (using the SET IP ADDRESS command) or factory reset the print server (which will then allow you to use the ARP command again). To configure the print server and to verify the connection, enter the following command ping ipaddress where ipaddress is the IP address of the print server. For example, ping 192.189.207.2. Using the TELNET console to configure the IP address You can also use the TELNET command to change the IP address. TELNET is an effective method to change the printer's IP address. But a valid IP address must already be programmed into the print server. Type TELNET ipaddress at the command prompt of the system prompt, where ipaddress is the IP address of the print server. When you are connected, push the Return or Enter key to get the "#" prompt, enter the password access (the password will not appear on the screen). You will be prompted for a user name. Enter anything in response to this prompt. You will then get the Local> prompt. Type SET IP ADDRESS ipaddress, where ipaddress is the desired IP address you wish to assign to the print server (check with your network administrator for the IP address to use). For example: Local> SET IP ADDRESS 192.168.1.3 You will now need to set the subnet mask by typing SET IP SUBNET subnet mask, where subnet mask is the desired subnet mask you wish to assign to the print server (check with your network administrator for the subnet mask to use). For example: A - 4
-
 1
1 -
2
-
3
-
4
-
5
-
6
-
7
-
8
-
9
-
10
-
11
-
12
-
13
-
14
-
15
-
16
-
17
-
18
-
19
-
20
-
21
-
22
-
23
-
24
-
25
-
26
-
27
-
28
-
29
-
30
-
31
-
32
-
33
-
34
-
35
-
36
-
37
-
38
-
39
-
40
-
41
-
42
-
43
-
44
-
45
-
46
-
47
-
48
-
49
-
50
-
51
-
52
-
53
-
54
-
55
-
56
-
57
-
58
-
59
-
60
-
61
-
62
-
63
-
64
-
65
-
66
-
67
-
68
-
69
-
70
-
71
-
72
-
73
-
74
-
75
-
76
-
77
-
78
-
79
-
80
-
81
-
82
-
83
-
84
-
85
-
86
-
87
-
88
-
89
-
90
-
91
-
92
-
93
-
94
-
95
-
96
-
97
-
98
-
99
-
 100
100 -
 101
101 -
 102
102 -
 103
103 -
 104
104 -
 105
105 -
 106
106 -
 107
107 -
 108
108 -
 109
109 -
 110
110 -
111
-
112
 |
 |