Brother International HL 5280DW Network Users Manual - English - Page 59
Control panel setup, Overview, Changing the print server settings using the control panel NETWORK menu
 |
UPC - 012502614456
View all Brother International HL 5280DW manuals
Add to My Manuals
Save this manual to your list of manuals |
Page 59 highlights
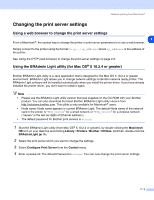
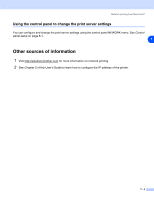
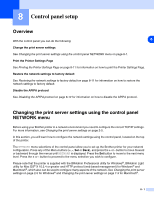
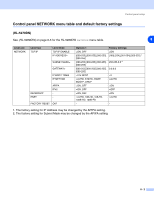
8 Control panel setup Overview With the control panel you can do the following: 8 Change the print server settings See Changing the print server settings using the control panel NETWORK menu on page 8-1. Print the Printer Settings Page See Printing the Printer Settings Page on page 8-11 for information on how to print the Printer Settings Page. Restore the network settings to factory default See Restoring the network settings to factory default on page 8-11 for information on how to restore the network settings to factory default. Disable the APIPA protocol See Disabling the APIPA protocol on page 8-12 for information on how to disable the APIPA protocol. Changing the print server settings using the control panel NETWORK menu Before using your Brother printer in a network environment you need to configure the correct TCP/IP settings. For more information, see Changing the print server settings on page 2-5. In this section, you will learn how to configure the network settings using the control panel, located on the top of the printer. The NETWORK menu selections of the control panel allow you to set up the Brother printer for your network configuration. Press any of the Menu buttons (+, -, Set or Back), and press the + or - button to move forward or backward through the menus until NETWORK is displayed. Press the Set button to move to the next menu level. Press the + or - button to proceed to the menu selection you wish to configure. Please note that the printer is supplied with the BRAdmin Professional utility for Windows®, BRAdmin Light utility for Mac OS® X 10.2.4 or greater and HTTP protocol (web based management) for Windows® and Macintosh®, which also can be used to configure many aspects of the network. See Changing the print server settings on page 2-5 for Windows® and Changing the print server settings on page 7-3 for Macintosh®. 8 - 1
-
 1
1 -
2
-
3
-
4
-
5
-
6
-
7
-
8
-
9
-
10
-
11
-
12
-
13
-
14
-
15
-
16
-
17
-
18
-
19
-
20
-
21
-
22
-
23
-
24
-
25
-
26
-
27
-
28
-
29
-
30
-
31
-
32
-
33
-
34
-
35
-
36
-
37
-
38
-
39
-
40
-
41
-
42
-
43
-
44
-
45
-
46
-
47
-
48
-
49
-
50
-
51
-
52
-
53
-
 54
54 -
 55
55 -
 56
56 -
 57
57 -
 58
58 -
 59
59 -
 60
60 -
 61
61 -
 62
62 -
 63
63 -
 64
64 -
65
-
66
-
67
-
68
-
69
-
70
-
71
-
72
-
73
-
74
-
75
-
76
-
77
-
78
-
79
-
80
-
81
-
82
-
83
-
84
-
85
-
86
-
87
-
88
-
89
-
90
-
91
-
92
-
93
-
94
-
95
-
96
-
97
-
98
-
99
-
100
-
101
-
102
-
103
-
104
-
105
-
106
-
107
-
108
-
109
-
110
-
111
-
112
 |
 |