Canon CanoScan FB 630U User Manual - Page 18
Selecting the Scanning Area
 |
View all Canon CanoScan FB 630U manuals
Add to My Manuals
Save this manual to your list of manuals |
Page 18 highlights
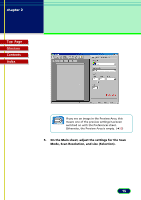
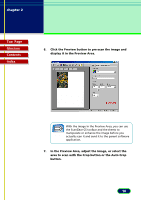
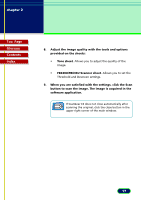
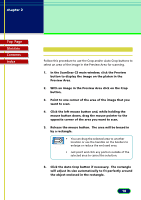
chapter 2 Scanning an Original Top Page Glossary Contents Index Selecting the Scanning Area Follow this procedure to use the Crop and/or Auto Crop buttons to select an area of the image in the Preview Area for scanning. 1. In the ScanGear CS main window, click the Preview button to display the image on the platen in the Preview Area. 2. With an image in the Preview Area click on the Crop button. 3. Point to one corner of the area of the image that you want to scan. 4. Click the left mouse button and, while holding the mouse button down, drag the mouse pointer to the opposite corner of the area you want to scan. 5. Release the mouse button. The area will be boxed in by a rectangle. • You can drag the selected area to another location or use the handles on the borders to Note enlarge or reduce the enclosed area. • Just point and click any portion outside of the selected area to cancel the selection. 6. Click the Auto Crop button if necessary. The rectangle will adjust its size automatically to fit perfectly around the object enclosed in the rectangle. 18
-
 1
1 -
2
-
3
-
4
-
5
-
6
-
7
-
8
-
9
-
10
-
11
-
12
-
 13
13 -
 14
14 -
 15
15 -
 16
16 -
 17
17 -
 18
18 -
 19
19 -
 20
20 -
 21
21 -
 22
22 -
 23
23 -
24
-
25
-
26
-
27
-
28
-
29
-
30
-
31
-
32
-
33
-
34
-
35
-
36
-
37
-
38
-
39
-
40
-
41
-
42
-
43
-
44
-
45
-
46
-
47
-
48
-
49
-
50
-
51
-
52
-
53
-
54
-
55
-
56
-
57
-
58
-
59
-
60
-
61
-
62
-
63
-
64
-
65
-
66
-
67
-
68
-
69
-
70
-
71
-
72
-
73
-
74
-
75
-
76
-
77
-
78
-
79
-
80
-
81
-
82
-
83
-
84
-
85
-
86
-
87
-
88
-
89
 |
 |