Canon CanoScan FB 630U User Manual - Page 44
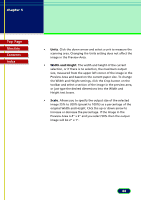
Units, Width and Height, Scale, Allows you to specify the output size of the selected
 |
View all Canon CanoScan FB 630U manuals
Add to My Manuals
Save this manual to your list of manuals |
Page 44 highlights
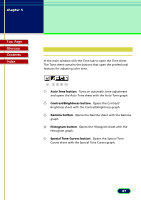
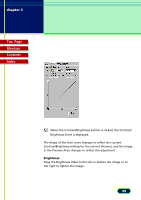
chapter 5 What is on the ScanGear CS Main Window? Top Page Glossary Contents Index • Units. Click the down-arrow and select a unit to measure the scanning area. Changing the Units setting does not affect the image in the Preview Area. • Width and Height. The width and height of the current selection, or if there is no selection, the maximum output size, measured from the upper left corner of the image in the Preview Area and based on the current paper size. To change the Width and Height settings, click the Crop button on the toolbar and select a section of the image in the preview area, or just type the desired dimensions into the Width and Height text boxes. • Scale. Allows you to specify the output size of the selected image 25% to 200% (preset to 100%) as a percentage of the original Width and Height. Click the up or down arrow to increase or decrease the percentage. If the image in the Preview Area is 4" x 2" and you select 50% then the output image will be 2" x 1". 44
-
 1
1 -
2
-
3
-
4
-
5
-
6
-
7
-
8
-
9
-
10
-
11
-
12
-
13
-
14
-
15
-
16
-
17
-
18
-
19
-
20
-
21
-
22
-
23
-
24
-
25
-
26
-
27
-
28
-
29
-
30
-
31
-
32
-
33
-
34
-
35
-
36
-
37
-
38
-
 39
39 -
 40
40 -
 41
41 -
 42
42 -
 43
43 -
 44
44 -
 45
45 -
 46
46 -
 47
47 -
 48
48 -
 49
49 -
50
-
51
-
52
-
53
-
54
-
55
-
56
-
57
-
58
-
59
-
60
-
61
-
62
-
63
-
64
-
65
-
66
-
67
-
68
-
69
-
70
-
71
-
72
-
73
-
74
-
75
-
76
-
77
-
78
-
79
-
80
-
81
-
82
-
83
-
84
-
85
-
86
-
87
-
88
-
89
 |
 |