Cisco 7962G Administration Guide - Page 119
Configuring a Custom Background Image, Software Upgrades > Upload TFTP Server File
 |
UPC - 882658140341
View all Cisco 7962G manuals
Add to My Manuals
Save this manual to your list of manuals |
Page 119 highlights
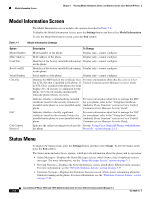
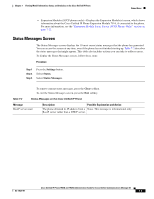
Chapter 6 Customizing the Cisco Unified IP Phone Creating Custom Background Images Tip Many graphics programs provide a feature that will resize a graphic. An easy way to create a thumbnail image is to first create and save the full size image, then use the sizing feature in the graphics program to create a version of that image that is 25% of the original size. Save the thumbnail version by using a different name. The PNG files for background images must meet the following requirements for proper display on the Cisco Unified IP Phone: • Full size image-320 pixels (width) X 196 pixels (height). • Thumbnail image-80 pixels (width) X 49 pixels (height). Tip If you are using a graphics program that supports a posterize feature for grayscale, set the number of tonal levels per channel to 16, and the image will posterize to 16 shades of grayscale. Configuring a Custom Background Image To create custom background images for the Cisco Unified IP Phone, follow these steps: Procedure Step 1 Step 2 Create two PNG files for each image (a full size version and a thumbnail version). Ensure the PNG files comply with the format guidelines that are listed in the "PNG File Requirements for Custom Background Images" section on page 6-4. Upload the new PNG files that you created to the following subdirectory in the TFTP server for the Cisco Unified Communications Manager: /Desktops/320x196x4 Note The file name and subdirectory parameters are case sensitive. Be sure to use the forward slash "/" when you specify the subdirectory path. Step 3 To upload the files, choose Software Upgrades > Upload TFTP Server File in Cisco Unified Communications Operating System Administration. For more information, see the "Software Upgrades" chapter in Cisco Unified Communications Operating System Administration Guide. You must also copy the customized images and files to the other TFTP servers that the phone may contact to obtain these files. Note Cisco recommends that you also store backup copies of custom image files in another location. You can use these backup copies if the customized files are overwritten when you upgrade Cisco Unified Communications Manager. Step 4 Step 5 Use a text editor to edit the List.xml file. See the "List.xml File Format Requirements" section on page 6-4 for the location of this file, formatting requirements, and a sample file. Save your modifications and close the List.xml file. OL-14625-01 Cisco Unified IP Phone 7962G and 7942G Administration Guide for Cisco Unified Communications Manager 6.1 6-5
-
 1
1 -
2
-
3
-
4
-
5
-
6
-
7
-
8
-
9
-
10
-
11
-
12
-
13
-
14
-
15
-
16
-
17
-
18
-
19
-
20
-
21
-
22
-
23
-
24
-
25
-
26
-
27
-
28
-
29
-
30
-
31
-
32
-
33
-
34
-
35
-
36
-
37
-
38
-
39
-
40
-
41
-
42
-
43
-
44
-
45
-
46
-
47
-
48
-
49
-
50
-
51
-
52
-
53
-
54
-
55
-
56
-
57
-
58
-
59
-
60
-
61
-
62
-
63
-
64
-
65
-
66
-
67
-
68
-
69
-
70
-
71
-
72
-
73
-
74
-
75
-
76
-
77
-
78
-
79
-
80
-
81
-
82
-
83
-
84
-
85
-
86
-
87
-
88
-
89
-
90
-
91
-
92
-
93
-
94
-
95
-
96
-
97
-
98
-
99
-
100
-
101
-
102
-
103
-
104
-
105
-
106
-
107
-
108
-
109
-
110
-
111
-
112
-
113
-
 114
114 -
 115
115 -
 116
116 -
 117
117 -
 118
118 -
 119
119 -
 120
120 -
 121
121 -
 122
122 -
 123
123 -
 124
124 -
125
-
126
-
127
-
128
-
129
-
130
-
131
-
132
-
133
-
134
-
135
-
136
-
137
-
138
-
139
-
140
-
141
-
142
-
143
-
144
-
145
-
146
-
147
-
148
-
149
-
150
-
151
-
152
-
153
-
154
-
155
-
156
-
157
-
158
-
159
-
160
-
161
-
162
-
163
-
164
-
165
-
166
-
167
-
168
-
169
-
170
-
171
-
172
-
173
-
174
-
175
-
176
-
177
-
178
-
179
-
180
-
181
-
182
-
183
-
184
-
185
-
186
-
187
-
188
-
189
-
190
-
191
-
192
-
193
-
194
 |
 |
